
More experimenting again trying to make some different room views. This tutorial is basically easy. I began with the concept of wanting to make stairs that looked as if they were going upwards to another floor. The only hard part was for me trying to figure out what I wanted to do with it after I had it done. When it's completed, then it is up to you to figure out what you want to do with it too. I wasn't sure whether it should be a front entrance hall, or the main floor looking out to a back yard or even a lower level with a walkout to a garden patio. I decided on the lower level walkout and have included the patio doors and scene just in case you want to use them, but that decision is yours as well. I made the door from a black and white piece of clip art, and I also made the scene for another special webset. It's great when you can recycle. Before you peek at mine at the bottom this time, I just want to let you know that the tables were done following a tut, the ladies came from my purchased CD of Tom Tierney Fashions published by Dover, the gentleman are also copyright to Tom Tierney via paperdoll books (I have email permission to use them) and the decorations to fill the room came from my purchased Hemera photo images collections.
I place absolutely NO restrictions on the use of this tutorial or your finished image.
This tutorial was completed using PSP7 but can easily be done in PSP6.
What You Will Need:
Paint Shop Pro: download a trial version here
Zip of my image files: you can download it here
Zip of my selections: you can download it here
PLEASE save your work often!! I did it after every layer. It is better to be safe than sorry.
(1) Open a new image 600 x 450, 16 mil colours, transparent background.
(2) Create a new layer and call it "outdoor scenery"
we will return to this layer at the very end
(3) Create a new layer and load selection "carpetfill.sel"
open the carpetfill image from the zip and floodfill at 75 size angle 0.
(4) Create a new layer and load selection "wall1.sel"
floodfill with colour #6D7CA7
(5) Create a new layer and load selection "wall2.sel"
floodfill the area with colour #4D5C87
(6) Create a new layer and load selection "wall3.sel"
floodfill the area with colour #8D9CC7
(7) Create a new layer and load selection "stairs.sel"
open the stairs image from the zip file and copy it
return to your main image, hold down the control and shift key and hit L
(this is the short cut for pasting a copied image into a selection)
(8) Create a new layer and load selection "wall4.sel"
floodfill the area with colour #7D8CB7
(9) Create a new layer and load selection "wall5.sel"
floodfill with the colour #8D9CC7
(10) Create a new layer and load selection "wall6.sel"
floodfill with colour #7882A0
(11) Create a new layer and load selection "wall7.sel"
floodfill with colour #6D7CA7
(12) Create a new layer and load selection "wall8.sel"
floodfill with colour #7D8CB7
(13) Create a new layer and load selection "wall9.sel"
floodfill with colour #8D9CC7
(14) Create a new layer and name it "down railing"
open the downrailing psp image from the zip, copy it and then paste it on the darker section of the little wall coming down the stairs
(15) Create a new layer and call it "up railing"
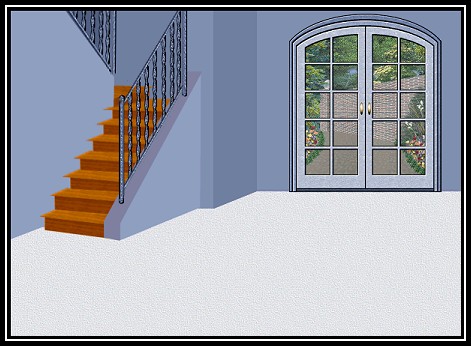
open the up railing image from the zip file, copy it and then paste it on the little part of the wall section leading up to the next floor. Check the image for placement help if you need to
*** If you want to change the door in my image to windows or just leave the wall solid, then you can forget the next two steps and you are basically finished. If you want it to look exactly like mine, then let's continue. ***
(16) Create a new layer and call it "door glass"
we will return to this in a minute
(17) Create a new layer and call it "patio doors"
open up the patiodoor image from the zip file and take note that it has two layers
one layer is the door and the other layer is the glass
activate the door layer, copy it and then return to your image and paste it on the wall whereever
you would like. I centred mine but you might want it to the right or left so you can decorate part of the wall
(18) Go back and activate "wall8"layer
set your eraser tool to 6 or 8 or what you are comfortable with and going by the door shape, erase parts of the blue wall 8 that show through where the door glass should be
by doing it this way, it doesn't have to be perfect as long as you don't see any blue showing through the inside of the door
(19) Go back to the "carpet" layer and erase the parts of the carpet that show through the inside door area near the bottom as well
(20) Go back now and activate the layer we made for the door glass
return to your patio door image from the zip file, and activate the glass layer
copy it and then return to the main image and paste it in place so they slide in behind the patio doors
at this time you can lower the layer opacity to 10 so it is easier to do the last step
(21) Go back and activate the first layer we left blank called "outdoor scenery"
open the outside view image from the zip file, copy it and then return and paste it in your image
you can slide it around until you get the placement and view you want
now you can adjust your glass layer opacity to whatever level you want for being able to see outside into the garden.
WOW! You are finished. Now what are you going to do with it????
Remember you can fill the selection pieces with any colour you want to. It is totally your choice. Have fun and I hope I have given you another room alternative to have fun decorating.
Here is my sample. I turned it into a main or lower level room all set up for a fancy party affair after the theatre.
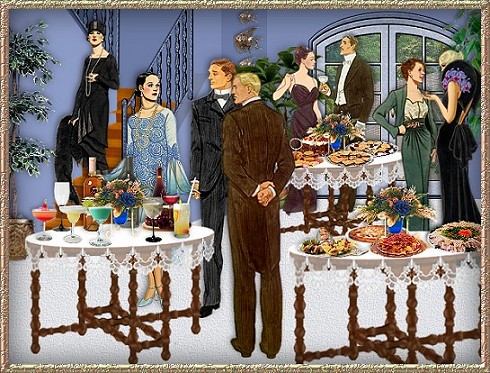
I have been having a lot of fun designing these room images lately. I hope this can spur you on to making a room scene too.
If you have any problems or need further explanations, please feel free to email me here
TUTORIAL PAGE ONE
TUTORIAL PAGE TWO
This tutorial was posted at the site of "P. Ann's Place" January 13, 2003 and written
by Pat Sherman.
All I ask is that you do not claim it as your own.
 
|
|