
This tutorial was inspired by the beautiful Deco Ladies created by FlyByNight- D. J. Walker.
She has posted two tutorials of her designs that you can go and see by clicking on the links. Please try them out and I assure you, you will have
fun doing them.
The Deco Lady
The Deco Lady II
This tutorial will be a little different than the other lady tutorials and will be a more "hands on" effort in some areas. It is
a little more challenging, in that I have provided you selections in some areas, and psp images that you will apply at your discretion in other cases.
I will tell you how I used these images and then you can do it yourself.
In the zip file of extras, you will find things that I have made or prepared for you to use. Please feel free to use them
in any other project you do. I don't mind.
What you will get are:
rose and baby's breath arrangements
pearl images and a little pearl stick
white headband I used and another I made but didn't use in silver glitter
lace overlay I made following one from the site of Mahogany PLUS
Mahogany has given me permission to offer you hers as well. Thanks Mahogany.
veil pieces that I made from "fiddling around a while" in Sinedots 2
sleeves that started out as a white square, Jama applied, circle deformed, blurred, then deformed more
hair- this I painted and wore out my fingers smudging. The techniques are from a marvelous tutorial on
"painting Hair" that you can find here
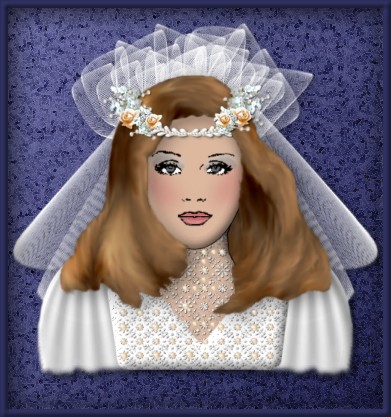
I started this image a little longer in length than the others to make it easier to add the smaller details and then
you can resize it to your own needs or liking. I used a lot of layers at the beginning with face details and headress details.
You can do all the face details then merge if you wish to cut down on the number of layers in your image.
Your image is yours to do with as you see fit - I place absolutely NO restrictions on what you do with her. Just have fun!
This tutorial was completed using PSP7 but can easily be done in PSP6.
What You Will Need:
Paint Shop Pro: download a trial version here
Zip of my selection files: you can download it here
Zip of all the extras mentioned above: you can download it here
Let Me Say Just Before We Begin
This tutorial is "screenshot free". I did each item on a separate layer.
I gave several layers (except the face details ) a drop shadow. We will do them all at the end.
If you see the shortform "ff" - it stands for floodfill.
PLEASE save your work often!! I did it after every layer. It is better to be safe than sorry.
Open a new image 500 x 550, 16 mil colours, transparent background. Add a new layer and floodfill it with a darker colour for
ease of viewing since you will be using white in a lot of the selections
(a) Create a new layer and call it "long veil". We will come back to this layer at the end.
(b) Create a new layer and load selection "backhair.sel"
ff-white; Open your psp image "hairdo" then copy and paste as a new layer. Now click on the
deformation tool and adjust the hair so it just covers the white outline you did on the layer below. What you are doing is
basically shortening it a little and squeezing it in. Don't worry if it doesn't work exactly. The only real part that shows will be a bit on the lower right near her cheek and neck area
just above her shoulder.
Then go back and delete the layer with the floodfill image and then rename this new layer "backhair".
(c) Create a new layer and load selection "2-neck.sel"
ff with #DCBAA3 ( or any skin colour of your choosing); keep selected; open one of the lace samples and use it as a floodfill
set at 50% size; floodfill neck again so it appears to have a lace covering; apply pillow inner bevel with ambience set to +43
(d) Create a new layer and load selection "3-leftsleeve.sel"
Open the psp image and copy and paste it into the selection; apply pillow inner bevel. Keep the sleeve image handy.
(e) Create a new layer and load selection "4-rightsleeve.sel"
Go to your psp image again, mirror, and copy and paste it into the selection; apply inner bevel.
(f) Create a new layer and load selection "5-dresstop.sel"
ff- white; keep selected; floodfill with the same lace selection at 50% that you did on the neck; apply inner bevel.
(g) Create a new layer and load selection "6-upperveil.sel"
Open the psp image of the veilruffle and then copy and paste into the selection. I used this image twice more but not until after I had the front hair done.
Close it for now, and I will remind you to go back to it.
(h) Create a new layer and load selection "7-head.sel"
floodfill with #DCBAA3 (or any skin colour of your choosing); then apply the inner bevel with ambience +43
(i) Create a new layer and load selection "8-facedetails.sel"
Flood fill with black, Make sure you enlarge and use the paintbucket. Avoid the spray can because it makes it much darker than it should be.
(j) Create a new layer called "lipstick" and move it down so it is below the face details layer
using paintbrush size 3, hardness 10 opacity 100, paint colour #C66A6A colour in the lips. Change to #E3B3B3;lower paintbrush opacity to 20 and paint in a highlight on the lower lip. In any of
the settings, I have only mentioned the numbers I have changed rather than all the values.
(k) Create a new layer called "blush" and make sure it is below the face details layer
Using the same as the lips #C66A6A, paintbrush 10, hardness 50, paint on the blush. I applied a gaussian blur of 9.00 then did it again. I also lowered the layer
opacity until I was pleased with the look. To get rid of excess blush, load the head selection again, invert, hit scissors and this will remove what has blurred beyond the face.
(l) Create a new layer called "shadow1" and make sure it is below the face details layer
Using #778C9A, paintbrush size 15, hardness 10, opacity 50 paint on the first colour on the lid just above the eye.
Don't go right to the eyebrow. If it goes in the eye area, don't be concerned because it will be covered when you add the white. Lower the layer opacity to what pleases you.I used 70 on both.
(m) Create a new layer called "shadow2" and make sure it is below the face details layer
Using #B8C4CC, paintbrush size down to 10, paint in uppershadow line then lower layer opacity to your liking.
(n) Create a new layer called "eyes" and make sure it is below the face details layer
Paint in the white area then change to #5C7180 and paint in the iris. Return to the face details layer and using white add 1 drop of
white to each pupil to act as a highlight.
(o) Create a new layer and load selection "9-fronthair.sel"
Open up the hair image, copy and paste into the selection. You can go to adjust brightness and change the
hair colour if you wish. I darkened my sample just a little. If you do make changes, however, immediately go and do the same
change to the layer with the backhair.
(p) Create a new layer and load selection "10-headband.sel"
If you want to use the same white one I did, open the headband image, then copy and paste into the selection. If you wish to use the
silver glitter one, deselect and then copy and place it yourself. I also included the same image in white so you can add any bladepro
setting you would like if you don't want silver.
(q) NOW, comes time for you to work on your own. I will tell you what I did and you can do similar, or make changes on your headband.
I used individual layers for everything so I could move things around and add drop shadows later.
(i) I used the larger baby's breath image, rotated it and put it at each end
(ii) I used the larger rose next at one side then mirrored and used on the other side
(iii) I used the smaller baby's breath next
(iv) I used the smaller rose next
(v) I used the midget pearl and ran a line all along the headband to cover the space in between
(vi) I used the pearl sticks and placed some on top rotating and mirroring as needed
(vii) I went down and created a layer below headband and added more pearl sticks there
(r) Create a new layer and name it "dress pearls"
I resized the larger pearl image until it was a pleasing size then placed a layer of pearls all over her dress and neck. Then I
found out the tint of the rose and colourized the pearls slightly so they would stand out better but not too too bright. If you do this as well, then
you just want a very delicate look.
(s) Now is the time to go back to the layer with the upperveil ruffle. It might make it easier if you create a new layer. Then open the psp image again.
You are going to copy and paste it into the layer and then rotate it so it fills out the left side of the ruffle and then do it again on the right side. You can either copy and mirror, or if you created a new layer, you
can duplicate the layer and then mirror.
(t) Now is the time to go back to the layer on the bottom called "longveil".
Open the psp image called "long veil image". You are going to copy and paste it onto this layer. You will need to
rotate and perhaps deform to get it to fit behind the body yet show out the edges. You can check my finished image.
When you get it the way you want it to look, then duplicate the layer and mirror. Just make sure that it looks okay when you mirror, because I probably did not
start my lady in the exact centre, so you might have to make some slight adjustments.
(u) Now is the time to go and apply the drop shadows. The settings are:
vertical and horizontal of 3, opacity 60, blur 6, colour-black
I added drop shadows to the following layers:
sleeves, dresstop in white, front hair, headband, all items on the headband
You can decide whether you want to give the head a shadow. I personally thought it made the neck area a little too dark for my liking and skipped it.
(After I copied and merged my layers to make the display image, then I added a drop shadow to the merged image.)
My suggestion is to save this image, as is, in PSP format with all the layers intact. This will make it easier
if you wish to go back and colourize the layers to make a totally new look for the bride or even turn them into bridesmaids and omit the long veil section.
To carry on with her in this outfit, shift D to make a duplicate and close your original. Now you can
merge all the visible layers. You can make her into a tube now too. Give her a nice backdrop and then you can resize her
and then frame her if you wish
I hope you have enjoyed creating the bride for her big day. Make changes in patterns, decorations, etc. Enjoy your new creation as much as
I did.
If you have any problems or need further explanations, please feel free to email me here
MAIN TUTORIAL LIST
This tutorial was posted at the site of "P. Ann's Place" June 2, 2002 and written
by Pat Sherman.
All I ask is that you do not claim it as your own.
|
|