
This tutorial was inspired by the beautiful Deco Ladies created by FlyByNight- D. J. Walker.
She has posted two tutorials of her designs that you can go and see by clicking on the links. Please try them out and I assure you, you will have
fun doing them.
The Deco Lady
The Deco Lady II
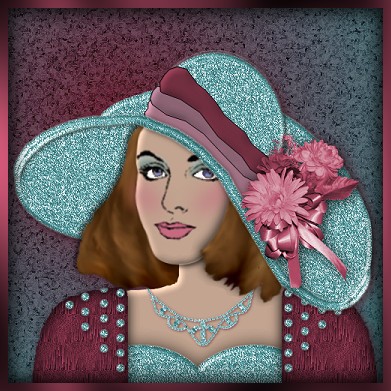
I have named this lady Debora in honour of my sister-in-law. It is the same face I used for "Elizabeth".
In the extras zip file you will receive the two hair images, a fill tile I made for her jacket, the necklace; a bladepro fill tile if you don't have BladePro and the flower ornament for the hat.
It was a tube I downloaded a while ago that I can no longer find the source. If anyone knows where it originally came from please let me know so I can provide a link or offer an alternative. I have colourized it from its original state to this
color to match my colour scheme for this tutorial.
Your image is yours to do with as you see fit - I place absolutely NO restrictions on what you do with her. Just have fun!
This tutorial was completed using PSP7 but can easily be done in PSP6.
What You Will Need:
Paint Shop Pro: download a trial version here
Dee's Blade Pro Preset called Green Shimmer: download here
You can Download a sample version of Super BladePro, if you would like to try it here
Zip of my selection files: you can download it here
Zip of all the extras mentioned above: you can download it here
Let Me Say Just Before We Begin
This tutorial is "screenshot free". I did each item on a separate layer.
I gave several layers (except the face details ) a drop shadow. We will do them all at the end.
If you see the shortform "ff" - it stands for floodfill.
PLEASE save your work often!! I did it after every layer. It is better to be safe than sorry.
(1) Open a new image 500 x 500, 16 mil colours, transparent background.
(2) Add a new layer and floodfill it with a medium value colour for
ease of viewing since you will be using very pale colours in some of the selections
(3) Create a new layer and load selection "leftbackbrim.sel"
ff -white; apply the bladepro setting - "d-greenshimmer". Before we go any farther, you have a decision to make. I wanted a turquoise
colour so I colourized this bladepro. If you are happy with having your lady in green, you can leave this without colourizing. The original
green will still go with the burgundy. If you want the same colour as in my image, then go to
colours - colourize - and input the first number as 130 and then saturation of 80.
(4) Create a new layer and load selection "leftfrontbrim.sel"
ff- white; apply bladepro; colourize 130, 80 or leave as is.
(5) Create a new layer and load selection "lefthair.sel"
Open your psp image of the left hair; copy; return to working image and then edit - paste - into a selection.
(6) Create a new layer and load selection "frontneck.sel"
ff - #DCBAA3; apply the "pillow" inner bevel with the ambience raised to +29.
(7) Create a new layer and load selection "head.sel"
ff -#DCBAA3; apply pillow inner bevel with ambience still at +29.
(8) Create a new layer and call it "lips"
Create a new layer and call it "blush"
Create a new layer and call it "shadow1"
Create a new layer and call it "shadow2"
Create a new layer and call it "eyes"
(9) Create a new layer and load selection "facedetails.sel"
Flood fill with black, Make sure you enlarge and use the paintbucket. Avoid the spray can because it makes it much darker than it should be.
(10) Return to the lips layer.
using paintbrush size 3, hardness 10 opacity 80, paint colour #C66A80 colour in the lips. Change to a lighter shade;lower paintbrush opacity to 20 and paint in a highlight on the lower lip. In any of
the settings, I have only mentioned the numbers I have changed rather than all the values.
(11) Return to the blush layer.
Using the same as the lips #C66A80, paintbrush 10, hardness 50, opacity 80, paint on the blush. I applied a gaussian blur of 9.00 then did it again. I also lowered the layer
opacity until I was pleased with the look. To get rid of excess blush, load the head selection again, invert, hit scissors and this will remove what has blurred beyond the face.
(12) Return to the shadow1 layer.
Using #4C8184, paintbrush size 4, hardness 10, opacity 50 paint on the first colour on the lid just above the eye.
Don't go right to the eyebrow. If it goes in the eye area, don't be concerned because it will be covered when you add the white. Lower the layer opacity to what pleases you.I used 40 on both.
(13) Return to the shadow2 layer.
Using #95C0C3, paintbrush size down to 3, paint in uppershadow line then lower layer opacity to your liking.
(14) Return to the eyes layer.
Paint in the white area then change to #5C7180 and paint in the iris. Return to the face details layer and using white add 1 drop of
white to each pupil to act as a highlight.
(15) Create a new layer and load selection "dress.sel"
ff - white; apply bladepro; colourize 130, 80 or leave as is.
(16) Create a new layer and load selection "leftjacket.sel"
open the psp image "jacketfill"; floodfill the selection with the image set to 50% size.
(17) Create a new layer and load selection "rightjacket.sel"
follow the same steps as #16 above for the left jacket.
(18) Create a new layer and reload selection "leftjacket.sel"
Go to effects - cutout - horizontal 5, vertical 1, opacity 82, blur 28, colour black
(19) Create a new layer and reload selection "rightjacket.sel"
Go to effects - cutout - horizontal 5, vertical -1, opacity 82, blur 28, colour black
(20) Create a new layer and load selection "jacketbeads.sel"
zoom in to make it easier to see then ff with white; apply bladepro; colourize 130, 80 or leave as is.
(21) Create a new layer and load selection "righthair.sel"
Open up the psp right hair image; copy; return to working image and then edit - paste - into a selection.
(22) Create a new layer and load selection "rightbrim.sel"
ff- white; apply bladepro; colourize 130, 80 or leave as is.
(23) Create a new layer and load selection "hathead.sel"
ff- white; apply bladepro; colourize 130, 80 or leave as is.
(24) Create a new layer and load selection "ribbon1.sel"
ff - black; contract by 1; ff - #B88295; apply pillow inner bevel with ambience still at +29
(25) Create a new layer and load selection "ribbon2.sel"
ff - black; contract by 1; ff - #9F7284; apply pillow inner bevel with ambience still at +29
(26) Create a new layer and load selection "ribbon3.sel"
ff - black; contract by 1; ff - #803649; apply pillow inner bevel with ambience still at +29
(27) Create a new layer and load selection "longbrimrim.sel"
ff - white; apply the bladepro; colourize 130, 80 or leave as is.
(28) Create a new layer and load selection "edgingshadow.sel"
Apply a drop shadow of horizontal and vertical 2.....opacity 60.....blur 10
(29) Create a new layer for the hat flowers
open the psp image and then copy; return to the working image and paste onto the hat and move into a position
pleasing to you
(30) Create a new layer for the necklace
open the psp image; I resized by 50% to start with but you can judge what size you want it; colourize 130, 80 or leave as is; copy then
return to working image and paste; move into position. You will have to erase the part that goes past the shoulders. It will
depend on how you place the necklace as to how much you have to erase.
(30) Now is the time to go and apply the drop shadows. I did not apply a shadow to every layer because some just didn't look right. At this
point I also floodfilled my bottom darker layer to something lighter to make sure I could see the shadow and was pleased with it. These are the settings I have used.
If you would like to alter them as we go, please feel free to do so. Remember, this is YOUR image.
I will list the numbers only. The first two stand for horizontal and vertical. The third is the opacity level and the fourth is the blur. The colour is black.
The layers and settings are:
leftfrontbrim: 3, 3, 70, 10
left hair: -3, -3, 70, 10
head: 3, 3, 70, 10
dress: minus3, 3, 50, 30
left jacket: 3, 3, 70, 20
right jacket: minus 3, minus 3, 70, 20
beads: 1, 1, 70, 10
right hair: minus 3, minus 3, 70, 20
right hatbrim: 3, 3, 70, 10
hat head: 3, 3, 70, 10
necklace:1, 1, 70, 5
You can decide whether you want to give any other layers a shadow.
My suggestion is to save this image, as is, in PSP format with all the layers intact. This will make it easier
if you wish to go back and colourize the layers to make a totally new look for Debora.
To carry on with her in this outfit, shift D to make a duplicate and close your original. Now you can
merge all the visible layers. You can make her into a tube now too. Give her a nice backdrop and then you can resize her
and then frame her if you wish
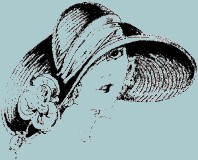
I have displayed below the image from my graphic CD collection that gave me the inspiration to create Debora
I hope you have enjoyed creating Debora or whatever name you would like to call her. Make changes in patterns, decorations, etc. Enjoy your new creation as much as
I did.
If you have any problems or need further explanations, please feel free to email me here
MAIN TUTORIAL LIST
This tutorial was posted at the site of "P. Ann's Place" June 21, 2002 and written
by Pat Sherman.
All I ask is that you do not claim it as your own.
|
|