
I decided I would try outside the house today.
This is a deck and garden scene so you can use all those flower tubes you collect.
This tut is not very complicated and the only tricky part is the side railing deformation. I have included the stairs for you as well as a railing piece and the corner posts of the deck. I made these in another programme I own called "Architectural Series 18" created by
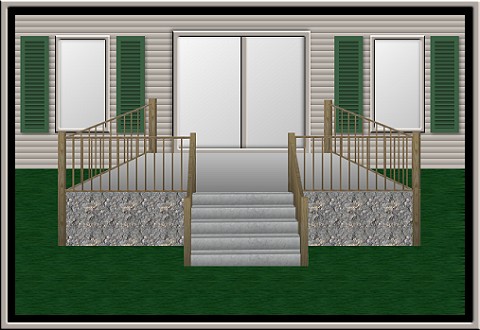
Punch. I also included a wall lantern I made if you want to use it on either side of the door. As we go along, we will make certain layers and then return to them at later stages after certain other layers have been completed. You can peek at my sample at the bottom but remember to leave enough time for it to fully download. I just colourized my walls and shutters to give you a different look.
I place no restrictions on the use of this tutorial or your finished image.
This tutorial was completed using PSP7 but can easily be done in PSP6.
What You Will Need:
Paint Shop Pro: download a trial version here
Zip of my image files: you can download it here
Zip of my selections: you can download it here
PLEASE save your work often!! I did it after every layer. It is better to be safe than sorry. You don't know how many times I still forget this and have to start all over again.
(1) Open a new image 600 x 400, 16 mil colours, transparent background.
(2) Create a new layer and load selection "grass.sel"
Use your own grass fill or tube or see the next line for an alternative.
Set your fill pattern to the one that came with the programme called "scrubber" size 30.
Fill the area then go to effects - geometric - wind.
use the settings - strength 10 and direction from the right
(3) Create a new layer called "window scenes"
(4) Create a new layer called "glass"
(5) Create a new layer and load selection "house.sel"
Fill the area using #D0C8C0 or your own choice.
Go to effects - texture - blinds.
Use width 8, opacity 28, checkmarks in both boxes (horizontal and light from left/top) and colour black.
(6) Create a new layer and load selection "patiodoorB.sel"
Fill the area with the same colour used on the wall.
Apply the inner bevel setting below.
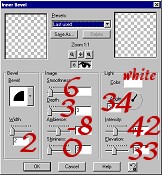
(7) Create a new layer and load selection "patiodoor1.sel"
Follow the same as step 6 above.
Apply a drop shadow of H and V both minus2, opacity 50 blur 7.4
(8) Create a new layer and load selection "leftwindow.sel"
Apply the same fill and inner bevel as above.
Apply a drop shadow of H and V both 2, opacity 18 blur 4.9
(9) Duplicate the leftwindow layer and then mirror the image to get the other window.
(10) Create a new layer and load selection "shutter.sel"
Floodfill the area with #3D6144 or your own choice.
Go to selections - modify - contract by 6.
Go to effects - texture - blinds
Use width 5, opacity 45, checkmark only in horizontal and colour black
Apply a drop shadow of H and V both 2, opacity 40 blur 6.2
Copy this shutter then paste another for the other side of the window.
(11) Duplicate the shutter layer.
If you don't mind the shadow being on the other side, then mirror the image like you did the window.
If you want the shadow on the same side as the original so they match, then move them over with the moving tool and place in the correct postion.
(12) Create a new layer and load "backleftpost.sel"
Open the post image from the zip file and copy it.
Return to the main image and paste into the selection by taking the short cut of holding down both the shift and control keys as you press the letter L.
On this same layer, load the selection "backrightpost.sel" and paste the post into this selection as well.
(13) Create a new layer and load selection "deckfloor.sel"
Set your foreground colour to grey 808080 and your background colour to grey C0C0C0
Set fill as foreground to background linear gradient angle 0 repeats 0 and floodfill the floor area.
(14) Create a new layer called "left side railing"
(15) Create a new layer and load selection "frontofdeck.sel"
Set your pattern fill to one that came with the programme called "granite3" using size 25, then floodfill.
(16) Create a new layer called "front railings"
(17) Create a new layer and load selection "stairs.sel"
Open the stairs image from the zip and copy.
Return to the main image and paste it into the selection
(remember - shift and control while pressing L)
Now we will go back and work on some of the other layers we created but left blank until this time.
(18) Go back and make active the layer called "front railings"
Open the railing image from the zip and copy it.
Return to the main image and paste in it in place lining up the left edge with the far left post and with the bottom railing resting on the grey floor area where it meets the front.
Keep pasting until you work your way over to the stairs. I think it took me 5.
Then when you get to the part that hangs over, just erase that piece so it disappears behind the stair post.
Then do the same steps again for the other right side of the front.
***Just before we leave this layer, we are going to do the side railings next and to make it easier to see, hide this layer so as we go to deform those railings, we are not seeing the front ones as well.***
(19) Go back and make active the layer called "left side railing".
Paste 4 more railing pieces together in a line almost identical to what you did for the front. Line them up with that same post again on the far left and work across.
Now we are going to hit the deformation tool to get it to fit.
Looking at the image below you will see that when you hit the deformation tool, boxes surround the area.
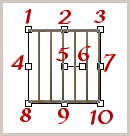
Click on box 7 and move it to the left to make the railing thinner and stop when you reach the point where the right end of the railing lines up with the centre of the back deck post.
Hold down the shift key while you click on box 7 again and move it up until the top of the railing is below the top of the post and looks close to the same distance from the top as the front.
Hold down the shift key again while you click on box 10 and move it up until it reaches the area of the edge of the grey floor.
Now double click in the area to apply the deformation if it looks okay to you......if not undo, and try again.
Duplicate this layer, go to image mirror and your right side railing will be finished as well.
(20) Go back to the house layer and make it the active one.
Using the selection tool set to rectangle, we are going to remove the areas where the two windows and door are.
Select an area on the left window just a tiny bit smaller than the outer edge of the window frame and when ready hit the delete key or the scissors as this is where you will add the glass and scenery behind.
Do this for the other window and the patio door area as well.
(21) Go back to the layer we created called "glass".
You have to make a decision here whether you want to have all the glass at the same opacity level or whether you might want to have the glass at different levels. I did mine all on the same layer and used opacity 50 in my sample. If you want different opacities, you would have to do each window and door on a separate layer rather than all on one layer.
If you want one layer, using the selection tool, draw a big rectangle enough to cover all the windows and door.
Set your foreground to grey #C0C0C0 and your background to white, then set your fill to foreground-background linear gradient, angle 322 repeats 0 and then fill the area.
You can then lower this glass layer opacity to whatever you feel you personally like.
(22) The last step is to return to the "window scenes" layer and decorate those areas as well as your deck and then plant your garden as your final task.
I filled my window scenes with the little images I include in my special webset section. If you wish to use any of those in your windows rather than design your own, you have permission to decorate your scene with them.
When you go to put something on your deck, place that empty layer below the front railing and above the side railings and your images will fit in without having any erasing to do.
I think you are now finished.
Remember you can fill the selection pieces with any colour you want to or any fill pattern such as stone or bricks. It is totally your choice. Just have fun and enjoy practising your decorating skills.
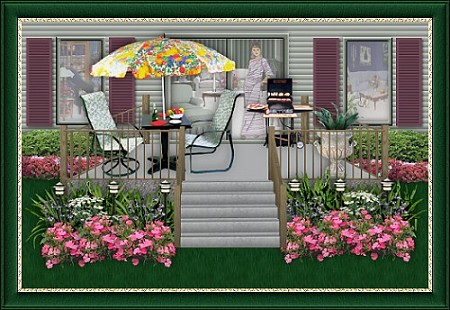
Here is my sample. I did the tut step by step but just colourized it at the end to get the green walls and burgundy shutters. A lot of the flower tubes came from Digital Designs but last time I visited, I think she has removed that section from her site.
If you have any problems or need further explanations, please feel free to email me here
TUTORIAL PAGE ONE
TUTORIAL PAGE TWO
This tutorial was posted at the site of "P. Ann's Place" June 14, 2003 and written
by Pat Sherman.
All I ask is that you do not claim it as your own.
If you are in a group and want to use this as a lesson, please use the link freely and you do not have to write me to ask permission.
  
|
|