
Ever dream of owning an "adult" dollhouse to decorate with miniatures? I did and my husband surprised me with one as a present. After gluing on thousands of little wood shingles, we both realized we really didn't have the room to display this properly or do it justice. We finally gave it to someone who could enjoy it as much as I was hoping I could.
Toni devised a simple dollhouse shape that we could all have fun with and I added the stairs for a little touch of something different.
Since there are many rooms and several colour changes in each one, I included a colour chart to make things easier. For those of you who have never worked with one of these, just open the image on your work area and whenever you need to change a colour, use the eyedropper tool, click on the appropriate colour sample and it will set the colour for you automatically. This takes away the need to constantly open the colour window and type all those 6 letter/number codes.
I will give the basic instructions for the beginning steps and for some of the upper areas, I will shorten the instructions as much as possible since they are repetitive.
We have also shown the windows for an example, but we gave no instructions for them. There are 5 choices of windows in the zip and you can use them anywhere you want or use your own or leave some of them out. That can be your choice.
We place absolutely NO restrictions on the use of this tutorial or your finished image, except for reproducing the tutorial on your own site without permission or claiming it as your own.
This tutorial was completed using PSP7 but can easily be done in PSP6 or 8 I am sure.
What You Will Need:
Paint Shop Pro: download a trial version here
Zip of my image files: you can download it here
Zip of my selections: you can download it here
PLEASE save your work often!! I did it after every layer. It is better to be safe than sorry and you don't want to have to start all over again.
(1) Open a new image 685 x 425, 16 mil colours, transparent background.
(2) Create a new layer and load selection "greenfloor.sel"
Set the colour by clicking on the chart and then floodfill.
(3) Create a new layer and load selection "greensides.sel"
Set the colour by clicking on the chart and then floodfill.
(4) Create a new layer and load selection "greenback.sel"
Set the colour by clicking on the chart and then floodfill.
(5) Create a new layer and load selection "bluefloor.sel"
Set the colour by clicking on the chart and then floodfill.
(6) Create a new layer and load selection "bluebackright.sel"
Set the colour by clicking on the chart (back #1)and then floodfill.
(7)Create a new layer and load selection "bluerightside.sel"
Set the colour by clicking on the chart (back #1)and then floodfill.
(8) We have to do the room above before we can add the stairs
Create a new layer and load selection "mauvefloor.sel"
Set the colour by clicking on the chart and then floodfill.
(9) Create a new layer and load selection "mauveceiling.sel"
Set the colour by clicking on the chart and then floodfill.
(10) Create a new layer and load selection "mauvesides.sel"
Set the colour by clicking on the chart (back #1)and then floodfill.
(11) Create a new layer and load selection "mauveback.sel"
Set the colour by clicking on the chart and then floodfill.
(12) Create a new layer and load selection "stairs.sel"
Open the stairs image from the zip and copy it.
Hold down the control key and the shift key and press the letter L
(13) Create a new layer and load selection "upperrailings.sel"
Open the railings image from the zip and copy it.
Hold down the control key and the shift key and press the letter L
(14) Create a new layer and load selection "blueleftside.sel"
Set the colour by clicking on the chart and then floodfill.
(15) Create a new layer and load selection "bluebackleft.sel"
Set the colour by clicking on the chart (back#2) and then floodfill.
(16) Create a new layer, open the door image from the zip, copy it and then paste it in place on this wall.
(17) Create a new layer, load and fill selection "pinkfloor.sel"
Create a new layer, load and fill selection "pinkceiling.sel"
Create a new layer, load and fill selection "pinksides.sel"
Create a new layer, load and fill selection "pinkback.sel"
(18) Create a new layer, load and fill selection "goldfloor.sel"
Create a new layer, load and fill selection "goldceiling.sel"
Create a new layer, load and fill selection "goldsides.sel"
Create a new layer, load and fill selection "goldback.sel"
(19) Create a new layer and load selection "mainroof.sel"
Set the colour by clicking on the chart and then floodfill.
Go to effects - texture - blinds and use the settings -
width 5 opacity 35 colour black
(20) Create a new layer and load selection "rooftrim.sel"
Set the colour by clicking on the chart and then floodfill.
Leave selected and go to effects - 3D - inner bevel
shape - quarter circle, width 8, smoothness 0, depth 6, ambience 0,
shininess 0, colour white, angle 315, intensity 45, elevation 35.
(21) Create a new layer and load selection "woodframingrooms.sel"
Set the colour by clicking on the chart and then floodfill.
Leave selected and go to effects - 3D - inner bevel
shape - quarter circle, width 2, smoothness 3, depth 2, ambience -17,
shininess 0, colour white, angle 315, intensity 45, elevation 35.
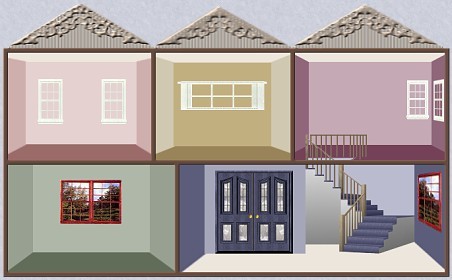
You are now finished the basics so I hope you have fun filling the space with furniture and decorations.
Another thing I was thinking of as I was typing this, was taking this image, and converting it into an image where you could click on the individual rooms and it would lead you to a larger version of the room on a separate page. I, honestly, would enjoy doing that much better if I wanted to spend a lot of time on the details of each room where all together, like the dollhouse, you are more limited. This is just an idea or suggestion for those who spend a lot of time on making rooms and this might be a nice way to link them all together. On the plain dollhouse room you could put the title, perhaps "Living room" that could lead to the larger room and it wouldn't have to be decorated the same. It could be one you have already finished a while ago.
If you have any problems or need further explanations, please feel free to email me here
TUTORIAL PAGE ONE
TUTORIAL PAGE TWO
TUTORIAL PAGE THREE
This tutorial was posted at the site of "P. Ann's Place" January 22, 2004 and a joint effort by Toni and Pat.
All we ask is that you do not claim it as your own or post it on your site without permission.
If you are in a group and want to use this as a lesson, please use the link freely and you do not have to write me to ask permission.
   
|
|