

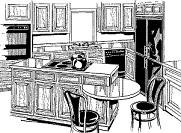
More creating again but with some inspiration from the following image this time. It is a black and white clipart image from my purchased Broderbund Clickart Collection.
This tutorial may look a little difficult but with the selections and images I have provided I think it is suitable for anyone to give it a try. It just takes a little longer than the other tuts I have been doing lately.
I place absolutely NO restrictions on the use of this tutorial or your finished image.
This tutorial was completed using PSP7 but can easily be done in PSP6.
What You Will Need:
Paint Shop Pro: download a trial version here
Zip of my image files: you can download it here
Zip of my selections: you can download it here
Free Filter by MuRa's Filter Meister called "prospective tiling" which you can download here
PLEASE save your work often!! I did it after every layer. It is better to be safe than sorry.
(1) Open a new image 602 x 442, 16 mil colours, transparent background.
(2) Create a new layer and call it "flooring"
we will return to this layer at the very end
(3) Create a new layer and load selection "1-wallpaper.sel"
open the wallpaper.psp image from the zip and floodfill at size 100 angle 0
(4) Create a new layer and load selection "2-backleftcupboards.sel"
open the woodsample.psp image from the zip and floodfill at size 50 angle 90
staying on this same layer, open the doors.psp image from the zip, then copy and paste it in the centre of the cupboard area
(5) Create a new layer and load selection "3-depthofrightcupboard.sel"
floodfill the area with wood sample, size 50 angle 90
go to colours - adjust only the brightness to minus 15
(6) Create a new layer and load selection "4-backupperright.sel"
floodfill the area with wood (keep size 50 and angle 90 all the time unless I tell you to change )
staying on this same layer, open the doors.psp image from the zip, then copy and paste it in the centre of the cupboard area
this is the same as what you did in step 4 but this time centre it, keeping in mind you have an extra piece of wood to help show perspective
(7) Create a new layer and load selection "5-lowerrightA.sel"
floodfill with the wood pattern
(8) Create a new layer and name it "single door"
open the singledoor.psp image from the zip, copy and paste it over the door
centre the left side of the door with the left side of the backing area and don't worry because it will be too wide and off shape
hit the deformation tool and then grab the square in the centre of the right side of the door and slowly pull in towards the left so the door becomes thinner and fits the width
hold down the shift key and then grab that same square in the centre of the right side then pull downwards until the angle of the door matches the angle of the backing shape at the bottom
it may look funny at the top but you have some countertop to add later
when completed then double click to apply the deformation
(9) Create a new layer and load selection "6-lowerleftA.sel"
floodfill with wood
(10) Create a new layer and call it "lower doors"
open the singledoor image from the zip, copy, then paste 5 doors as evenly spaced out as you can
(11) Create a new layer and load selection "7-maincountertop.sel"
floodfill with colour #546559
effects - add noise - 30 % - uniform
(12) Create a new layer and load selection "8-fronttrimleft.sel"
floodfill with colour #546559
effects - add noise - 30 % - uniform
go to colours and only adjust the brightness to minus 30
effects - 3D- drop shadow- (these settings will be the same for all the little front counter pieces and even the ones on the centre island area.
V..... 2 H.... 0 opacity...57 blur... 2.5
(13) Create a new layer and load selection "9-fronttrimright.sel"
floodfill with colour #546559
effects - add noise - 30 % - uniform
go to colours and only adjust the brightness to minus 30
effects - 3D- drop shadow-
V..... 2 H.... 0 opacity...57 blur... 2.5
(14) Create a new layer and load selection "10-darkerbacksplash.sel"
floodfill with colour #546559
effects - add noise - 30 % - uniform
go to colours and only adjust the brightness to minus 30
effects - 3D- drop shadow-
V..... -2 H.... -2 opacity...35 blur... 6.2
(15) Create a new layer and load selection "11-backsplash.sel"
floodfill with colour #546559
effects - add noise - 30 % - uniform
go to colours and only adjust the brightness to minus 10
effects - 3D- drop shadow-
V..... 1 H.... 0 opacity...21 blur... 6.2
(16) Create a new layer and load selection "12-leftlongwall.sel"
floodfill with the wood
effects - 3D- drop shadow-
V..... 0 H.... 4 opacity...60 blur... 12.3
(17) Create a new layer and load selection "13-ovenoutline.sel"
floodfill with black
(18) Create a new layer and load selection "14-ovendoor.sel"
set your two colours to white and grey #C0C0C0
using linear gradient set to fg-bg, angle 300 if you need to get the darker colour to the top left, floodfill
effects - noise - add 3 %
staying on this same layer, load selection "15-ovenhandle.sel"
fill with same gradient however change angle to 270 and the repeats to 1
(19) Create a new layer and call it oven dials
using the 3Dgold tube size 15, place how many dials you want on your oven
go to colours - colourize - change both numbers to 0
go to colours - adjust brightness only to plus 30
(20) Create a new layer for cupboard door above the oven
open the single door image from the zip, copy and paste it in your image
go to image - rotate - 90, making sure the box at bottom for all layers is NOT checked
move the cupboard into place above the oven centring it the best you can
(21) Create a new layer and load selection "16-bigrightwall.sel"
floodfill with the wood
staying on this same layer load selection"17-darkenedarea.sel"
go to colours - adjust brightness and only change it to minus 15
make sure you deselect the darkened area before applying the shadow, because you want the shadow on the whole wall not just the dark part
effects - 3D- drop shadow-
V..... -3 H.... -3 opacity...73 blur... 21
(22) Create a new layer and load selection "18-silveronfridge.sel"
floodfill with the same linear gradient you used for the oven door handle
(23) Create a new layer and load selection "19-fridgefront.sel"
floodfill with black
open the fridgehandle image from the zip, copy and paste two handles on the doors
(24) Create a new layer and load selection "20-frontright.sel"
floodfill with the wood
(25) Create a new layer and load selection "21-littlecounter.sel"
floodfill with the green - add noise 30 % uniform
(26) Create a new layer and load selection "22-countertrim.sel"
follow the same steps for green, noise, darkening and drop shadow
as in step 12
(27) Create a new layer and load selection "23-islandright.sel"
floodfill with the wood and lower the colour brightness to minus20
(28) Create a new layer and load selection "24-islandfront.sel"
floodfill with the wood
(29) Create a new layer and load selection "25-righttrim.sel"
follow the same steps for green, noise, darkening and drop shadow
as in step 12
(30) Create a new layer and load selection "26-fronttrim.sel"
follow the same steps for green, noise, darkening and drop shadow
as in step 12
(31) Create a new layer and load selection "27-islandcounter.sel"
follow the same steps for green and the noise only as in step 12
(32) Create a new layer for the counter bevels
open the "counterbevels.psp" image from the zip, copy and paste it as evenly spaced as you can along the front of the island
(33) Create a new layer and load selection "28-lowercircle.sel"
floodfill with the green, add 30 uniform noise and adjust the brightness to minus 30
effects - 3D- drop shadow-
V..... 2 H.... 2 opacity...71 blur... 6.2
(34) Create a new layer and load selection "29-uppercircle.sel"
floodfill green, add 30 uniform noise
(35) Create a new layer, open the smallsink.psp image from the zip, copy and paste it in place.
(36) Create a new layer, open the stovetop.psp image from the zip, copy and paste it in place on the island counter.
(37) Create a new layer, open the doorknob image from the zip, copy and paste on all the doors
you can decide where you want them and which way you want your cupboard doors to open
effects - 3D- drop shadow-
V..... 2 H.... 2 opacity...50 blur... 3.7
(38) Create a new layer, if you want to do this step, or you can forget it.
I included a tiny little black rectangle called hinge if you want to add them to your doors. This is strictly your call because if you shrink the image for use later, they may not even be that visible.
just remember to put them on the oppposite side of your knobs.
(39) Go back and activate the first layer we made for the flooring
floodfill with the floortile image from the zip at size 75 and don't worry about the look of it at the moment
go to effects - Mura Meisters perspective tiling and apply these settings:
perspective..... 60
stretch..... 0
centre..... 0
height..... 50
offset x ..... 0
offset y ..... 0
crop ..... 100
crop opacity ..... 255
box underneath called crop by colour - NOT checked
apply the effect and watch your floor take shape
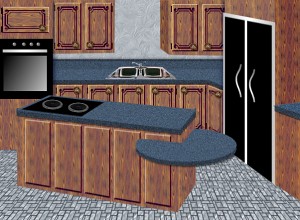
Instead of showing you a decorated sample, I thought I would show you what quick fixes I did to make a different look. My original image I saved in psp format with all layers intact and then made a duplicate before I closed it up. I then worked on the duplicate.
The first sample I did by going back to each layer that I needed to, and did some colourizing effects. This was a lot faster than redoing the total kitchen. I would have to redo it if I wanted a non wood look and perhaps something smooth and more modern, but I just thought I'd play around with the wood look and see what could be done.
On each of the wood layers I went to image -manual photo colour correction and chose "wood" section - and stain - Oak Stn Dk. I left both boxes unchecked and this is how it turned out. Then on the counter layers, I went and just used the plain colourize feature and used hue 150 intensity 60, and changed the intensity to 20 when I did the floor and the wallpaper.
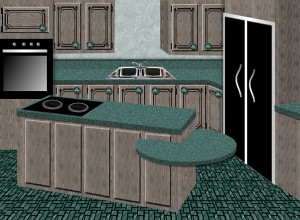
Then I saved this image with all its layers intact and duplicated the changed one and this is
my second sample. On this one I totally used just the plain colourize feature. On each of the wood layers I went to hue 20, intensity 20 and it reminded me of old barnwood. On the counters I colourized them hue 120 intensity 50. On the floor I did the same 120, 50, but then adjusted the brightness to minus 100.
I have been having a lot of fun designing these room images lately. I hope this can spur you on to making a room scene too. This also might be a great one to try if you have a recipe site.
I could just see it now - "From Pat's Kitchen" - the only problem is after 34 years teaching kids, I never taught myself how to cook and I am still terrified in the kitchen without a recipe book in front of me. That I really shouldn't have told you - now you know one of my deep dark secrets - I am a lousy cook!! However, I do make one mean tuna casserole.
If you have any problems or need further explanations, please feel free to email me here
TUTORIAL PAGE ONE
TUTORIAL PAGE TWO
This tutorial was posted at the site of "P. Ann's Place" January 19, 2003 and written
by Pat Sherman.
All I ask is that you do not claim it as your own.
  
|
|