I was just experimenting one weekend trying to make some fireplaces for my
"Special Websets" images and I decided to add them to my Christmas section as well for others to download and enjoy.
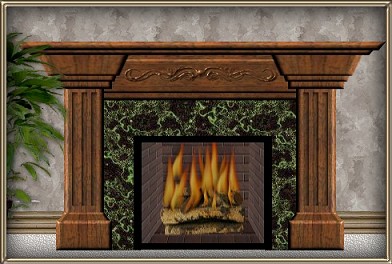
I have 9 there now. I decided to write this tutorial to share how I did this version and to show that they aren't really that difficult if you want to
experiment too. You can use different wood fills or ornaments or even colours to achieve totally different looking fireplaces.
I place absolutely NO restrictions on the use of this tutorial or your finished image. I have also included the firebox and another version of a screen
in the zip file that I created and you can also use those any time you want as well.
This tutorial was completed using PSP7 but can easily be done in PSP6.
What You Will Need:
Paint Shop Pro: download a trial version here
Zip of my image files: you can download it here
(includes wood, marble, ornament, extra screen and firebox image)
Let Me Say Just Before We Begin
The wood sample and marble sample were originally found at "Absolute Backgrounds". They have a marvelous array of background textures they
offer for download and you can find other samples of wood and marbles there as well. You can click on the link below to visit their site.
www.grsites.com
PLEASE save your work often!! I did it after every layer. It is better to be safe than sorry. I started off with a larger size canvas for ease of working.
At the end, I resized it.
(1) Open a new image 500 x 400, 16 mil colours, transparent background.
(2) Create a new layer and call it "long side". Open up the wood image and set it up for your foreground fill, background null. Use it at
100% size and angle 0
(3) Double click on the square dotted selection tool to have the window appear.
Where it says left - insert the number 80.
Where it says
right - insert 130.
Where it says top - insert 130.
Where it says bottom - insert 330.
The size underneath this area should say 50 by 200. Click okay to apply and an
area will appear on your image.
(4) Flood fill with the wood fill. Keep selected and go to Effects - 3D - inner bevel and apply the following settings.
These same settings will be used throughout the tutorial.

(5) Create a new raster layer called "cutouts". These will make the areas that look like the carvings down the centre.
Go back and double click on the square selection tool again and insert these numbers
left- 90...........................right - 97
top - 140..........................bottom - 310
Click to apply these settings to your image and then go to Effects - 3D - cutout. Use these settings below.
V and H.....2, Opacity...82, Blur...7, shadow colour black, fill colour box NOT checked. Keep this area selected.
(6) Holding down the control key, hit the letter C to copy your first cutout. Then holding down the control key hit E to paste another
image onto this layer. Move it over to the other side of the wood piece equal distance from the edge, and then do the control E again to paste another
cutout area which you will move right to the middle between the other two.
(7) Create a new layer and call it "bottom 1". We are going to return one last time to the selection tool window by double clicking and then add these co-ordinates.
left - 70.....................right - 140
top - 320.....................bottom - 365
Flood fill with the wood and apply the same inner bevel as before with just one change. Move the "shininess" from 50 to 40. These will stay the same from now on.
(8) Duplicate the "bottom 1" layer and rename it "bottom 2". Using the selection tool set to rectangle, draw a larger rectangle around the image, then click inside to have the ants
surround the shape. Hold down the shift key on your keyboard and press the down arrow key on your keyboard 12 times. If you lose count, don't worry!
(9) Return to the "bottom 1" layer. What we are going to do is deform this shape. Check this image so you will see what the next steps are going to accomplish.

Click the deformation tool. Holding down the control key, grab the upper right box and move in until it meets the long piece. Keeping the control key down, grab the bottom right
box and pull outwards so part of the shape lines up and meets the bottom piece. Some of it will extend beyond as you see in the image above. When ready, double click to apply the deformation, and
then go in and erase the parts that extend like the ones circled in red.
(10) The next steps will create the upper part.
(11) Duplicate the "bottom2" layer and rename it "top1". Just drag it up to the top and place it in the centre of the long piece, with the bottom just covering the bevel part and
above the cutouts. We are doing it this way rather than flipping, because I want the darker part of the shading on the bottom rather than on the top.
(12) Duplicate "top1" and call it "top 2". Drag it up a little and then go to Image - resize - fill in the percentage 105. Make sure the box at the bottom for "all layers" is NOT checked. Then
click on the deformation tool. Holding down the control key, grab the upper right box and drag further to the right to create a slight diagonal look. Then apply.
(13) Duplicate the "top 2" layer, drag it up a little again and then apply the same "image enlarge by 105%". Click on the deformation tool and drag the centre box down a little to make it not quite so tall.
Don't worry about being too precise because part of it will be covered when we add the 2 mantle pieces later on.
(14) You have to make a decision here about whether you might be making any more fireplaces in the future. What I did originally was hide the first layer and I also hid the cutout layer.
Then I merged - visible, all the rest. I did it this way, so I could use this same base and then change the decorations down the side part to make a different looking fireplace. If you know you won't be worrying about making any more,
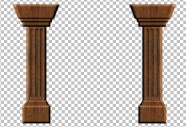
then hide the bottom layer and merge all the visible. Then duplicate the merged image layer and "mirror" to make the other side of the fireplace. If you didn't add the cutout layer before you merged, then duplicate the cutout layer and mirror it separately.
What you should now have are your two fireplace sides.
(15) Create a new layer and move it down so it is below the two sides layers. Change your wood fill angle from 0 to 90.
Using the selection tool set to rectangle, no feather and no antialias, draw out an area that starts level with the top of the two sides, goes from the centre of the left side to the centre of the right side and down to the area just below the start of the cutouts. Check the main
image at the top if you are unsure. This is the main crossbar going from side to side. Then floodfill with the wood and apply the same inner bevel.
(16) Duplicate this layer. Go to Image - resize - fill in 70%. Make sure, once again, that the all layers box at the bottom is NOT checked. Then apply. The top and bottom have moved in nicely but the left and right sides
need to be hidden so we can't see them. Click on the deformation tool. Grab the right side centre box and drag so the end disappears behind the right side of the fireplace. Then grab the left side centre box and
drag that end further to the left to hide it under the left side of the fireplace. Then double click to apply the deformation.
(17) Create a new layer. You can use your own ding decoration here if you want to. If you don't have any dingfonts, open up my decoration image from the zip file, copy and then paste it into your image. Centre it
so it fits in the middle of your crosspieces.
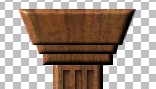
(18) Create a new layer and move it to the top. We are now going to add the first part of the mantlepiece. Using the selection tool set to rectangle, draw out a long thin shape starting and extending just beyond the top pieces and starting just above and going just below the top of
the fireplace. Check the image below.
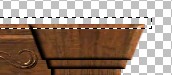
Flood fill with the wood and apply the same inner bevel. Then click on the deformation tool, hold down the control key and drag the top right box out to the right to add the diagonal shape. Then double
click to apply the deformation.
(19) Duplicate this layer, go to image resize and insert 105%, all layers NOT checked and then apply. Then grab the mover tool and move it slightly above the first mantle piece to finish off the top. This finishes off the wood section.
(20) Now you need to open the marble tile and set it as your foreground fill and also open the image of the firebox I included for you in the zip file.
(20) Create a new layer and move it down below all parts of the fireplace. Using the selection tool, set to rectangle, no feather and no antialias, draw out a shape that will be larger than the empty centre part of the fireplace but will be level with the bottom of the fireplace. Then fill with the marble and deselect.
(21) Create a new layer. Copy the firebox image and paste it onto your new layer in the centre of the fireplace level with the bottom. We will move it below the marble layer in a minute. Click on your marble layer and make it the active one.
Using the selection tool, again set to rectangle, you are going to create a shape level with the bottom and just inside the fire area. Check the image below.
Now either hit the delete key or the scissors. Nothing will show because what you have done is remove the marble behind the firebox. Now, make the fire the active layer and move it down behind the marble layer. Doing it this way will make the edges of your outline much smoother in case you decide not to use a firescreen in front.
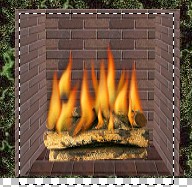
(22) Create a new layer and move it up so it is above the marble layer. We are going to make another selection here but check the image below first.
You want it level with the bottom but just beyond the fire area covering a tiny bit of the marble area. Then floodfill with just a plain black colour. Keep the area selected and go to
"Selections - modify - contract - 10." Then hit the delete key or the scissors. Keep selected.
(23) Create a new layer and with your selection still active - go to "selections - modify - expand - 4". Floodfill with black again, deselect, then lower the opacity slider of this layer to between 20 -30 to create the illusion of dark glass covering
your fire area. You can adjust this to your liking to make it lighter or darker whatever your preference.
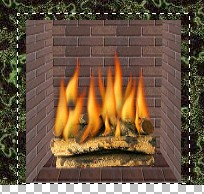
(24) You are finished your fireplace creating. Now I would suggest saving your creation as is, in psp format with all the layers so you can use it again to make changes at a later date if you want to make a different one. Duplicate your image before closing the original.
Now merge all the visible layers on your duplicate. At this p[oint, I felt the fireplace was a little too tall for my liking, so I used the deformation tool again to drag the top down to make it shorter and more the proportions I was looking for. Now you can resize it, tube it or
save it ready for copying and pasting when you need a fireplace.
I hope you have enjoyed making your fireplace. Make changes in patterns, colours, etc. If you want to see what I did with the others, click
HERE to take you to the Christmas Miscellaneous page where I have them for downloading.
If you have any problems or need further explanations, please feel free to email me here
MAIN TUTORIAL LIST
This tutorial was posted at the site of "P. Ann's Place" October 20,2002 and written
by Pat Sherman.
All I ask is that you do not claim it as your own.
|
|