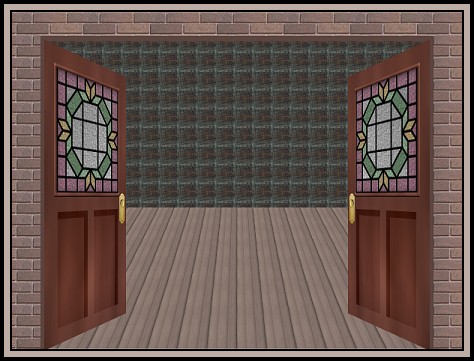
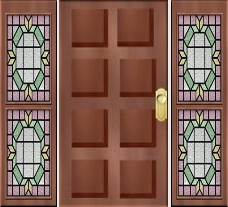
I made a similar door scene for one of my specials so I thought you might be interested in another way to introduce a room scene. The perspective may be off a little so as to allow more of what is behind the doors to show through. You will be making the doors, the stained glass and the knob. We will be working on a main image for the door and scene, and also another one for preparing the stained glass and another one again for doing the doorknob. The stained glass is a traditional quilting block and not my own creation. I downloaded it and have received permission to offer it here from
Designs by Joy.
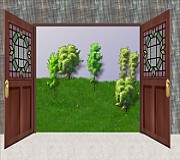
You can peek at my samples at the bottom but remember to leave enough time for them to fully download. I did two to show you can either be welcoming your guests into your home or ushering them out if they have overstayed their welcome. I cheated a little on these because I used two images from my websets. The blue room is the same but the outside scene is the one with the Victorian couple out taking a stroll. I just duplicated the image, removed the layer with the couple on it and then merged and resized to fit behind the open doors. I can't emphasize enough to keep a copy in layers in case you want to reuse it at a later date. Those extra saved copies do come in handy!!!
I place no restrictions on the use of your finished image since you have been the one to do all the work.
This tutorial was completed using PSP7 but can easily be done in PSP6.
What You Will Need:
Paint Shop Pro: download a trial version here
Zip of my image files: you can download it here
Zip of my selections: you can download it here
PLEASE save your work often!! I did it after every layer. It is better to be safe than sorry. You don't know how many times I still forget this and have to start all over again.
(1) Open a new image 600 x 450, 16 mil colours, transparent background.
(2) Create a new layer and load selection "fulldoorshape.sel"
Set your pattern fill to the one that came with the programme called "Finished wood". It is the darker one.
Using size 80 and angle 90, floodfill the area and keep selected.
(3) Go to Effects - blur - motion blur
We are going to apply this effect twice with two different settings.
For the first use angle 0 intensity 40 then click to apply
Go back to motion blur and change the angle to 90 and intensity to 25 and apply again.
Deselect.
(4) Staying on the same layer, load selection "darkerone.sel"
Go to colours - adjust brightness/contrast and use the settings
brightness - minus 12 and contrast - 0
(5) Staying on the same layer, load selection "darkertwo.sel"
Go to colours - adjust brightness/contrast and use the settings
brightness - minus 20 and contrast - 0
(6) Staying on the same layer, load selection "glasscutout.sel"
Hit the delete key or click on the scissors to remove this area.
Make sure you hit save here and then minimize this image and hide it at the bottom while we go on to work on the stained glass.
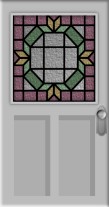
(7) Open the stained glass image from the zip. It is in two layers and what you have to do next is create a layer in the middle above the glass effect and below the black outline. I always colour in below the outline so I don't have to be perfect yet it doesn't show. Yo might also have a quicker way by clicking the black area and then filling so you can do it any way you are comfortable with. Your job now is to colour in the parts of the glass pattern you want coloured rather than clear. You can choose any colours you wish and you can colour in any parts you wish. If you look at mine, I used gold #A6946A, pale green #829E82, darker green #627C62 and pale burgundy #8E6877.
(8) Now that your window is almost ready, you have to make a decision whether you want it to be solid or partially transparent so you can see through it. It doesn't make much difference for this picture but it might if you want to save this door and use it for other pictures you make. If you want it partially see through, then merge the grey layer and the coloured layer before going on. Apply the texture by going to effects - texture - texture and I used image #10 called "cracked cement.bmp". Adjust the bumpiness to your liking. When completed, lower the opacity of the coloured areas to 50 or less so you will be able to see through the glass then merge all your layers by "layers -merge visible". Copy this image and then you can hide it at the bottom.
(9) Reopen the main image and load selection "glasssection.sel"
Hold down the control and shift key while you hit the L key. This is the shortcut for pasting your copied stained glass window into a selection.
(10) Create a new layer and load selection "upperframing.sel"
Fill the area with the same wood and keeping it selected, apply the same two motion blurs as before ...
angle 0 intensity 40
angle 90 intensity 25
Go to the menu - selections - modify - contract by 6 and hit the delete key or the scissors.
Go to the menu- selections - select all then back and select "float"
Apply an inner bevel using these settings:
shape - quarter circle.......width 4.......smoothness 0
depth 3.......ambience minus30.......shininess 25
colour white.......angle 315.......intensity 50.......elevation 50
Deselect
(11) With your magic wand, click inside the frame and we will add a cutout effect for shading.
Go to effects -3D - cutout and apply the following settings.
horizontal and vertical of zero, opacity 86 and blur 12.5
(12) Make sure you save now and then we are going to hide this one at the bottom again while we go on to the doorknob. If you had no problems applying your glass to the door then close up your stained glass image and save it for another time or trash it at your discretion.
(13) Create a new image 100 by 100, 16mil colours, with a black background for ease of viewing.
Create a new layer and load selection "B-backknob.sel"
Set your foreground colour to #EDD995 and your background to #A98D39 and your fill to "linear gradient - foreground to background angle 153 repeats 0
((the darker gold should be on the bottom right and the lighter upper left))
Floodfill and keep selected.
Go to the menu - selections - modify - contract by 3
Go to colours - adjust brightness and change only the brightness setting to minus 30
Go back to menu - selections - modify - contract by 3
Go back to colours - adjust brightness and change only the brightness setting to plus 30.
Deselect
(14) Create a new layer and load selection "B-knob.sel"
Floodfill with the same gradient and then go to effects 3D - inner bevel and apply the following settings.....
shape - quarter circle .......width 6.......smoothness 10
depth 5.......ambience minus17.......shininess 13
colour white.......angle 122.......intensity 48.......elevation 36
Deselect
Add a drop shadow using H and V 1, opacity 44 and blur 4.9
Hide the black layer and merge the visible
Copy and then hide this image at the bottom
(15) Reopen the main image and create a new layer.
Paste your doorknob on this new layer. You can adjust it where you want it. On mine, I thought it was a little big, so I resized this layer ONLY, by 85% and then left it without the sharpening effect.
HINT OR TIP BEFORE PROCEEDING
If you want to keep this door only for future use, something I do all the time, then take a second now and duplicate your image. Working on the duplicate, make active the bottom layer with the full door size and then select it to have the marching ants surrounding it. Then go to the tool bar at the side and double click on the crop tool. A window will open and near the bottom is a little circle you can click on that says - surround the current selection. Then click okay and then apply the crop. This will crop off all the extra space right down to the edges of your door, keep it in all the layers and you can save it as a psp image now for using and modifying later.
(16) Back to our original image, we are now going to merge - visible all the door layers together.
We will finish off by adding a slight bevel or you can leave your door as is.
shape - quarter circle .......width 5.......smoothness 13
depth 3.......ambience 0.......shininess 0
colour white.......angle 222.......intensity 45.......elevation 35
(17) Create a new layer and send it to the bottom.
Load selection "brickshading.sel" and fill with #5C443F
(18) Create a new layer and load selection "brickwalls.sel"
Open up the brick image from the zip and set it as your pattern fill at size 50. Floodfill then deselect.
(19) Now we are going to deform the door.
Make your door the active layer and click on the deformation tool. When it appears, it will have several boxes outlining the shape. Look at the little image below for the numbers I will be referring to.
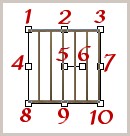
Click on box 7 and move it to the left to make the door about half its width.
Hold down the control key while you click on box 10 and bring it upwards. I looked at the angle between the door and the floor and it would be about 45 degrees. If it's been a while since you did math in school and you forgot some of those geometry lessons like I have, then think of it as dividing the bottom corner of your computer screen in half to make a thin pie shape.
At this point let go of the control key and go back and click on box 7 to make the door a bit thinner again. You can't explain this too well on paper, so eyeball it and good luck!
(20) If your door has moved, move it to the correct placement and when you are happy, duplicate this layer - mirror the image and you have your other door done to match. Adjust its placement if you have to as well.
You can stop now if you wish and carry on with your own image as decoration, or you can proceed and add a floor and wallpaper. The decision is yours and if you stop now, I hope you enjoy your open door welcoming scene as another way to make a room image.
(21) Create a layer at the bottom for your floor.
Using the selection tool set to rectangle, outline a shape the full width and about half way up the image.
Set your floodfill pattern to the one that came with the programme called "pine" size 40 angle 90 then floodfill the area.
Hit the deformation tool again and holding down the control key, click and move towards the centre either box 1 or box 3.
Hitting just box 2 move the top of the floor down towards the bottom a little.
If you need to again, hold down the control key while you move either box 1 or 3 but keep it so the floor is just hiding behind the door. Then apply your deformation.
Go to colours - colourize - hue 13 and saturation 28.
(22) Create a new layer for the wallpaper. Using the selection tool again, draw out an area so that it goes just over the edge of your flooring.
Set your floodfill pattern to "wrapped" size 20 angle 90 and floodfill but keep selected.
Adjust the brightness down to about -50 for darker paper or lighter to your discretion.
Create a new layer and with your paper area still selected, change the floodfill to angle 0 this time and fill. Adjust the brightness to the same level you did, then lower the opacity of this level down to 50.
By doing this your back layer shows through and gives you the geometric look.
WOW! You are finally finished. Sorry if this one was a bit longer than usual.
Remember you can fill the selection pieces with any colour you want to. It is totally your choice. Just have fun and enjoy practising your decorating skills.
Here are my two samples.
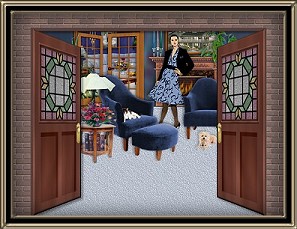

If you really want the true perspective of having the doors open inward, rather than the quickie I did above with having them open outwards, then just make the wall bigger. Then put your doorknob on the opposite side. See the tiny image below.
I did a few alternate doors to show you below from the same beginning steps you just did. Here are the samples and then I will explain below what I did.
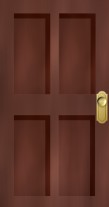
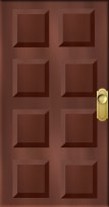
On the first one I just used a plain grey colour rather than a wood fill. I used the same doorknob but colourized it to 0,0 to make it silver.
On the second one, I made the whole door shape as well. On that one, I applied the same steps as the original up to the shading. Then I highlighted those two bottom areas and copied and then pasted them on the top of the door.
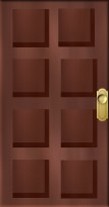
On the third one, I did the basic door then duplicated the layer to have a second copy of the plain door. I then did the bottom sections but then highlighted and copied only half the area. Then I went to my duplicate and pasted on 8 little shaded areas.
On the last one, I just took door three. Then I made a copy of the darkest shading, reversed it and made it lighter, and if you look at it the right way, it makes it feel as if the door has boxed areas standing out from the door as raised areas rather than recessed into the door.
Hope this helps you make some more of your own door shapes with a different feel to each one. If you want to copy my doors above or the one below and take them and use them, feel free to do so. Don't forget colourizing does wonders and gives you a whole set of doors for your collection. If you want to lighten them, you might have to adjust your contrast settings but you can play that by ear for your personal tastes. You can also see one last sample below. Can you figure out what I did here? I colourized it by going to "enhance photo" and using the colour "oak stn dk" in the "woods" section.
If you have any problems or need further explanations, please feel free to email me here
TUTORIAL PAGE ONE
TUTORIAL PAGE TWO
This tutorial was posted at the site of "P. Ann's Place" June 30, 2003 and written
by Pat Sherman.
All I ask is that you do not claim it as your own.
If you are in a group and want to use this as a lesson, please use the link freely and you do not have to write me to ask permission.
  
|
|