
I just love Christmas decorations. I have tried to continue with the theme of the fancy Christmas ornament and see if I could create
a realistic looking glass one. In all the time spent creating this, I will tell you before you start this tutorial, that it only appears
at its best on a black background. I don't want you to think that this will make a good tube or be suitable for any other coloured backgrounds. I am afraid this ornament needs the black.
What You Will Need to Start
...PSP 6 or 7 (this was done in 6)...
Visit JASC to download a free trial
...my zip file containing some of the images in psp format you will need...
...Blade Pro copper shimmer that you can download at Dee's site.
(or gold of your own)...
... good working knowledge of PSP will definitely help...
... if you did the Fancy Ball tutorial, that will help...
We will start by opening an image 300 wide by 400 high, 16 mil colours, 72 res., transparent background. Go to "save as" and give it a name. Save your work often and never take the chance of losing it all.
Create a new raster layer
called "black" and flood fill with black.
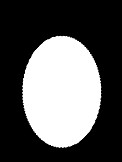
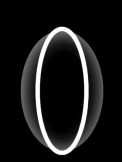
Create a new raster layer and name it "shape". Choose the shape tool and set it to ellipse - filled - antialias checked, vector checked. Choose white as your colour.
Starting at point 150 across and 225 down (check the left corner of the bar at the bottom of your screen), draw out the ellipse until it reaches approximately points 245, 362.
(If you are using PSP7, the ellipse shape is drawn in a different manner, so you will have to start at coordinates 50, 90 and drag to 248, 362. When you are doing the ellipses for the ribbons, remember
to adjust the PSP6 coordinates to yours for version 7)
If yours isn't exact don't worry. This is to give you the idea of the size mine was. Your ellipse will appear with the vector box around it. Go to Layers- convert to raster.
Go to the selection tool set to rectangle and draw a shape around your ellipse then click inside.
The marching ants will now surround the shape itself. Go to Selections - save to an alpha channel. This is the only one we will be doing, so when the
two windows pop up just click okay and you will be returned to your work area. Do NOT deselect yet.
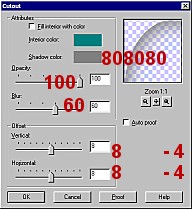
Create a new raster layer called "shading1". Go to Image - effects - cutout and apply using the settings below and the first set of vertical and horizontal numbers.
Then create a new raster layer (you should still have your marching ants) called "shading2" and apply another cutout effect this time using the second set of horizontal and vertical numbers. Deselect.
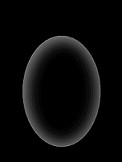
Before we go any further, make everything invisible except the layers "shading1" and "shading2" and merge these two layers. Rename it "glassglobe". You can delete the
shape layer and converted to raster layer and what you should have left are 3 - layer one, black and glassglobe.
We will now start preparing the ribbons.
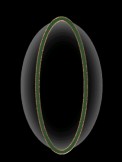
Create a new raster layer and call it "upribbon". Select the shape tool set to "ellipse, stroked, line width 10, antialias checked" and using white, start at points 150, 225 again draw your ellipse
down to approximately 206 and across to 365. Once again it doesn't have to be exact but you do have to make sure of one thing and this is a little difficult to explain. Make sure at the bottom of your ellipse, the upper part of the line
falls just at or below the globe line. It just makes it easier to appear that the ribbon is going around the shape. Using the selection tool set to rectangle again, surround your ellipse and click inside to have the ants surround your ellipse.
At this point go to BladePro and apply the copper shimmer. Then go to Selections - modify - contract - 2. Then
floodfill with the colour green #2E502E or one of your choice. Deselect your ellipse
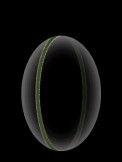
and now we need to cut it into two pieces.
Once again choose the selection tool set to rectangle, and very carefully, start from just above the top centre of the ribbon and come down and drag to the right to select half of the ribbon. Click inside
so the ants surround the right half of the ribbon ellipse. Go to "Selections - promote to a layer". Rename this new layer "upribbonback". We are now goingto move this layer down until it is just above the black layer and below the
glassglobe layer. Still on this layer, go to "Selections - load from an alpha channel" When the selection appears, go to "Selections - invert" then hit the delete key or the pair of scissors. This should remove any excess ribbon.
Keeping the selection active, change layers to the "upribbon" layer and hit delete there to remove any excess ribbons as well. Then deselect. Now return to the "upribbonback" layer and lower the opacity slider to 30%. Hopefully it know
looks as if your ribbon is circling the glassglobe and appearing fainter as you look at it through the glass.
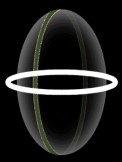
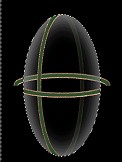
Create a new raster layer called "roundribbon" and move it to the top. Using the same settings for the ellipse as we did for the other ribbon, start at points 150,225 and drag out until it extends just beyond the globe and down a little but not too far.
Check my image above. Repeat the step above to add the copper shimmer and green colour to the ribbon. Now we have to cut this ribbon in half as well. Activate the selection tool set to rectangle and we will
try and select the top half of the ribbon. Click inside and then when it is surrounded, go to "Selections- promote to a layer". Call this new layer "roundribbonback". Move this new layer down the line until it is just above the black layer.
Return to the "roundribbon" layer. Go to "Selections - load from an alpha channel " then invert and delete the excess ribbon. Deselect at this point.
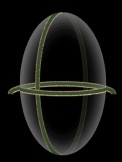

Return to the "roundribbonback" layer. We have to select it and move it down a little until the top of the back ribbon matches the top of the front ribbon.
Check the image above. When that is in place, go to "Selections- load from an alpha channel", then invert and delete the excess ribbon here. Deselect and lower the opacity level to 30%.
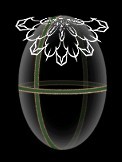
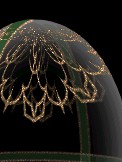
Create a new raster layer named "lacefront" and move it to the top. Open the zip image of lace I made, and then copy and paste it onto your image. Check the image above for an
approximate placement. Choose the selection tool set to rectangle, surround it, then click inside to activate the ants. Go to BladePro and apply the copper shimmer again. When that is completed, go
to "Selections - load from an alpha channel", invert and delete the excess lace. Duplicate this layer, rename it "laceback" and move it down the line again until it is below the glassglobe layer. Select your lace, and using the shift key and the right arrow key,
move your lace a little to the right and then use the down key to move it down a little. Then deselect and lower the opacity of this level to 30% as well. We have moved it slightly to also give the appearance of seeing just a touch
of it through the glass globe. Go back to the lacefront layer. Open the zipfile image of the ornament top and copy and paste it onto your image so the bottom of the ornament topper sits on the top of the glassglobe.
We are now going to create four new raster layers all at once. Create the first and call it "lowerstreamers".
Create another and call it "leaves". Create another and call it "upperstreamers". Create a fourth and call it "flowers".
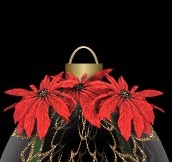
We are going to work in reverse order and start with the "flowers" layer. Open the zip file image of the poinsettia. Copy and then paste the first flower in the middle
of your globe. You will have to turn this one only just a little to make it more level. Then add a drop shadow. These settings will be used for all the rest of the decorations on the top. (except for the other two poinsettias which will
have a vertical horizontal of minus 4).
"Colour- black.... Opacity - 65....Blur- 7....Vertical and Horizontal 2". Paste another poinsettia on the right and just add a drop shadow (remember to change v. and h. to -4). Paste another poinsettia on the left, mirror it and then add its drop shadow. See the image above.
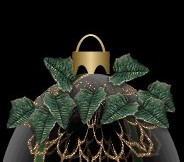
Activate the "leaves" layer. Open the zip image and decide which placements of leaves you like then copy and paste. I left the poinsettia layer visible so I could tell where I wanted to place my leaves. In the image above,
I hid the flowers so I could show you where my leaves ended up. When you have finished adding all the leaves you would like to, then apply the drop shadow. We will move on to the last decoration - the streamers.
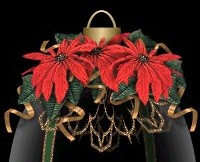
Open the zip image of the streamers. There are two sizes for you to add variety. They are examples from the tube Jasc provides with the programme but I colourized them to match the copper look. You can copy and paste some on the "lowerstreamers" layer so some are below the leaves and some
on the "upperstreamers" layer so they appear just below the flowers. You may add as many or few as you like. You can see my finished version above. Even though
they already have a drop shadow, add another to each layer of streamers.
We are nearing the end. Create a new raster layer and name it "angel". Move it down so it is just below the glassglobe layer. Use the eyedropper and
choose a colour from the streamer to draw a line. Start just under the flowers and draw a straight line to just about the centre ribbon. I used line width 2, antialias yes and the pencil with
settings - point to point. Open the zip image of the angel and copy and paste it onto your layer. You can paste it where you wish but you can check above for my placement. When you are finished, lower the opacity slider to 50%. At this point, I had to go
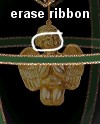
to the back ribbon layer and erase some of the ribbon that was showing through the angel's head. Check and see if you need to erase anything as well.
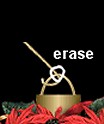
Create a new raster layer called "hook" and send it to the top. Open the zip file image of the hook and copy and paste it into position. Check above as well. Using the eraser tool set to 1, go in and erase part of the hook so it appears to be
behind the ring.
You should now have a finished glass ornament. Why not turn it into a Christmas card, a gift tag, part of a webset title or button ornament, or anything else you can think of. I will be turning mine into
a webset similar to the introductory page you saw and offering it for download on the Holidays page. If you would like to see it, click
HERE to take a peek.
I hope you have enjoyed creating this ornament as a companion piece to the other Christmas ball.
If you have any problems or need further explanations, please feel free to email me here
If you want another look at it in full size click below to go back to the Introductory page.
BACK TO INTRODUCTORY PAGE
MAIN TUTORIAL LIST
This tutorial was posted at the site of "P. Ann's Place" Dec. 2, 2001 and written
by P. Sherman.
All I ask is that you do not claim it as your own.
|
|