
Everyone seems to love collecting flower tubes and I guess I am no exception. I must admit that I don't garden and never have. Unfortunately I loathe the look of worms so maybe that's why I have never gone fishing either. I leave all the gardening to my husband and then praise him for his efforts and enjoy all his hard work. This is an outside room that you can decorate and so can I, since I have made sure there are no wigglies around my cybergreenhouse.
If you want to look at mine before you begin, it is at the end of the tutorial. Just make sure you have left enough time for it to download fully.
I place absolutely NO restrictions on the use of this tutorial or your finished image.
This tutorial was completed using PSP7 but can easily be done in PSP6.
What You Will Need:
Paint Shop Pro: download a trial version here
Zip of my image files: you can download it here
Zip of my selections: you can download it here
PLEASE save your work often!! I did it after every layer. It is better to be safe than sorry.
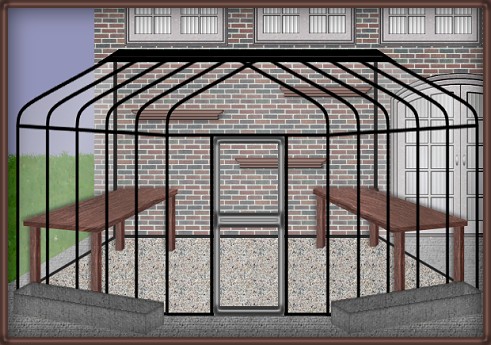
Open a new image 600 by 415, transparent, 16mil colours.
(1) Create a new layer called "sky" which you can return to at the end
(2) Create a new layer called "grass" which you can return to at the end
(3) Create a new layer and load selection "patio.sel"
set as your pattern fill the one that came with the programme called "cement" at size 50, angle 0, then floodfill
go to colours - colourize, set the two settings both to 0 which will give the grey look
(4) Create a new layer and load selection "housewall.sel"
set as your pattern fill the one that came with the programme called "brick2" at size 25, angle 0, then floodfill
(5) Create a new layer and load selection "curtains.sel"
floodfill with white (or your own choice)
go to effects - texture - blinds set to size 5, opacity 30, black with no boxes checked
please feel free here to do anything else you might like instead
(6) Create a new layer called "windows"
open the image from the zip called "partialwindow.psp"
copy then paste in your image over each of the three sets of curtains
I have never been able to figure out how to do this all at once with selections so this copy and paste I felt was the easiest.
(7) Create a new layer and load selection "housedoor.sel"
open the image from the zip called "partialhousedoor.psp"
copy and return to your image and then hold down the control key and the shift key while you press the letter L (this is the shortcut to paste a copied image into a selection)
(8) Create a new layer and load selection "rightglass.sel"
set your foreground colour to #A3A3A3 and your background colour to white; go to gradient - linear - angle 110 - repeats 1 (darker outsides and lighter to inside) and then floodfill
keep selected and go to Noise - add uniform - 3
lower the opacity of the layer to approximately 35 and at this point you might want to hide this layer to make it easier to carry on with the rest of the tutorial
(9) Create a new layer and load selection "leftglass.sel"
do the same thing as you just completed in step 8
(10) Create a new layer and load selection "floor.sel"
set as your fill pattern the one that came with the programme called "cemented", size 25, angle 0, and then floodfill
(11) Create a new layer and load selection "backattachment.sel"
floodfill with black
(12) On the same layer, or create a new layer,
load selection "bottomdiagonals.sel"
floodfill with black
(13) Create a new layer and call it "table legs"
This step will take a little longer because of the 8 legs and having to load up 8 different selections one at a time. Again, I have never been able to figure out that if I load the 4 front legs and then paste into a selection, I get one leg spread out over all the selections rather than one leg in each of the selections. So.. let's carry on.
Open the image from the zip called "tablelegs.psp". It has two layers with the larger front leg on one layer and the smaller back leg on the other layer. Make sure you are on the longer leg and then copy.
Return to the working image and load up selection "frontleg1.sel". Hold the control and shift key down while you press L. Load up selection "frontleg2.sel" and then control + shift + L again. Load up "frontleg3.sel", complete the same step, then load up "frontleg4.sel" and repeat again.
Return to the image of the two legs, change layers, and copy the smaller leg this time. Return to the working image and on the same layer, load up selection "backleg1.sel" then shift+control+L to paste the first smaller leg in place at the back. Do the same steps as you load up "backleg2.sel", "backleg3.sel", and finally "backleg4.sel".
(14) Create a new layer and load selection "underlefttable.sel"
set your pattern fill to the one that came with the programme called "finished wood", size 50, angle 340, floodfill then go to colours - adjust and change the brightness only to minus 30
(15) Create a new layer and load selection "leftworktable.sel"
floodfill with the exact same fill as step 14 and do not make any adjustments to the colour
(16) Create a new layer and load selection "underrighttable.sel"
keep the same pattern fill however, change the angle to 20, floodfill then go to colours - adjust and change the brightness only to minus 30
(17) Create a new layer and load selection "rightworktable.sel"
floodfill with the exact same fill as step 16 and do not make any adjustments to the colour
(18) If you want to add shelves to your greenhouse, create a layer now called "shelves", open the image from the zip and then copy and paste where ever you would like to put them. Their placement is a personal choice and it depends on how you want to decorate your greenhouse with the flowers.
(19) Create a new layer called "flowers" and this is where you would start placing your tubes.
(20) Create a new layer and load selection "frontglass.sel"
set your foreground colour to #A3A3A3 and your background colour to white; go to gradient - linear - angle 110 - repeats 1 (darker outsides and lighter to inside) and then floodfill
keep selected and go to Noise - add uniform - 3
lower the opacity of the layer to 20. I made this more transparent so the flowers would show through better. At this point you might want to hide this layer to make it easier to carry on with the rest of the tutorial as well
(21) Create a new layer and load selection "greenhouse.sel"
floodfill with black
(22) Create a new layer and load selection "door.sel"
floodfill with #A3A3A3 and apply the following inner bevel or one of your choice. The one following is one created by Mahogany which she offers but her site is off line right now for alterations and she has given me permission to use it. It is called "Mahogany's Framebevel2". You might have already downloaded this from her site so you would have all the settings already.
Bevel- the very last one that looks like a rectangle on top of a triangle)
width.....12
smoothness.....25
depth.....20
ambience.....0
shininess.....0
colour.....808080
angle.....0
intensity.....55
elevation.....90
(23) If you want to add the planterbox at the front, I have included it in the image zip. You can skip this step or you can create a new layer, copy and paste it in place and then I duplicated the layer, mirrored the image and that gave me the other planter box as well.
(24) One of the last steps now is to go back and add your sky and grass. You can either add a plain blue or use a sky image you might already have. For the grass, I just used the lawn tube. There really isn't a lot of room for sky and grass because the main objective here was the greenhouse.
(25) After I reached this step, and before I started decorating with the flower tubes, I had a quick look to see if I wanted to add any drop shadows. To be honest, and in my opinion, I really didn't think any were desperately needed, however I did add a couple just to see what they would be like. You don't need to do this unless you want to. I added shadows to 4 items. The settings are below. The first two numbers will represent the horizontal and vertical, the third number will represent the opacity and the fourth number will represent the blur. You will noticeI basically just changed the horizontal and vertical.
Table legs ..... minus2.....minus2.....60.....8
Left Table Top .....same as above
Right Table Top ..... minus2.....2.....60.....8
Shelves .....2.....2.....60.....8
You are finished (except for the decorating).
Have fun and I hope I have given you a fun way to use all those wonderful flower tubes we all collect.
Here is my sample.
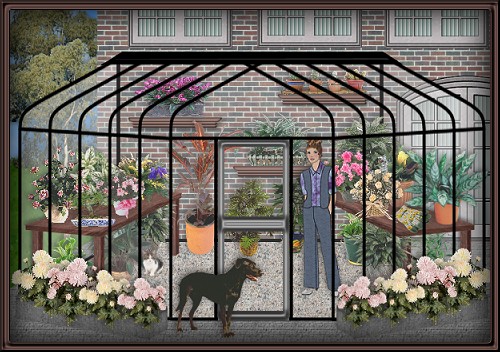
If you are interested in the lady I used in my image, she is one I drew using an old sewing pattern as a reference, and her head is from one I was preparing for another bride tutorial (sorry, not completed). She can be coloured or pattern filled any way you want to. She is on multi layers and you are more than welcome to download her and have some fun with her in your images as well.
Lady Download
I have been having a lot of fun designing these room images lately. I hope this can spur you on to making a room scene too.
If you have any problems or need further explanations, please feel free to email me here
TUTORIAL PAGE ONE
TUTORIAL PAGE TWO
This tutorial was posted at the site of "P. Ann's Place" February 22, 2003 and written
by Pat Sherman.
All I ask is that you do not claim it as your own. If you want to pass the link around to friends or group members feel free to do so without having to write and ask for permission.
  
|
|