
This tutorial was inspired by the beautiful Deco Ladies created by FlyByNight- D. J. Walker.
She has posted two tutorials of her designs that you can go and see by clicking on the links. Please try them out and I assure you, you will have
fun doing them.
The Deco Lady
The Deco Lady II
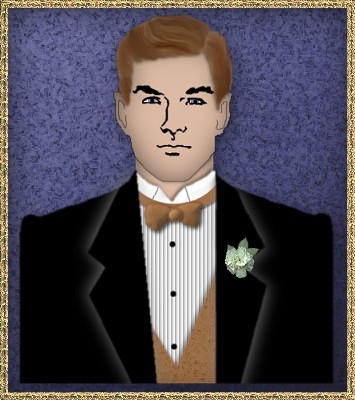
This tutorial will be a little different than the other lady tutorials since this is a man.
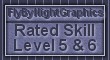
I also wanted to try and make this image to go along with "The Bride".
I can't draw from memory. If you asked me to draw a horse, I'd say "Forget it!"
If you gave me a picture of a horse and said, "Draw that horse", I could provide you with a pretty good reproduction of the horse in the picture.
I learned to do this for a lot of the things I had to prepare for my classroom while I was still teaching. Therefore, this gentleman is a good reproduction of
another of the copyright free clipart images from Dover. This is the same source where I got Elizabeth's face details.
I have provided you selections, and a hair and flower image.
In the zip file of extras, you will find things that I have made or prepared for you to use. Please feel free to use them
in any other project you do. I don't mind.
What you will get are:
carnation and leaves for his lapel
hair- this I painted and wore out my fingers smudging. The techniques are from a marvelous tutorial on
"painting Hair" that you can find here
I started this image large but
you can resize it to your own needs or liking at the end. I used a lot of layers.
Your image is yours to do with as you see fit - I place absolutely NO restrictions on what you do with him. Just have fun!
This tutorial was completed using PSP7 but can easily be done in PSP6.
What You Will Need:
Paint Shop Pro: download a trial version here
Zip of my selection files: you can download it here
Zip of all the extras mentioned above: you can download it here
Let Me Say Just Before We Begin
This tutorial is "screenshot free". I did each item on a separate layer.
I gave several layers a drop shadow and this time we are going to do them as we go along on each layer.
If you see the shortform "ff" - it stands for floodfill.
PLEASE save your work often!! I did it after every layer. It is better to be safe than sorry.
Open a new image 444 x 500, 16 mil colours, transparent background.
(a) Create a new layer and load selection "neck.sel"
ff with #DCBAA3 (or your choice) and keep selected.
(b) Create a new layer and call it "neckcutout"
Go to effects - 3D- cutout and use the following settings:
hor and vert..3.....opacity..50.....blur..30.....colour..black
(c) Create a new layer and load selection "head.sel"
ff with #DCBAA3 ( or any skin colour of your choosing); keep selected.
(d) Create a new layer and call it "headshadow"
Go to selections - invert and apply a drop shadow using the following settings:
hor and vert..6.....opacity..40.....blur..60.....colour..black
(I found the shadow worked better on the face than the cutout effect)
(e)Return to the head layer and apply a regular drop shadow (not inverted like the previous layer)using the following settings:
hor and vert..2.....opacity..30.....blur..6.....colour..black
(f) Create a new layer and call it "eyes"
(g) Create a new layer and load selection "facedetails.sel"
ff with black. At this point return to the eyes layer, and paint in the white, any colour you choose
for the iris, and then black for the pupil. I just used a brush size 1 and did one pixel at a time since it is
such a small area.
(h) Create a new layer, send it to the top, and load selection "shirtcollar.sel"
ff with white; then apply the pillow inner bevel with ambience +42. Apply a drop shadow with the following settings:
hor and vert..minus 1.....opacity..35.....blur..4.....colour..black
(i) Create a new layer and load selection "shirtfront.sel"
Ff with white; go to effects-texture-blinds and use these settings:
width..5.......opacity..30.......horizontal and light from left..not checked
(j) Create a new layer and load selection "bowtiepartone.sel"
ff with colour #9D724C. I used this colour to match the same colouring as I used for the bride's flowers, and also because
.....if you can keep a secret..... the next lady will be a bridesmaid in the same colours. Apply a drop shadow using the following settings:
hor and vert..2.....opacity..50.....blur..3.....colour..black
(k) Create a new layer and load selection "bowtiepartwo.sel"
ff with colour #9D724C; apply the pillow inner bevel with ambience +42; then apply a drop shadow with the following settings:
hor and vert..2.....opacity..80.....blur..8.....colour..black
(l) Create a new layer called "bowtieknot"
I did include a selection that you can just floodfill, but I think you can do this part yourself. Using #9D724C, paintbrush size 20, hardness 80, opacity and density 100, click once on the centre of the bowtie where the knot would be.
Apply the pillow inner bevel ambience raised to +42 again, then apply a drop shadow using the following settings:
hor and vert..1.....opacity..80.....blur..5.....colour..black
(m) Create a new layer and load selection "vest.sel"
ff using the same #9D724C; keep selected and choose spraypaint size 250, hardness 100, opacity and density 30, colour black, click once in the centre of the vest area.
Then apply a drop shadow using the following settings:
hor and vert..minus 2.....opacity..50.....blur..8.....colour..black
(n)Create a new layer and load selection "rightjacket.sel"
ff with black
(o) Create a new layer and load selection "leftjacket.sel"
ff with black
(p) Create a new layer and load selection "rightlapel.sel"
ff with black and apply a drop shadow using the following settings:
hor and vert..3.....opacity..80.....blur..30.....colour..grey #808080
(q) Create a new layer and load selection "leftlapel.sel"
ff with black and apply a drop shadow using the following settings:
hor and vert..minus 3.....opacity..80.....blur..30.....colour..grey #808080
(r) Create a new layer and load selection "buttons.sel"
ff with black
(s) Create a new layer and load selection "hair.sel"
Open up the hair psp image from the zip file. Copy this image then go to the groom image and
then go to edit - paste- into a selection. Then apply a drop shadow using the following settings:
hor...1.....vert..minus 1.....opacity..40.....blur..6.....colour..black
(t) Create a new layer and load selection "earcollarlines.sel"
ff with black; lower the opacity of the layer to 40% or lower. I didn't want the ears to be too prominent but they looked funny without anything there.
If your collar lines don't match up, just select them with the rectangular tool and move them into the right position.
(u) Create a new layer for his boutonniere. I included a small carnation in the zip file or you can add a rose or any other flower of your choosing.
My suggestion is to save this image, as is, in PSP format with all the layers intact. This will make it easier
if you wish to go back and colourize the layers to make a totally new look for the groom. You will notice that the bottoms do not perfectly line up. This can be corrected in the next step.
To carry on with him in this outfit, shift D to make a duplicate and close your original. Now you can
merge all the visible layers. What I did on mine at this point was to select an area at the bottom and cut off a section so the suit and shirt all lined up evenly. I also centred him more in the frame. You can make him into a tube now too.
Give him a nice backdrop and then you can resize him
and then frame him if you wish, either alone or put him in a frame with his bride to be. You know you are getting a sneak preview of the bridesmaid here. Like I said earlier, this is a secret between
you and me that she will be next.
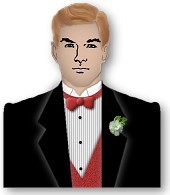
I hope you have enjoyed creating the groom for his big day. Make changes in patterns, decorations, etc. Enjoy your new creation as much as
I did. Below you will see another groom. I gave him a red outift and I took the same hair and went to colours... adjust brightness. I used +30 then adjusted the number a little higher
on the contrast side. You can have fun changing his looks too. Perhaps I should spend some time designing him a regular shirt and tie then you could
colourize his suit and turn him into a businessman or anybody for that matter who wears a suit. if I do that I'll make it into a "mini tut" with just the changes.
If you have any problems or need further explanations, please feel free to email me here
MAIN TUTORIAL LIST
This tutorial was posted at the site of "P. Ann's Place" June 4, 2002 and written
by Pat Sherman.
All I ask is that you do not claim it as your own.
|
|