
How silly does this sound - a Canadian sitting here looking out the window at the snow falling thinking of a Hacienda and trying to do it without finding any real pictures to compare to????? Well.... what you have is my version of what I remember after seeing travel shows and postcards from ages ago and a little help from three dear American friends who helped me with the way the roof should really look like. I just was in the mood for an outside "decorating challenge" this time rather than an inside room. Once again, I must credit my Hemera Photo Collections for giving me all the plants and things to decorate the scene. Those were my best purchases, after PSP of course.
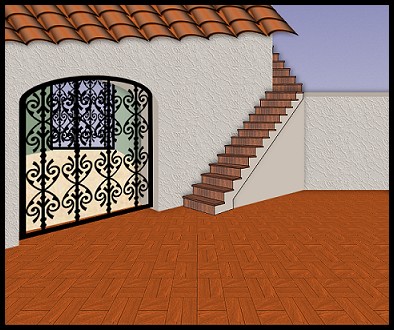
If you want to peek at my finished courtyard before you begin, it is at the end of the tutorial. Just make sure you have left enough time for it to download fully.
I place absolutely NO restrictions on the use of this tutorial or your finished image. I have included all the fills, stairs, gates, finished roof and the single tile if you want to make your own roof in the "images" zip file. All the things I made except for the wall texture and the patio texture which originally came from GRSites.
This tutorial was completed using PSP7 but can easily be done in PSP6.
What You Will Need:
Paint Shop Pro: download a trial version here
Zip of my image files: you can download it here
Zip of my selections: you can download it here
Free Filter by MuRa's Filter Meister called "prospective tiling" which you can download here
PLEASE save your work often!! I did it after every layer. It is better to be safe than sorry.
(1) Open a new image 600 x 500, 16 mil colours, transparent background.
(2) Create a new layer and load selection "sky.sel"
you can floodfill with your own favourite sky colour or image or
use linear gradient #9293BE and #C6C6D8, set to foreground,background, angle 180 and make sure the darker shade is at the top
finish off by going to effects - add noise - 3% uniform
(3) Create a new layer and call it "outside patio floor"
we will come back to this layer later
(4) Create a new layer and load selection "insidefloor.sel"
open the patterns fill and choose the one that came with the programme called "old paper" and fill at 100%
(5) Create a new layer and load selection "insiderightwall.sel"
floodfill with #A5B5A1 (or your own choice)
(6) Create a new layer and load selection "insideleftwall.sel"
floodfill with #899D83 (or your own choice)
(7) Create a new layer and call it "small gate"
open the smallgate psp image from the zip, copy it and then paste it between the two walls resting on the floor
at the end I wasn't sure if I wanted it there or not because it was hard seeing it through the larger gate you will be doing later
see what you think and you can always delete this layer if you feel you don't want the smaller back gate showing
(8) Create a new layer and load selection "walldarker.sel"
floodfill with colour #B6ABA0
(9) Create a new layer and load selection "upperstairs.sel"
open the upperstairs psp image from the zip and copy it
return to working image, hold down control and shift key and then press L
(this is the shortcut for pasting a copied image into a selection)
(10) Create a new layer and load selection "walllighter.sel"
Open the image from the zip called "walltexture.psp"
floodfill the area with the pattern set to size 60%
(11) Create a new layer and load selection "darkerhousewall.sel"
floodfill with #B6ABA0
(12) Create a new layer and load selection "lighterhousewall.sel"
using the same image from the zip called "walltexture.psp"
floodfill the area with the pattern set to size 60%
(13) Create a new layer and load selection "stairenclosure.sel"
floodfill with colour #CBC0B5
(14) Create a new layer and load selection "lowerstairs.sel"
open the lowerstairs psp image from the zip and copy it
return to working image, hold down control and shift key and then press L
(this is the shortcut for pasting a copied image into a selection)
(15) Create a new layer and call it "large gate"
open the "goodgate.psp" image from the zip, copy it
return to the working image and just paste it in place centring it in the rounded archway
(16) Create a new layer and load selection "roof.sel"
open the readymaderoof.psp image from the zip and copy it
return to working image, hold down control and shift key and then press L
(this is the shortcut for pasting a copied image into a selection)
At the end of the tutorial, I will explain how I did this if you want to make your own roof instead
(17) Go back and activate the layer we created in step 3 called outside patio floor
open up the image from the zip called patiofill.psp and set it as your pattern fill size 100
floodfill the layer and don't be alarmed when it looks ridiculous
go to effects - plugins - Mura Meister's prospective tiling
use the following settings
perspective..... 80
stretch..... 0
centre..... 0
height..... 45
offset x ..... 0
offset y ..... 0
crop ..... 100
crop opacity ..... 255
box underneath called crop by colour - NOT checked
apply the effect and watch your patio take shape
After I finished, I had a good look and I went back and added some drop shadows. You may prefer to omit them, but I will tell you what I did to my image. I used the colour black for all. The first number will stand for Vertical, the second number will stand for Horizontal, the third for Opacity and the fourth for Blur.
Step Eight - walldarker.sel
0 minus4 54 13.5
Step Nine - upperstairs.sel
0 4 35 9.9
Step Eleven - darkerhousewall.sel
minus4 minus4 57 25.9
Step Thirteen and Fourteen - stairenclosure.sel and lowerstairs
minus4 0 35 9.9
You are finished (except for the decorating).
I told you earlier, I would explain how I did the roof. In the zip file, I also included the "goodtile.psp" image. That is what I started with.
I created a new layer, copied the tile, then started pasting the image in a line across the length of the house. I did have blank spots underneath which I fixed at the end. Then I pasted a second row on top of the first and then a third row as well. I then created a new layer underneath. Picked a dark rust close to the tile colour and then started filling in the blank areas with the paint brush. Then I merged only the tile layer and the colour layer. Then I hit deformation and holding down the shift key, grabbed the square in the upper centre and moved the roof off to the left to achieve the angle I was looking for. You might have to grab the centre right box and widen the image so it covers the roof. I just played for a little while until it covered the area. Then I applied the deformation and added a drop shadow.
Remember you can fill the selection pieces any way you want to. It is totally your choice. Have fun and I hope I have given you an "outside room" to have fun decorating.
Here is my sample.
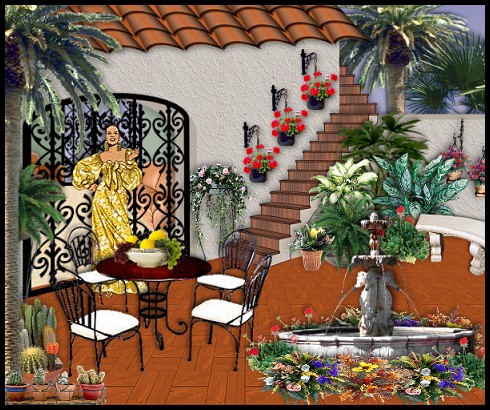
I have been having a lot of fun designing these room images lately. I hope this can spur you on to making a room scene too.
If you have any problems or need further explanations, please feel free to email me here
TUTORIAL PAGE ONE
TUTORIAL PAGE TWO
This tutorial was posted at the site of "P. Ann's Place" January 16, 2003 and written
by Pat Sherman.
All I ask is that you do not claim it as your own.
   
|
|