
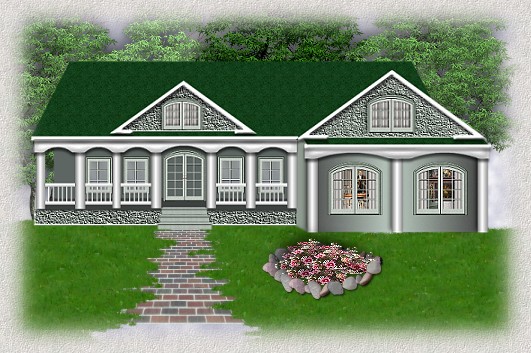
In my "Special Websets" section, I love doing tutorials and putting them in scenes or doing some of my own creations and using them. I love rooms and houses and constantly scour magazines and decorating websites for ideas that will spark my own creativity. This house was so inspired by one I saw while surfing "For Sale" sites. It is in the USA somewhere and I thought to myself, "I could be happy in that house if........" So I took the basic look and changed it by adding my "ifs" to make it more to my liking and something I would be happy to have as a secret hideaway to get away to and relax and forget the troubles of the world. You can do whatever you want with your hideaway results. I never place any restrictions or copyright technicalities on anything I do ever. Try changing colours, using siding or bricks for another different feel. If you look at the bottom, I have included a brick version and a blue version where I used a plain colour and added texture to make it appear hopefully like stucco. This will show you how the same house can appear so differently with just your choice of fills and colours.
What You Will Need to Start
...PSP 6 or 7 (this was done in 7)...
Visit JASC to download a free trial
...my zip file of the bladepro setting "cutout" that you can download here...
...my zip file of the house selections that you can download here...
...my zip file of the extra psp images that you can download here...
I want to give special thanks to Mardi from
Web Graphics on a Budget for being kind enough to grant me permission to include her setting in my zip download here. It is
called "cutout" and one I have used constantly and just love what it does. If you click
here, this leads you to her page to read about the cutout effect.
Thank you again, Mardi, for your generosity.
Start by unzipping and installing your bladepro "cutout" so it will be ready for use.
There are no screen shots here to make it easier to print out. If you are like me, when I see a tut I like, I print it out in case I can't find the site again, stick it in a binder and then I can do it whenever I get the chance.
[A] Create a new image 676 X 339, transparent, 16mil colours.
[B] Create a new layer - load selection "1-backroof.sel"
floodfill with the pattern provided with the programme called "scrubber" size 15, angle 0
[C] Create a new layer - load selection "2-dormersiding.sel"
floodfill with #919D92
go to Effects- texture - fine leather - default
(just in case your options are different than mine, use colour DCDCDC,
angle 30, blur 40, number of furrows 40,
length of furrows 4, transparency 250)
[D] Create a new layer - load selection "3-dormertrim.sel"
floodfill with white and keep selected
apply the bladepro "cutout" with height moved to +100 rather than -100
apply a drop shadow of V-5, H-0, Opacity 55, blur 5, colour black
[E] Create a new layer - load selection "4-frontright.sel"
set your two colours to 4C4D4C and BDCDC2
choose linear gradient - foreground to background - angle 90 repeat 1
**Make sure the darker colour is on the outsides**
floodfill then go to effects - noise - add 3% uniform
[F] Create a new layer - load selection "5-joiningside.sel"
floodfill with 919D92
[G] Create a new layer - load selection "6-lowerporchstone.sel"
floodfill 919D92
go to effects - texture - fine leather - default ( same as step C )
[H] Create a new layer - load selection "7-rightcolumns.sel"
floodfill with white then deselect
We are going to floodfill each with a gradient but if we do them all at the same time, the effect doesn't work properly.
set your two colours to white and grey #808080,
choose gradient, linear. foreground to background, angle 90 repeats 1
(just make sure the grey is on the outsides- invert if you have to)
using the selection tool set to rectangle, outline the first column, then click inside to have the ants surround just your column, fill with the gradient then deselect (control + D)
do the same thing to the next two columns filling each one individually
finish off with a drop shadow of H and V minus3, opacity 55, blur 10
[I] Create a new layer - load selection "8-rightpostroof.sel"
floodfill with white then apply an inner bevel using settings
shape- pie one, width 31, smoothness 100,
depth 50, ambience -46, shininess 0,
colour white, angle 0, intensity 49, elevation 90
finish with a drop shadow of H 5, V 0, Opacity 55, Blur 5, colour black
[J] Create a new layer - load selection "9-littlefrontroof.sel"
floodfill with the same pattern as the large roof - "scrubber" set to size 15
[K] Create a new layer - load selection "10-bigdormersiding.sel"
floodfill with #919D92 then apply the same texture- fine leather- default as in step C
[L] Create a new layer - load selection "11-bigdormertrim.sel"
floodfill with white, apply the bladepro setting "cutout" with height still at +100
apply drop shadow of H 5, V 0, Opacity 55, Blur 5
[M] Create a new layer - load selection "12-leftbackwall.sel"
floodfill with #5D6662
[N] Create a new layer and call it "left windows and door"
we will leave this blank right now but will return to it later
[O] Create a new layer - load selection "13-porchfloor.sel"
floodfill with #3D413F
[P] Create a new layer - load selection "14-railingspokes.sel"
floodfill with #C0C0C0
apply drop shadow of V and H minus1, opacity 43, blur 1.2
[Q] Create a new layer - load selection "15-upperlowerrailings.sel"
floodfill with white first then deselect
(we have to do these similar to our columns - each one individually)
choose linear gradient set to fg-bg, using colours white and C0C0C0, angle 0, repeats 0
select one railing at a time and fill with the gradient
finish off with a drop shadow of V and H minus1, opacity 50, blur 3.7
[R] Create a new layer - load selection "16-leftcolumns.sel"
return to step H and complete these columns the same as the other ones
when all columns have been completed, finish with a drop shadow of
V and H minus 3, opacity 55, blur 10
[S] Create a new layer - load selection "17-leftcolumnsupports.sel"
floodfill with white and same inner bevel as in step I for "rightpostroof"
[T] Create a new layer - load selection "18-lefteaves.sel"
floodfill with white, apply bladepro setting "cutout" +100
apply drop shadow of 5, 0, 55, 5, black
[U] Create a new layer - load selection "19-righteaves.sel"
floodfill with white, apply the bladepro setting "cutout" but move the height back to approximately +50
apply a drop shadow of 3, 0, 40, 5, black
[V] Create a new layer and call it "dormer windows"
open the 2 psp images included in the file of the smaller and larger dormer windows
copy and then paste the smaller window in the centre of the left dormer, and copy and paste the larger window in the centre of the right dormer
[W] Create a new layer and call it "right front windows"
Open the psp image included in the file called "rightfrontwindows.psp"
copy and then paste one window between the left and centre column, and then another between the centre and right column.
[X] Creat a new layer called "stairs"
open the steps.psp image, copy and paste between the 4th and 5th columns
[Y] Return and activate the layer we created earlier called "left windows and door"
open the two psp images included in the file of the small door and the small rectangular window
copy the door and then paste it in the centre of the 4th and 5th columns
copy the window and then paste two on either side of the door centring them between the columns the best you can
[Z] The last thing for you decide on yourself is how you want to put something behind your windows. Some tutorials I have seen, explain to create a new layer below the window you want to fill, then load up the selection again and fill it that way.
I am going to explain how I do it even though it sometimes takes a bit longer. On the two right front windows, for my display ones, I zoomed in and kept the windows in plain view up close. I set my eraser tool to approximately 4 or 5, then I activated the green layer below the window. I then erased following the inside shape of the window the green behind. When I did the upper right larger dormer window, I got it in good view, then activated the siding layer and erased it. Then, as well, I had to activate the roof layer and erase it too. I like doing it this way so I can decide what I want to place behind the window and if it is a small image, I can move it around on a new layer I create at the bottom, until I get what I think looks the best. This is just my personal choice so you can do your favourite window filling however you find it best for you.
The greatest suggestion I was ever given is one I constantly use. I save this as an original psp version with all its layers intact. Then I duplicate it, close the original, and play with the copy. The samples I have shown you below were created simply, by opening up the original again, copying and then playing around with the copy either by colourizing things or changing the fills on the different layers. Then you can merge and carry on. This way you only ever have to make the house once, yet you can achieve so many different looks by changing the original. I will continue passing that tip on as long as I can, since it is such a useful one.
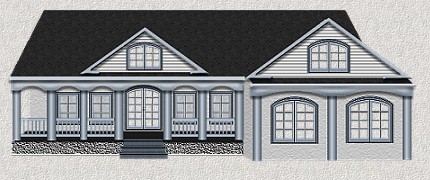
This first sample was done in pale blues and whites. I took the original, colourized all the columns and railings. Then instead of the green wall fills, I filled them plain cream and added the texturizer filter to make it look like stucco. I left the leather texture look for the bottom of the porch but for the dormers I floodfilled them and then applied the blinds texture.
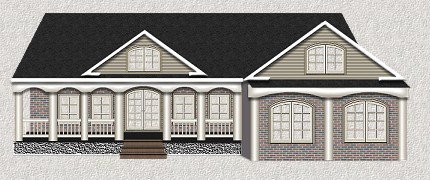
For this look, I changed the walls by floodfilling with the brick pattern that comes with the programme set to a low number. I forgot to write down what the setting was, so you can experiment with this one.
If you want another hot tip right from me this time, the images I used to fill the front windows came from the tiny pictures from some of my "Special Websets". I then made them even smaller. So if you are in need of a room scene, you have my permission to go scene hunting through the special websets section and taking the little images if you can make use of them. You can take the larger images too of course if you can use them. I never worry if you don't want the whole set.... but feel free to take parts of what you can use.
I hope you have been successful in completing your hideaway too. Enjoy yourself either by relaxing, reading on the porch, or getting a deck chair and sitting in the sun (fully protected with your sunblock, of course).
If you have any problems or need further explanations, please feel free to email me here
TUTORIALS PAGE TWO
TUTORIALS PAGE ONE
This tutorial was posted at the site of "P. Ann's Place" Jan. 4, 2003 and written by Pat Sherman.
All I ask is that you do not claim it as your own.
  
|
|