
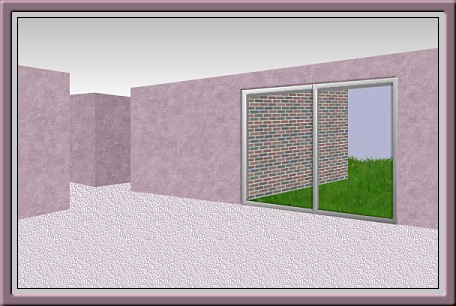
I was just experimenting again, as usual. I think I am running out of ideas so if you have any, send them to me if you want to see something that perhaps I can try and create. I won't promise but I love a challenge. This tutorial is pretty quick and easy. You can use different window views. When it's completed, then it is up to you to decorate. If you want to peek at my finished room sample before you begin, it is at the end of the tutorial. Just make sure you have left enough time for it to download fully. I did something a little different and have written out how I did it for you in case you want to give it a try too.
I place absolutely NO restrictions on the use of this tutorial or your finished image.
This tutorial was completed using PSP7 but can easily be done in PSP6.
What You Will Need:
Paint Shop Pro: download a trial version here
Zip of my image files: you can download it here
Zip of my selections: you can download it here
PLEASE save your work often!! I did it after every layer. It is better to be safe than sorry. You don't know how many times I still forget this and have to start all over again.
(1) Open a new image 560 x 360, 16 mil colours, transparent background.
(2) Create a new layer and name it "outside wall"
We will come back to this layer at the end.
(3) Create a new layer and load selection "ceiling.sel"
Set your foreground colour to white, the background colour to grey #C0C0C0 and choose linear gradient, angle 0, repeats 0, and fill the ceiling area.
(4) Create a new layer and load selection "carpet.sel"
open the carpetfill image from the zip and floodfill at 100 size angle 0.
(5) Create a new layer and load selection "backleftwall.sel"
floodfill the area with the wallpaper image I gave you in the zip at full size 100.
(6) Create a new layer and load selection "backrightwall.sel"
floodfill the area with the same wallpaper image then go to colours - adjust brightness. Darken the brightness to "minus 12" but leave the contrast at 0.
(7) Create a new layer and load selection "frontleftwall.sel"
floodfill the area with the same wallpaper image then go to colours - adjust brightness. Adjust the brightness to "plus 12" but leave the contrast at 0.
(8) Create a new layer and load selection "frontrightwall.sel"
floodfill with the same wallpaper, and adjust the brightness again using "plus 12" to lighten it.
(9) Create a new layer and load selection "doorshading.sel"
floodfill with the colour grey #808080
(10) Create a new layer and load selection "patiodoors.sel"
Set your foreground colour to grey #808080, the background colour to white and choose linear gradient, angle 329, repeats 0, and fill the door area.
Apply the inner bevel setting below
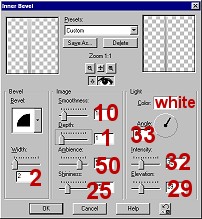
Apply a drop shadow using vertical and horizontal both at minus 2, opacity at 32 and blur 2.5
At this point, I also wanted to show that the patio area really was two doors. I set the paintbrush at 1, and using the grey, I zoomed in really close and painted a straight line of about 5 pixels long just down to the immediate left of where the centre post was at the very top. I did the same at the very bottom and this made it appear, to me at least, that I now had two separate doors. You can see it in the picture if you want to check it out.
(11) Now return to that first layer we made and make it the active one so we can now add that outside house wall.
Load selection "housewall.sel"
Set up your pattern fill to the brick one that came with the programme. Mine is called "Bricks2" and I used it very small at size 20. Floodfill the area then deselect.
Click on the deformation tool so we can now shape it.
Click on the square on the far right in the centre and drag your house in towards the centre of the patio doors. I brought it more than half way in but not all the way to the centre division.
This time, hold down the control key as you click on the far right bottom square and drag it upwards. Both top and bottom will move closer together at the same time. When you have a nice angle then stop.
This time hold down the shift key and click on the square in the far right upper corner and drag it upwards until it goes just above the patio door and you no longer see any empty space. Then double click inside the area to apply your deformation.
(12) Now you can add a few layers below this and add your grass and sky and flowers or anything you want. Also have fun decorating inside the house as well.
WOW! You are finished.
Remember you can fill the selection pieces with any colour you want to. It is totally your choice. Just have fun and enjoy practising your decorating skills.
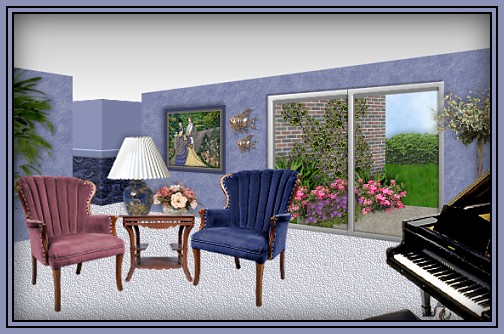
Here is my sample. A lot of the images are from my Hemera CD photo collection. You may have noticed that in the zip I have included my dark blue patterned wallpaper (one that I created also and the other walls are the pink one you used colourized to match) and I have also given you a treat with my favourite chair ready for colouring the way I do it. It is in two layers. Always work on a duplicate and keep the original for any future decorating needs. I never wanted to colourize too much because the wood always went funny, so I duplicated the image, rubbed out the wood parts on the second layer, colourize that fabric layer then merge at the end. I hope you can enjoy this chair as much as I do. I use it a lot in my room scenes for my special webset section.
I have received many questions about deforming and getting the right angles so it looks proper, so I thought I would explain how I did the two small back walls with the half wallpaper and wood border look. Please remember, that I do not profess to be an expert and there may be many ways better or quicker than the way I did it here. I am no expert in drawing or perspective either and so I will explain my way here because it might help the novice to do something different. I do this on other's tutorials that I have not created so I get it to look the right way as well.
I loaded up the backleftwall selection and filled it the same way as above. Then I created another layer below it. I discovered that the wall area I needed was 80 pixels wide and 126 pixels long. Then I created a new image that size and filled it blue. I did the half wallpaper on the bottom, and then I added a blue band across the middle which I added a bevel to so it looked like a piece of moulding. Then I copied it and pasted it on that layer below the tut wall. I lined up the top and bottom and the right side. Then I clicked on the deformation tool. I held down the shift key and lowered the top left so it matched up with the original tut wall. Then I held the shift key and clicked on the bottom left square and brought it up until it matched the bottom of the tut wall. Then when finished, I deleted the tut wall layer and was left with my new wall layer that I had just created. Because the backright wall is almost the same size, I just duplicated the layer, mirrored it and then moved it into place so the two walls lined up then I darkened it a little for shading.
If you want to try this on any wall and don't know the size, do the original, then draw a selection around it so it is the full width and the height of the side that isn't deformed to give it the perspective. Then copy that to another image and go from there. I hope I have been able to convey what I do clearly enough for you to understand. It is hard to write it all down and not miss anything out that I might take for granted because I do it so often. Please email me if you want to try this and are still having problems.
If you have any problems or need further explanations, please feel free to email me here
TUTORIAL PAGE ONE
TUTORIAL PAGE TWO
This tutorial was posted at the site of "P. Ann's Place" June 10, 2003 and written
by Pat Sherman.
All I ask is that you do not claim it as your own.
If you are in a group and want to use this as a lesson, please use the link freely and you do not have to write me to ask permission.
  
|
|