

I call this "Jade Room" because of its colour. Some call this jade and others think it may be a form of turquoise.
This tut isn't a very difficult one. I have included a colour chart this time to make it easier for switching colours. Keep it available on your work area, and when you need to switch colours, click on the right one with the eyedropper and it will set it for you. This way you dont have to keep typing in the numbers in the colour window. I have included the stairs, door and windows for you. I made the stairs in another programme I own called "Architectural Series 18" created by
Punch. I use it to make houses and decks and some room shapes. This is the same programme I used to make the house images I have offered for your use as well.
I place absolutely NO restrictions on the use of this tutorial or your finished image, except for reproducing the tutorial on your own site without permission or claiming it as your own.
This tutorial was completed using PSP7 but can easily be done in PSP6 or 8 I am sure.
What You Will Need:
Paint Shop Pro: download a trial version here
Zip of my image files: you can download it here
Zip of my selections: you can download it here
PLEASE save your work often!! I did it after every layer. It is better to be safe than sorry. You don't know how many times I still forget this and have to start all over again.
(1) Open a new image 625 x 385, 16 mil colours, transparent background.
(2) Create a new layer and call it "outside scenery".
This is where you can add the view you want to look at when the tutorial is almost complete. I have included the two images I have used in case you would like to use them too.
(3) Create a new layer and call it "carpet."
Load selection "carpet.sel"
Open the carpetfill image provided in the zip and floodfill at 100 size, angle 0.
(4) Create a new layer called "ceiling"
Load selection "ceiling.sel"
set your foreground to white and your background colour to #C0C0C0
set your fill to gradient #1- foreground to background, angle 0 repeats 0 and floodfill
(5) Create a new layer called "back left wall"
Load selection "backleftwall.sel"
Floodfill with #C0CDD0
(6) Create a new layer called "left window"
load selection "leftwindow.sel"
Open the window image provided in the zip and copy it by pressing the control key and C
Return to your room image and holding down both the control key and the shift key, press L to take the shortcut of pasting the window into the window selection.
Return to the layer below and remove the part of the wall necessary to have your scenery show through the window opening.
(7) Create a new layer called "far left side wall"
load selection "farleftsidewall.sel"
Floodfill with #A2B5BA
(8) Create a new layer called "backbackrightwall"
Load selection "backbackrightwall.sel"
Floodfill with #809AA0
(9) Create a new layer called "right window"
load selection "rightwindow.sel"
Your window image should still be available in memory so,
hold down both the control key and the shift key, press L to take the shortcut of pasting the window into the window selection.
Return to the layer below and remove the part of the wall necessary to have your scenery show through this window opening.
(10) Create a new layer called "door wall"
load selection "frontdoorwall.sel"
floodfill with colour #C0CDD0
(11) Create a new layer called "door"
Open the door image provided, copy and then paste it into place in the middle of the wall with the bottom resting beside the carpet.
(12) Create a new layer called "width curve"
load selection "widthcurve.sel"
floodfill with colour #668086
(13) Create a new layer called "curved centre wall"
(remember my Canadian spelling may be different than yours - centre, colour instead of center and color)
load selection "curvedcentrewall.sel"
floodfill with colour #809AA0
Staying on this same layer, load selection "curveddarkenarea.sel"
Adjust only the brightness to minus 25.
(14) Create a new layer called "rightsidewall"
load the selection "rightsidewall.sel"
Floodfill with #9CAFB4"
(15) Create a new layer called "rightfrontwall"
Before we go farther with this wall, it could be left out altogether if it makes it easier with your decorating. I just added it for extra interest.
Load selection "rightfrontwall.sel"
floodfill with #C0CDD0
(16) Create a new layer called "depthstaircurve"
load selection "depthstaircurve.sel"
Floodfill with #A2B5BA
(17) Create a new layer called "wall front of stairs"
Load selection "wallfrontofstairs.sel"
Floodfill with #C0CDD0
(18) Create a new layer called "upper back wall"
Load selection "upperbackwall.sel"
Floodfill with the beige colour #D0C8C0
(19) Create a new layer called "upper side wall"
Load selection "uppersidewall.sel"
Floodfill with #809AA0
(20) Create a new layer called "stairs"
Open the stairs image I provided and copy it.
Return to the room image and load selection "stairs.sel"
Holding down both the control and shift key, press the L to paste your stairs into the stairs selection.
(21) Return to the scenery layer and add either your own images or you can use the two I provided for you in the zip.
You are now finished the basics so I hope you have fun filling the space with furniture and decorations.
Remember, if you ever think you might decorate or use this room again, save the original with all the layers in psp format. Then duplicate it and work on decorating the copy. That way you can reopen the original and then make another duplicate and colourize or add wallpaper or change the windows and door etc. and have a totally different image to use in another creative moment. I do this all the time, and you will be surprised how handy this comes in when you don't have to do the complete tutorial over again.
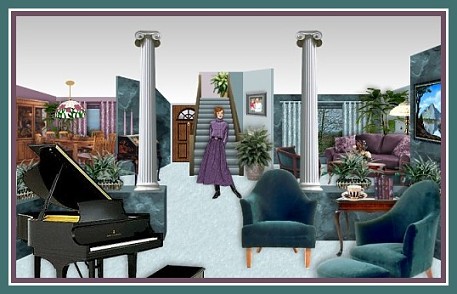
Here is a sample I worked on but I changed and added some wallpaper. I also created a little area with columns at the front. Remember, when you see a tut...think where it can lead you! Don't be afraid to change, rearrange or alter. Just let this be a beginning step to your own creativity and have FUN!
If you have any problems or need further explanations, please feel free to email me here
TUTORIAL PAGE ONE
TUTORIAL PAGE TWO
This tutorial was posted at the site of "P. Ann's Place" January 8, 2004 and written
by Pat Sherman.
All I ask is that you do not claim it as your own or post it on your site without permission.
If you are in a group and want to use this as a lesson, please use the link freely and you do not have to write me to ask permission.
  
|
|