
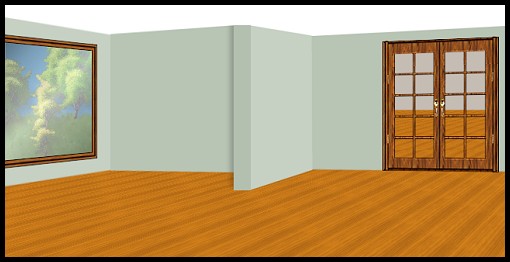
How many rooms would you like to decorate this time? Here are three and an outside view as an extra. This originally was going to be an apartment with a balcony so maybe that will be another one to follow??? I have just used a fill colour in the instructions and the wood pattern from the programme itself, but you can change anything as you go along. When you peek at mine, you will notice that when I went to decorate all my wood furniture didn't show up against the wood floor, so I carpeted instead. I also wallpapered. You can fill each wall with the same wallpaper then just adjust the brightness by about -10 to -15 for the darker walls. I have included my wallpaper sample for you in the zip file. This tut takes just 12 selections and some of those are removing areas so you can see through the door and out the window. Once again, I must credit my Hemera Photo Collections for giving me most of the plants and things to decorate the scene. Those were my best purchases, after PSP of course.
If you want to look at mine before you begin, it is at the end of the tutorial. Just make sure you have left enough time for it to download fully.
I place absolutely NO restrictions on the use of this tutorial or your finished image. I have included the door and window frame and wallpaper fill in the extras zip.
This tutorial was completed using PSP7 but can easily be done in PSP6.
What You Will Need:
Paint Shop Pro: download a trial version here
Zip of my image files: you can download it here
Zip of my selections: you can download it here
Free Filter by MuRa's Filter Meister called "prospective tiling" which you can download here
PLEASE save your work often!! I did it after every layer. It is better to be safe than sorry.
(1) Open a new image 645 x 325, 16 mil colours, transparent background.
(2) Create a new layer and call it "floor"
set as your pattern fill the one that came with the programme called "stained wood" at size 50 angle 110
floodfill the layer and don't be alarmed when it looks ridiculous
go to effects - plugins - Mura Meister's prospective tiling
use the following settings
perspective..... 80
stretch..... 0
centre..... 50
height..... 59
offset x ..... 0
offset y ..... 0
crop ..... 100
crop opacity ..... 255
box underneath called crop by colour - NOT checked
click OK to apply
(3) Create a new layer and load selection "1-tinyroomwall.sel"
floodfill with #C5BCB3
(4) Create a new layer and load selection "2-ceiling.sel"
floodfill with white
(5) Create a new layer and load selection "3-wall1.sel"
floodfill with #C6D1C3 (or your own choice)
(6) Create a new layer and load selection "4-wall2.sel"
floodfill with #B864B4 (or your own choice)
(7) Create a new layer and load selection "5-wall3.sel"
floodfill with #B864B4 (or your own choice)
(8) Create a new layer and load selection "6-wall4.sel"
floodfill with colour #C6D1C3
(9) Create a new layer and load selection "7-wall5.sel"
floodfill with colour #B3BFAF
(10) Create a new layer and load selection "8-door.sel"
open the door psp image from the zip and copy it
return to working image, hold down control and shift key and then press L
(this is the shortcut for pasting a copied image into a selection)
(11) Create a new layer and load selection "9-window.sel"
open the window psp image from the zip and copy it
return to working image, hold down control and shift key and then press L
(this is the shortcut for pasting a copied image into a selection)
(12) Go back and click on the layer where we did "wall 3" (where door is)
load selection "10-doorcutout.sel"
hit the scissors or your keyboard delete key
(13) Go back and click on the layer where we did "wall 1" (where window is)
load selection "11-windowcutout.sel"
hit the scissors or your keyboard delete key
keep the selection going but change active layers to the floor layer
hit the scissors or your keyboard delete key again
keep the selection going still while you create a new layer - where it is is fine and you don't have to worry about moving it
to make the glass effect, set your foreground colour to #A3A3A3 and your background colour to white
go to gradient- linear, angle 110 repeats 1 (darker should be on outside and lighter centre)
floodfill with the gradient then go to effects - noise - add 3% uniform
you can adjust the layer opacity to your liking as to how much you want to see through the window
(14) Create a new layer at the top and load selection "12-wallshadow.sel"
floodfill with black and lower the layer opacity to 50 or to your liking
You are finished (except for the decorating).
Remember you can fill the selection pieces any way you want to. It is totally your choice. Have fun and I hope I have given you another challenge on your road to becoming a cyberspace interior decorator.
Here is my sample.
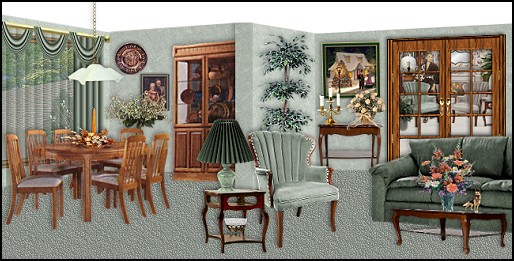
I want to give credit to two sites where I got the couch and
the dining room set tubes.
They are:
Graphic Reflections
and
Rosie's Graphics
I will also mention again, that if you want tiny premade rooms for that little section I gave you behind the french doors, check out my special websets section and take any of those you want. That's what I did in my sample image. I took the tiny image that I provide with each set and just made it smaller to fit just behind the door. Help yourself to any of those you want.
I have been having a lot of fun designing these room images lately. I hope this can spur you on to making a room scene too.
If you have any problems or need further explanations, please feel free to email me here
TUTORIAL PAGE ONE
TUTORIAL PAGE TWO
This tutorial was posted at the site of "P. Ann's Place" January 27, 2003 and written
by Pat Sherman.
All I ask is that you do not claim it as your own.
   
|
|