
Experimentations again will hopefully give you another setting to have fun with.
This tutorial is quick and pretty easy and takes 8 selections to prepare. There is one spot that is a little more tricky but shouldn't cause too many problems. You can use different windows but I included this one that I made in the zip. When it's completed, then it is up to you to decorate to your heart's content. If you want to peek at my finished room sample before you begin, DON'T, because it hasn't been done yet. I thought I would get the tut up for you to have fun with as quickly as possible and I'll do mine later as well.
I place absolutely NO restrictions on the use of this tutorial or your finished image.
This tutorial was completed using PSP7 but can easily be done in PSP6.
What You Will Need:
Paint Shop Pro: download a trial version here
Zip of my image files: you can download it here
Zip of my selections: you can download it here
PLEASE save your work often!! I did it after every layer. It is better to be safe than sorry.
(1) Open a new image 600 x 375, 16 mil colours, transparent background.
(2) Create a new layer and load selection "1-carpet.sel"
open the carpetfill image from the zip
floodfill at 100 size
(3) Create a new layer and load selection "2-ceiling.sel"
open the ceilingfill image from the zip and floodfill at 100 size.
(4) Create a new layer and load selection "3-otherroom.sel"
floodfill with colour #95978E
(5) Create a new layer and load selection "4-depthwallcutout.sel"
open the walltile from the zip and set the size to 50
floodfill and then go to colours -adjust brightness and change only the first number to "minus 50".
(6) Create a new layer and load selection "5-cutoutwall.sel"
with the wall fill still set at 50 size, fill this selection
adjust the brightness on this section to "minus 30"
(7) Create a new layer and load selection "6-thirdwall.sel"
with the wall fill still set at 50 size, fill this selection
adjust the brightness on this section to "minus 18"
(8) Create a new layer called "first wall shadow" and this is where the tricky part comes in. I am NO expert and I fiddled and fiddled and couldn't get a shadow on the wall just the way I wanted it to look so it added some look of depth. I tried a drop shadow, and a cutout and neither looked suitable. So here is what I compromised with and hope you can follow.....
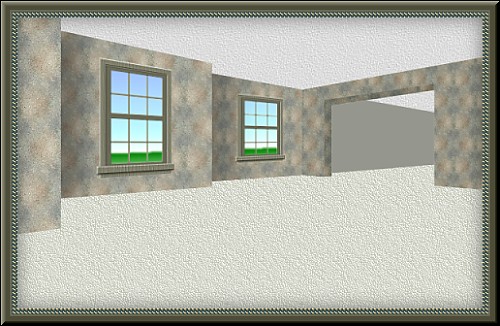
Here are the four images I hope will let you "see" what I am "trying" to explain.
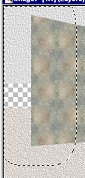
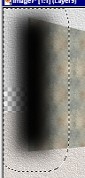
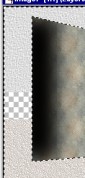
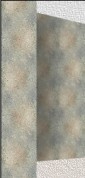
Set the selection tool to rectangle with a feather of 30. Draw a box around the left end of the wall starting at the edge and going about one quarter down the wall. Remember it will feather out bigger as soon as you finish choosing the area. Picture one above shows you how the area enlarges with the feathering. Set you colour to black and floodfill the area. Picture two will show you the filled look. Deselect the area and go back and load up selection "6-thirdwall.sel" Go to selections - invert and then hit the delete key or the scissors. This will remove all the black that extends beyond the wall itself. Now for the final step, lower the opacity on your layer to approximately 28. That is what it looks like in the final picture with the wall added that you are going to do next. Well, I hope that wasn't too hard!!
(9) Create a new layer and load selection "7-secondwall.sel"
change the wallfill size to 75 now to make it larger and so the wall appears closer to you. Floodfill. Change the brightness on this layer to "minus 10".
(10) Create a new layer called "second wall shadow".
You are going to do exactly the same shadow effect on this wall that you just did on the previous wall. Draw a rectangle around the area, floodfill with black, deselect, load up selection "7-secondwall.sel" this time, invert and then delete. Lower the opacity on this level to approximately 38.
(11) Create a new layer and load selection "8-firstwall.sel"
floodfill with the wall tile set this time to its full size 100 and there will be no changes to the brightness.
(12) Create a new layer called "window left".
Open the larger sized window from the zip file and then copy it and paste it on your new layer. Move it into place in the middle of the wall. Click on the deformation tool. You are going to make two adjustments to the left of the window. Hold down the shift key and move your cursor over and grab the uppermost left corner square. Move it very slowly upwards until the line of your upper window is following the same line as the top of the wall. Then, hold the shift key. grab the bottom lower left corner square and move it down so the bottom of the bottom of the window follows the same line as the bottom of the wall. Then double click inside to apply the deformation.
(13) To remove the wall for the outside sun to shine through, using the magic wand, click on an area away from the window. Then go to selections invert. This should get the marching ants around the outside of your window shape only. Go to selections - modify and then decrease by 7. Keep this selection active, and click on the carpet layer to make it active. Then hit the delete or scissors key to remove any carpet that might be behind the window. Click and make active the ceiling layer and do the same thing - hit delete or scissors. Finally activate the second wall layer where the window is, and hit delete or scissors to remove the wall. Now you can add any image behind on a separate layer later.
(14) Create a new layer at the top called "window right".
Open the smaller window from the zip file and follw the same steps you just did for the other window - deform, highlight, modify by 5 this time, activate some of the other layers to remove sections.
WOW! You are finished.
Remember you can fill the selection pieces with any colour or pattern you want to. It is totally your choice. Just remember that it should be something that you can use at three different sizes to give your room a look of depth. I experimented with a lot of patterns and some just look plain "lousy" so you might have to play too. Have fun and I hope I have given you another room alternative to have fun decorating.
If you have any problems or need further explanations, please feel free to email me here
TUTORIAL PAGE ONE
TUTORIAL PAGE TWO
This tutorial was posted at the site of "P. Ann's Place" March 29, 2003 and written
by Pat Sherman.
All I ask is that you do not claim it as your own. You do not have to write and ask me for permission to post a link to it with any groups you belong to. You are more than welcome to post a link anytime.
 
|
|