
This tutorial was inspired by the beautiful Deco Ladies created by FlyByNight- D. J. Walker.
She has posted two tutorials of her designs that you can go and see by clicking on the links. Please try them out and I assure you, you will have
fun doing them.
The Deco Lady
The Deco Lady II
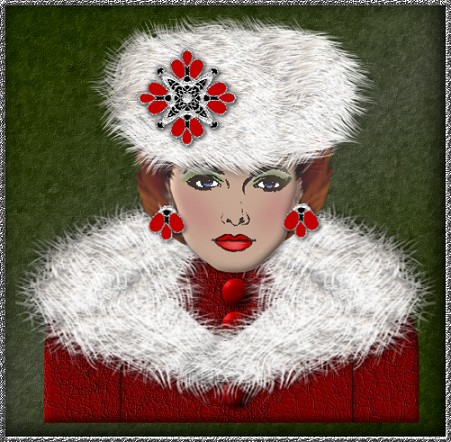
When I created "Samantha", she reminded me immediately of the red, white and blue of my American neighbours' flag. Patricia was created with
the red and white colours of my Canadian flag in mind and is dressed appropriately for our colder winters. I vowed to myself that I would never use my name in
creating any of the ladies, but when I had her finished, the coat changed my mind. I used to have a brown coat with a big faux fur collar just like the one I created.
I used to love to pull it up close and snuggle into it when I had to go out on those cold and blowy winter days and do yard duty at school.
The hardest part in completing this figure is the numerous steps it takes to get the fur just right. I did both the hat and one side of the collar on separate psp images before I started
the main image. You will need Eyecandy 4000 for this because the most important part is being able to change the direction of the fur. I have made a copy of the preset you will need to create the fur with my settings.
When you unzip it from the extras file, find your Eyecandy folder, then the settings folder, then the fur folder, and move it into there. It will show up as "PATSHATFUR". Also in the zip, you will get hair samples,
the psp images for the hat and collar, button if needed and a silver ding I made for the hat.
Your image is yours to do with as you see fit - I place absolutely NO restrictions on what you do with her. Just have fun!
This tutorial was completed using PSP7 but can easily be done in PSP6.
What You Will Need:
Paint Shop Pro: download a trial version here
EyeCandy 4000: download a trial version here
Zip of my selection files: you can download it here
Zip of all the extras mentioned above: you can download it here
Let Me Say Just Before We Begin
This tutorial is "screenshot free". I did each item on a separate layer.
I gave several layers (except the face details ) a drop shadow. We will do them all at the end.
If you see the shortform "ff" - it stands for floodfill.
PLEASE save your work often!! I did it after every layer. It is better to be safe than sorry.
The Hat
(1) Open the psp image from the zip with the hat shape. I always do "shift" and "D" to duplicate the image and I save the original in case I
"goof up" which I sometimes do.
(2) Make sure your active layer is the one with the grey shape rather than the black background I put there for ease of viewing. Do not select the image but go to
Effects - Eyecandy 4000 - fur - then look for the preset in the drop down window called "PATSHATFUR". The only one of these settings that will ever change is the "Direction".
For the first application of the fur, make the direction 56 then apply.
(3) Immediately go back to Eyecandy fur and change only the direction to 333 then apply.
(4) You are going to repeat this step of applying the fur 5 more times. I will list all of the remaining 5 settings here now.
application 3 - direction 222
application 4 - direction 132
application 5 - direction 335
application 6 - direction 215
last application - direction 350
(5) I was happy with the look at this point and stopped. If you feel you want to make more applications of the fur for a different
look, do so now and just keep changing the direction only. Then "save" and close until you are ready for it later.
The Collar
(1) Open the psp image of the collar from the zip, duplicate, then close the original. The collar is done in the exact same
manner as the hat. The only thing is, you will need to do the fur application more times than the hat. Once again do not select the shape but go right
to Eyecandy 4000 fur and get ready once again. It took me 19 applications to get this look. I will list only the directions you have to change for each application. Remember, nothing else is changed.
application 1 - direction 56
application 2 - direction 333
application 3 - direction 222
application 4 - direction 132
application 5 - direction 335
application 6 - direction 215
application 7 - direction 350
application 8 - direction 306
application 9 - direction 245
application 10- direction 166
application 11- direction 98
application 12- direction 43
application 13- direction 13
application 14- direction 344
application 15- direction 295
application 16- direction 295 again
application 17- direction 288
application 18- direction 104
application 19- direction 273
(2) I was happy with the look at this point and stopped. If you feel you want to make more applications of the fur for a different
look, do so now and just keep changing the direction only. Then "save" and close until you are ready for it later.
The Main "Patricia" Image
(1) Open a new image 550 by 550, 16mil colours, transparent.
(2) Add a new layer and floodfill it with a dark colour for
ease of viewing.
(3) Create a new layer and load selection "coat.sel"
ff - #800000; apply the effects - "fine leather" and use the preset "Custom 2"
If your settings are not the same as mine, the settings are:
colour #595959
angle: 46
blur: 37
number of furrows: 25
length of furrows: 9
transparency: 225
Then apply the inner bevel "pillow" and raise ambience to +46
(4) We are going to create a few new layers here all at once and then return to them later.
We need to get the head in place first, so we can arrange some of the other features around it.
Create a new layer called "buttons"
Create a new layer called "left collar"
Create a new layer called "right collar"
Create a new layer called "back hair"
Create a new layer called "ears"
Cretae a new layer called "ear details"
(5) Create a new layer and load selection "head.sel"
ff - #DCBAA3; apply the pillow inner bevel and raise ambience to +32
(6) Return to the "left collar" layer and also open your psp image of the collar now all nice and furry.
Copy and then go the main image and paste. At this point, I used the deformation tool and changed the shape
so it was shorter and a bit wider and just looked like it should as if going around her coat and behind the head. You can check my image
or you can make it look like you want the collar to look. Before leaving this layer, go to image - copy.
(7) Return to the "right collar" layer and paste the left collar you just copied. Go to image - mirror - then slide it into the right position to match
up with the left collar.
(8) Return to the "button" layer.
I used the selection tool set to circle, antialias, then went back to the coat layer and drew out a small circle. I then copied and
pasted as a new image. I played around with the inner bevel settings until it looked like a button. You can use any button here, you can make one yourself,
or I did enclose mine in the zip file. Paste the buttons so they go down the centre of the coat.
At this point I also drew two black lines to give the appearance of where the sleeves would be.
(9) Return to the "back hair" layer and load selection "backhair.sel".
Open the back hair image from the zip file; copy; return to the working image and then paste - into a selection.
(10) Return to the ears layer and load selection "ears.sel"
ff - #DCBAA3; apply pillow inner bevel and leave the ambience at +32.
(11) Return to the ears detail layer and load selection "eardetails.sel"
I found the best way to do this small area was with the spray can set to black. Then lower the opacity of the layer to 25.
(12) Create a new layer and call it "lips"
Create a new layer and call it "blush"
Create a new layer and call it "shadow1"
Create a new layer and call it "shadow2"
Create a new layer and call it "eyes"
(13) Create a new layer and load selection "facedetails.sel"
Flood fill with black, Make sure you enlarge and use the paintbucket. Avoid the spray can because it makes it much darker than it should be.
(14) Return to the lips layer.
using paintbrush size 3, hardness 10 opacity 80, paint colour #C00000 colour in the lips.
Lighten to colour #FF9B9B, change the opacity to 20, colour in a highlight on the lower lip. In any of
the settings, I have only mentioned the numbers I have changed rather than all the values.
(15) Return to the blush layer.
Using #BE7A7A, paintbrush 10, hardness 50, opacity 80, paint on the blush. I applied a gaussian blur of 9.00 then did it again. I also lowered the layer
opacity until I was pleased with the look. To get rid of excess blush, load the head selection again, invert, hit scissors and this will remove what has blurred beyond the face.
(16) Return to the shadow1 layer.
Using #769563, paintbrush size 4, hardness 80, opacity 100 paint on the first colour on the lid just above the eye. Apply a gaussian blur of 2.00
Don't go right to the eyebrow. If it goes in the eye area, don't be concerned because it will be covered when you add the white. Lower the layer opacity to what pleases you. I moved this one to 70.
(17) Return to the shadow2 layer.
Using #D9E3D3, paintbrush size down to 2, paint in uppershadow line; apply gaussian blur of 2.00; then lower layer opacity to your liking. I used 65.
(18) Return to the eyes layer.
Paint in the white area. Using #7D7EB7, paint in the iris. Return to the face details layer and using white add 1 drop of
white to each pupil to act as a highlight.
(19) Create a new layer and load selection "fronthair.sel"
Open up the psp hair image; copy; return to working screen and then edit - paste - into a selection.
(20) Create a new layer called "hat".
Open up your fur hat image, copy and then return to the main image and paste as a new selection. Move it into place. I had the bottom of the fur just slightly cover
the eye area and then make sure it is centred on the head.
(21) Open the psp image from the zip with the silver ding for the hat.
I created a layer below the ding then coloured in the loops part with red and the centre part with black. I worked on it just like I do the face details from below using a paintbrush about size 4 or 5. This ding is larger
than the way you will use it. It is easier to paint it larger, then I reduced the image when I placed it on the hat. Remember to merge the 2 visible ding and colour layers before copying and pasting onto the hat.
When I was finished painting, I chose the lasso tool, freehand and encircled part of the loops and a little bit into the shape.
Then I copied and pasted as a new image to create the earrings.
(22) Create a new layer and paste the earrings in place.
(23) Create a new layer and paste the ding on the hat. Use the deformation tool to resize to what you are happy with, then sharpen.
(24) Now is the time to go and apply the drop shadows. I did not apply a shadow to every layer because some just didn't look right. At this
point I also floodfilled my bottom dark layer to something lighter to make sure I could see the shadow and was pleased with it. These are the settings I have used.
If you would like to alter them as we go, please feel free to do so. Remember, this is YOUR image.
I will list the numbers only. The first two stand for horizontal and vertical. The third is the opacity level and the fourth is the blur. The colour is black.
The layers and settings are:
buttons: 2, 2, 100, 12
both collars: 2, 2, 100, 12
earrings and hatpin: 2, 2, 60, 8
head: 0, 0, 100, 12
hat: 2, 2, 60, 12
You can decide whether you want to give any other layers a shadow.
My suggestion is to save this image, as is, in PSP format with all the layers intact. This will make it easier
if you wish to go back and colourize the layers to make a totally new look for Patricia.
To carry on with her in this outfit, shift D to make a duplicate and close your original. Now you can
merge all the visible layers. You can make her into a tube now too. Give her a nice backdrop and then you can resize her
and then frame her if you wish
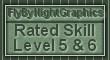
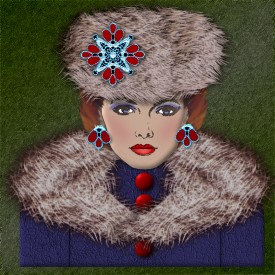
This is the Patricia image with the fur colourized to two new alternate looks. I used the variations filter then used darken and contrast adjustments.
I hope you have enjoyed creating Patricia. I know I have. Make changes in patterns, decorations, etc. Enjoy your new creation.
If you have any problems or need further explanations, please feel free to email me here
MAIN TUTORIAL LIST
TUTORIAL PAGE TWO
This tutorial was posted at the site of "P. Ann's Place" July 10, 2002 and written
by Pat Sherman.
All I ask is that you do not claim it as your own.
|
|