
I was just experimenting again trying to make some different room views for my
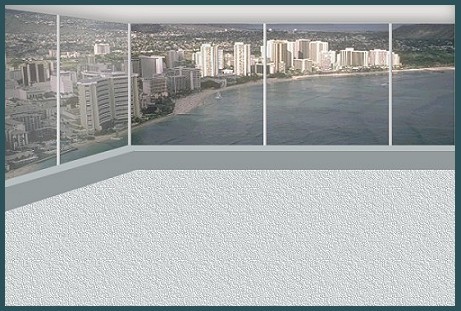
"Special Websets" images. This tutorial is quick and easy and takes 8 steps to prepare. You can use different window views but I included this one in the zip and it is a scene from Waikiki Hawaii from one of my purchased CD collections. When it's completed, then it is up to you to decorate to your heart's content. This one took longer to decorate because my husband was sitting there giving his suggestions while I was picking furniture so we had to come to a compromise on this one. If you want to peek at "our" finished room sample before you begin, it is at the end of the tutorial. Just make sure you have left enough time for it to download fully.
I place absolutely NO restrictions on the use of this tutorial or your finished image.
This tutorial was completed using PSP7 but can easily be done in PSP6.
What You Will Need:
Paint Shop Pro: download a trial version here
Zip of my image files: you can download it here
Zip of my selections: you can download it here
I want to give special thanks to Mardi from
Web Graphics on a Budget for being kind enough to grant me permission to include her Bladepro setting in my zip download here. It is
called "cutout" and one I have used constantly and just love what it does. If you click
here, this leads you to her page to read about the cutout effect.
Thank you again, Mardi, for your generosity.
I have recently discovered that if you use Super Bladepro, you can open this setting in your version, but then you have to resave it for your previews to show up. I use this setting constantly for titles and making easy bevels.
PLEASE save your work often!! I did it after every layer. It is better to be safe than sorry.
(1) Open a new image 600 x 400, 16 mil colours, transparent background.
(2) Create a new layer and load selection "windowscenery.sel"
open the hawaiiscenery jpg image from the zip
copy it, then hold down the control and shift key and then press L
(this is the shortcut for pasting a copied image into a selection)
(3) Create a new layer and load selection "carpet.sel"
open the carpetfill image from the zip and floodfill at 100 size angle 0.
(4) Create a new layer and load selection "windowdividers.sel"
floodfill with colour #C0C0C0
apply the cutout bladepro setting raised from minus100 to plus70
If you don't have BladePro just apply a simple inner bevel setting
(5) Create a new layer and load selection "ceiling.sel"
floodfill the area with colour #EFEEED and keep selected
(6) Create a new layer and go to effects -3D- cutout
apply the following Vert minus6, horizontal - 0, opacity 53, blur 26.3,
colour black and the square with filled colour NOT checked.
lower the opacity level of this whole layer to 66.
(7) Create a new layer and load selection "rightwindows.sel"
set your foreground colour to #A3A3A3 and your background colour to white
go to gradient- linear, angle 110 repeats 1 (darker should be on outside and lighter centre)
floodfill with the gradient then go to effects - noise - add 3% uniform
(8) Create a new layer and load selection "leftwindow.sel"
floodfill with the same gradient and follow the same steps as (7) above
****Take a minute here and have fun for a second by lowering the level opacity and seeing how much you want your Hawaiian scene to be visible through the windows. On my sample above, I set the opacity at level 25 for the right windows and 40 for the left windows just to show you what the difference was. You can decide personally what you like the best. Okay, fun's over - back to the last two steps...****
(9) Create a new layer and load selection "lighterductwork.sel"
floodfill with the colour #B9C0C1
(10) Create a new layer and load selection "darkerductwork.sel"
floodfill with colour #939B9D
WOW! You are finished already.
Remember you can fill the selection pieces with any colour you want to. It is totally your choice. Have fun and I hope I have given you another room alternative to have fun decorating.
Here is "our" sample. A lot of the images are from my Hemera CD photo collection. I just purchased their 50,000 Volume 1 and their 50,000 Volume 2 collections. That is where the living room furniture came from. Volume 2 is great because they are now including images with the backs of furniture which makes it great for room decorating. I would highly recommend either of these two CD collections. I used my original 25.000 image collection constantly.

I have been having a lot of fun designing these room images lately. I hope this can spur you on to making a room scene too.
If you have any problems or need further explanations, please feel free to email me here
TUTORIAL PAGE ONE
TUTORIAL PAGE TWO
This tutorial was posted at the site of "P. Ann's Place" January 10, 2003 and written
by Pat Sherman.
All I ask is that you do not claim it as your own.
  
|
|