This tutorial was inspired by the beautiful Deco Ladies created by FlyByNight- D. J. Walker.
She has posted two tutorials of her designs that you can go and see by clicking on the links. Please try them out and I assure you, you will have
fun doing them.
The Deco Lady
The Deco Lady II
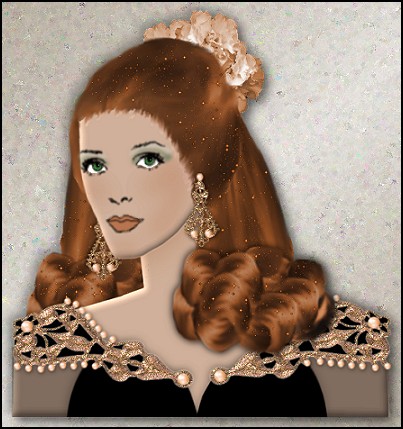
I have named this lady "Prom Date". As I was working on her, she just seemed to have a young enough looking face and then all dressed up, hair in sparkles, and I thought
she would look great going off to her prom. I really couldn't figure out a "regular" name for her so you can have the fun of naming her whatever you would like.
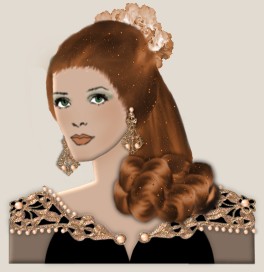
I also discovered that you might want to give her a slightly different look too. Below I have included another smaller image to show you what she looks like with just the hair
on the right side as if it was pulled over her shoulder. The left hair pieces have been left out here. Again, this is your image, you can do whatever you would like with her.
In the extras zip file you will receive all the hair pieces I did myself, two small pearl images, a psp outline image to make the earrings, a carnation flower and a sparkle tube prepared by
my good friend Mary Mac that she has allowed me to use here.
Your image is yours to do with as you see fit - I place absolutely NO restrictions on what you do with her. Just have fun!
This tutorial was completed using PSP7 but can easily be done in PSP6.
What You Will Need:
Paint Shop Pro: download a trial version here
Zip of my selection files: you can download it here
Zip of all the extras mentioned above: you can download it here
Blade pro preset called "copper shimmer" from Dee: download here
Let Me Say Just Before We Begin
This tutorial is "screenshot free". I did each item on a separate layer.
I gave several layers (except the face details ) a drop shadow. We will do them all at the end.
If you see the shortform "ff" - it stands for floodfill.
PLEASE save your work often!! I did it after every layer. It is better to be safe than sorry.
(1) Open a new image 550 x 590, 16 mil colours, transparent background.
(2) Add a new layer and floodfill it with a colour for
ease of viewing.
(3) Create a new layer and load selection "leftlonghair.sel"
Open the corresponding psp image from the zip; copy; return to the working image; edit - paste - into a selection.
(4) Create a new layer and load selection "leftcurls.sel"
Open the corresponding psp image from the zip; copy; return to the working image; edit - paste - into a selection.
(5) Create a new layer and load selection "neckshoulders.sel"
ff- #DCBAA3 or your chosen colour; apply the inner bevel "pillow" but raise the ambience to +38
(6) Create a new layer and load selection "sleeves.sel"
ff - black ; lower the layer opacity to 40.
(7) Create a new layer and load selection "heartdresstop.sel"
ff - black. It may look a little odd but parts are covered by the shoulders in the next step.
(8) Create a new layer and call it "black shoulders" and we will return to this in a minute.
(9) Create a new layer and load selection "metallicshoulders.sel"
ff - white; then apply the blade pro setting "d-coppershimmer"
(10) Return to the empty layer called "black shoulders"
using a small paint brush size 2 or 3, and the colour black, fill in the empty spaces under the metallic shoulders
so it looks as if the black material from the dress is underneath. If you would prefer to leave the metallic shoulders as if her
skin was showing through, omit this step and you might have to go back to the dress layer and erase a little of the black there as well.
The decision is totally yours as to how you would like her to look.
(11) Crate a new layer and call it "pearls"
Open the two pearl images from the zip. You can look at my placement in the image or do your own placement. I used the larger one twice, once near the
centre neckline and then near the outside shouder. I used the smaller image all around the outside of the shoulders following
the bumps that are there on the shoulder edges.
(12) Create a new layer and load selection "lefttophair.sel"
Open the corresponding psp image from the zip; copy; return to the working image; edit - paste - into a selection.
(13) Create a new layer and load selection "head.sel"
ff -#DCBAA3; apply pillow inner bevel and leave the ambience at +38.
(14) Create a new layer and call it "lips"
Create a new layer and call it "blush"
Create a new layer and call it "shadow1"
Create a new layer and call it "shadow2"
Create a new layer and call it "eyes"
(15) Create a new layer and load selection "facedetails.sel"
Flood fill with black, Make sure you enlarge and use the paintbucket. Avoid the spray can because it makes it much darker than it should be.
(16) Return to the lips layer.
using paintbrush size 3, hardness 10 opacity 80, paint colour #B87550 colour in the lips. Change to a lighter shade; lower paintbrush opacity to 20 and paint in a highlight on the lower lip. In any of
the settings, I have only mentioned the numbers I have changed rather than all the values.
(17) Return to the blush layer.
Using the same as the lips #B87550, paintbrush 10, hardness 50, opacity 80, paint on the blush. I applied a gaussian blur of 9.00 then did it again. I also lowered the layer
opacity until I was pleased with the look. To get rid of excess blush, load the head selection again, invert, hit scissors and this will remove what has blurred beyond the face.
(18) Return to the shadow1 layer.
Using #5E7A5E, paintbrush size 6, hardness 50, opacity 50 paint on the first colour on the lid just above the eye.
Don't go right to the eyebrow. Then apply a gaussian blur of 2.00. If it goes in the eye area, don't be concerned because it will be covered when you add the white. Lower the layer opacity to what pleases you.I used 70 on both.
(19) Return to the shadow2 layer.
Using #C4D2C4, paintbrush size down to 4, paint in uppershadow line; apply 2.00 gaussian blur; then lower layer opacity to your liking.
(20) Return to the eyes layer.
Paint in the white area then change to #478B47 and paint in the iris. Return to the face details layer and using white add 1 drop of
white to each pupil to act as a highlight.
(21) Create a new layer and load selection "rightlongstrand.sel"
Open up the psp corresponding image; copy; return to working screen and then edit - paste - into a selection.
(22) Create a new layer and load selection "rightcurls.sel"
Open up the psp corresponding image; copy; return to working screen and then edit - paste - into a selection.
(23) Create a new layer and name it flowers.
(24) Create a new layer and load selection "topfullhair.sel"
Open up the psp corresponding image; copy; return to working screen and then edit - paste - into a selection.
(25) Open up the psp carnation image, copy, return to the flower layer and paste 2 or 3 flowers in place behind the top of her hair.
(26) Create a new layer at the top for the sparkles. Using the tube you were given in the zip, at 75% size, you are going to add sparkles to the hair area.
There are several ways to do this. On this layer, you could load up each hair selection and then tube it and that way the sparkles will stay inside the marching ants area.
You could wing it like I did and then if any went outside the area, I went in with a big eraser and just rubbed them out.
When you have added all the sparkles you want, then go to colors = colorize and enter the first number as 18 and the second as 180. This gives
the sparkles a coppery look to match the hair colouring
(27) Minimize this window at the bottom and open the earringmold psp image from the zip. I just made this with dings and then duplicated and mirrored.
You can make your own if you want or use any others that you might already have. Activate it and then apply the same
d-coppershimmer blade pro setting as you did for the dress shoulders. Apply any pearls you want for decoration. Copy and then return to the working image.
(28) Create a new layer at the top and paste the right earring in place. Then create a new layer just below the head layer
and then paste the left earring in place.
(29) Now is the time to go and apply the drop shadows. I did not apply a shadow to every layer because some just didn't look right. At this
point I also floodfilled my bottom dark layer to something lighter to make sure I could see the shadow and was pleased with it. These are the settings I have used.
If you would like to alter them as we go, please feel free to do so. Remember, this is YOUR image.
I will list the numbers only. The first two stand for horizontal and vertical. The third is the opacity level and the fourth is the blur. The colour is black.
The layers and settings are:
heart dress: minus1, minus1, 34, 16
shoulders: minus1, minus1, 34, 16
pearls: 1, 1, 50, 10
curls: 2, 2, 60, 12 then repeat using minus 2
left earring: minus2, minus2, 60, 5
right earring: 2, 2, 60, 5
Head: This can be ignored and still looks good. I tried it this way in my image but the more I look at it, the more I think I
don't really like it. Do as you see fit....
Head: 0, 0, 50, 60, colour #A96B41
You can decide whether you want to give any other layers a shadow.
My suggestion is to save this image, as is, in PSP format with all the layers intact. This will make it easier
if you wish to go back and colourize the layers to make a totally new look for our young party goer.
To carry on with her in this outfit, shift D to make a duplicate and close your original. Now you can
merge all the visible layers. You can make her into a tube now too. Give her a nice backdrop and then you can resize her
and then frame her if you wish
I hope you have enjoyed creating "The Prom Date". Make changes in patterns, decorations, etc. Enjoy your new creation as much as
I did.
If you have any problems or need further explanations, please feel free to email me here
MAIN TUTORIAL LIST
This tutorial was posted at the site of "P. Ann's Place" June 30, 2002 and written
by Pat Sherman.
All I ask is that you do not claim it as your own.
|
|