
In the Snowglobe section I am offering globe bases and blank globes in a zip file for you to make your own snowglobes. Some of you will know
exactly what to do with them, yet others, I realize, might be just beginning and therefore I thought this tutorial might be of benefit to some of you.
This tutorial won't be like others because I have personally given up on the quest for the perfect transparent snowglobe and I now
do all of mine with a background and usually a frame. I much prefer the look of the globe this way and to me, it makes the effort more worthwhile. If you
know the background of the page it is going on, then you can use that colour without a frame around it. If you are not sure of where it will eventually find a good home, then a
complimentary colour and frame is the way I go. So what follows are the instructions on how I personally make my globes. The screenshots
have all been made using PSP6 but the tutorial works the same if you are using PSP7. My screen images will appear a little differently
than what you are viewing in version 7.
What You Will Need to Start
... zip file containing this globe, my image, and a snow tube ...
...download by clicking HERE...
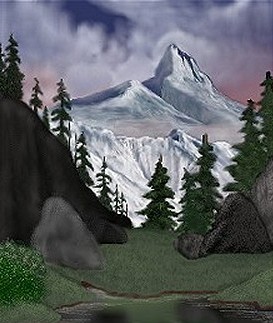
You can save this picture by right clicking on it and then "save as" but it is in the zip file. It is a picture I painted after following a tutorial for
a different painting. I said that would be my last but this one was definitely my second and last.
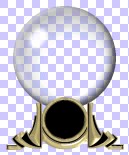
When you unzip the globe, you will get a PSP6.02 image on a transparent background. This is a smaller version of what it will look like. I checked and it will also
open in PSP7 with no problems. In order to keep this base for future use, hold down the shift key and press D to make a duplicate copy for your work now. Then you can close the original
and keep for future use. Before we start, it might be a good idea to go to File, and click on "Save as" and give it a name. Make sure you save it as a PSP file.
It is also wise to save your work often as we proceed through these instructions. Just click "File- Save", since you have already named it.
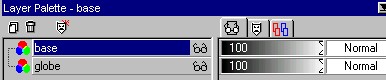
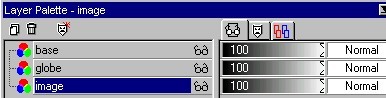
If you click on the little red and turquoise icon to open the layer palette, you will see that your image has two layers. Remember that the "active" layer or the
one where you are working, will always be the one highlighted in blue. (I will refer to blue since that is my colour scheme, but your computer might
be set to show something different.)
What we need to do is create a new raster layer. When the window opens, you can call it "image".
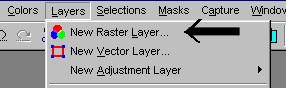
Now that it has been created, we are going to send it to the bottom because it will be where our image for inside the globe will be placed.
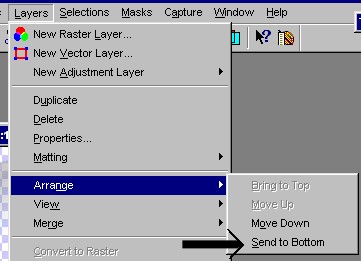
Your layer palette should now look like the image below.
We are now ready to start building our snowglobe.
PAGE TWO
MAIN TUTORIAL LIST
This tutorial was posted at the site of "P. Ann's Place" Oct.20,2001 and written
by P. Sherman.
All I ask is that you do not claim it as your own.
|
|