
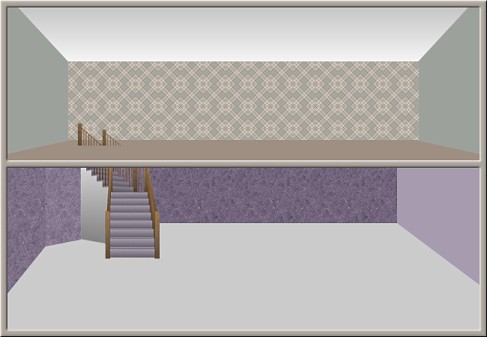
I guess this view is a very simple form of the dollhouse theme.
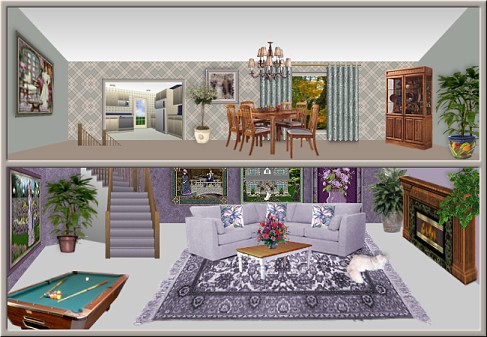
It is an upper and lower view of two rooms that you can transform into anything you desire. If you peek at my version below you will see I even went one step farther and opened the upper back wall and made another room just to show you another possibility.
I have included the two paper fills and feel free to use them again if you wish because they are two I created. I have also included the stairs.
The instructions are very simple and this should leave you lots of time to decorate your creations.
I place absolutely NO restrictions on the use of this tutorial or your finished image, except for reproducing the tutorial on your own site without permission or claiming it as your own.
This tutorial was completed using PSP7 but can easily be done in PSP6 or 8 I am sure.
What You Will Need:
Paint Shop Pro: download a trial version here
Zip of my image files: you can download it here
Zip of my selections: you can download it here
PLEASE save your work often!! I did it after every layer. It is better to be safe than sorry and you don't want to have to start all over again.
(1) Open a new image 650 x 450, 16 mil colours, transparent background.
(2) Create a new layer and load selection "lowerfloor.sel"
Floodfill with colour #CBCBCB.
(3) Create a new layer and load selection "lowerleftside1.sel"
Open the lower paper fill from the zip and set it as your fill at size 100 angle 0 then floodfill.
(4) Create a new layer and load selection "lowerleftside2.sel"
Floodfill with the same paperfill and then adjust the brightness to +10.
(5) Create a new layer and load selection "lowerright.sel"
Floodfill with colour #A69BAF.
(6) Create a new layer and load selection "lowerback.sel"
Floodfill with the same paperfill and then adjust the brightness to minus 15.
(7)Create a new layer and load selection "ceiling.sel"
Set your foreground to white and your background to #C0C0C0
Pick the gradient fill foreground to background, angle 0 repeats 0 and then floodfill the selection.
(8) Create a new layer and load selection "upperfloor.sel"
Floodfill with colour #B1A79E.
(9) Create a new layer and load selection "upperleft.sel"
Floodfill with colour #9DA19C.
(10) Create a new layer and load selection "upperright.sel"
Floodfill with colour #9DA19C.
(11) Create a new layer and load selection "upperback.sel"
Open the upper paper fill from the zip and then floodfill at the reduced size 20.
(12) Create a new layer and load selection "stairs.sel"
Open the stairs image from the zip and copy it.
Hold down the control key and the shift key and press the letter L
This is the shortcut that will paste your stairs right into the selection
(13) Create a new layer and load selection "surrounding.sel"
Floodfill with colour #D0C8C0
Leave selected and go to effects - 3D - inner bevel
shape - quarter circle, width 4, smoothness 3, depth 2, ambience -20,
shininess 0, colour white, angle 315, intensity 45, elevation 35.
You are now finished the basics so I hope you have fun filling the space with furniture and decorations.
Here is my quickie sample for you to see.
If you have any problems or need further explanations, please feel free to email me here
TUTORIAL PAGE ONE
TUTORIAL PAGE TWO
TUTORIAL PAGE THREE
This tutorial was posted at the site of "P. Ann's Place" January 24, 2004 and written by Pat Sherman.
All I ask is that you do not claim it as your own or post it on your site without permission.
If you are in a group and want to use this as a lesson, please use the link freely and you do not have to write me to ask permission.
   
|
|