
This is our little cabin by the lake for that summer weekend retreat.
This is a "first" in what I hope will lead to "P. Ann's Place" being able to offer you many more opportunities to creating in PSP.
This tutorial, and at times others to follow, will introduce you to the wonderful talents of one of my friends Toni. You have already seen her creations in my Special Websets section where she allowed me to share her work in the sets "Summer", "Fall" and "Winter". Since we both love our moments creating room and house scenes, I asked her if she would like to collaborate and share her ideas with you. She has this enviable ability to visualize the ideas in her mind and then just transform them into great images with such ease. So, in these joint efforts, you will get to benefit from her fresh new ideas and my instructions on helping you re-create her basic room scenes. Remember, the cyber-decorating is always left up to your own personal creative juices. We are both looking forward to this opportunity to share with you more new ideas for your PSP fun.
We place NO restrictions on the use of this tutorial or your finished image other than we ask you not to reproduce this tutorial on your website without permission or give the impression that it is your own personal creation.
We have included the images for the poles, the door, the screen windows and the outside scenery if you wish to use it.
This tutorial was completed using PSP7 but can easily be adjusted to other versions.
What You Will Need:
Paint Shop Pro: download a trial version here
Zip of my image files: you can download it here
Zip of my selections: you can download it here
Free Filter by MuRa's Filter Meister called "prospective tiling" which you can download here
PLEASE save your work often!! It is better to be safe than sorry.
(1) Open a new image 650 x 450, 16 mil colours, transparent background.
(2) We will create three new layers next, but will work on them later in the tutorial.
Create a new layer called "scenery"
Create a new layer called "glass"
Create a new layer called "screens"
(3) Create a new layer called "ceiling"
Load the selection "ceiling.sel"
Set your pattern fill to the one that came with the programme called "stained wood", using size 50, angle 0
Floodfill the area
To colourize, hold down the shift key and press the letter L. When the window opens, change the hue to 20 and the saturation to 60. Click on OK to apply.
(4) Create a new layer called "floor"
Open the patterns fill and choose the one that came with the programme again, called "phone pole" and fill at size 50 angle 0
Colourize the floor using the same settings as we did for the ceiling.
Go to Effects - plugins - Mura Meister - perspective tiling
use the following settings
perspective..... 80
stretch..... 0
centre..... 0
height..... 50
offset x ..... 0
offset y ..... 0
crop ..... 100
crop opacity ..... 255
box underneath called crop by colour - NOT checked
Click OK to apply the effect to the floor.
(5) Create a new layer called "small centre wall"
Load selection "smallcentrewall.sel"
floodfill with #848765
(6) Create a new layer called "left centre wall"
Load selection "leftcentrewall.sel"
floodfill with #9EA17F
(7) Create a new layer called "right centre wall"
Load selection "rightcentrewall.sel"
floodfill with #9EA17F
(8) Create a new layer called "moulding"
Load the selection "windowmoulding.sel"
floodfill with colour #9EA17F
Go to Effects - 3D - inner bevel and apply the following settings
shape - quarter circle, width 4, smoothness 50, depth 11, ambience minus20, shininess 0, colour white, angle 313, intensity 42, and elevation 51.
(9) Create a new layer called "window front pole"
Open the smallerpole.psp image from the zip and copy it
Return to your working image, and paste it on this layer.
It is larger than you need, so what we want to end up with is the top of the pole in the area similar to the first image below and then we can later remove the bottom of the pole so it matches similar to the second image shown below. Line up the left edge of the pole to the left edge of the small little left wall.
Then remove the extra at the bottom using the eraser tool or the rectangular selection tool and then deleting.
To make it easier, duplicate this layer and then move the pole over to the right, so the right side of the pole matches with the right side of the little right wall.


(10) Duplicate the layer again and move the pole towards the back and line it up with the left side of the back wall.
You will now have to remove some of the bottom again. Check the picture above if you need help.
Then duplicate this layer and move the pole over so it lines up with the right side of the small centre wall.
***If you were able to follow all those left left lefts, and right right rights, congratulations!!
(11) Create a new layer called "left door"
Open the door image from the zip and copy and paste it on this layer
Line it up so the right edge of the door touches the left edge of the pole and they line up at the bottom near the floor
Duplicate this layer and then move the door over to the right so the left edge of the door touches the right side of the pole this time.
(12) Create a new layer called "left wall"
Load selection "leftwall.sel"
Floodfill with the colour #9EA17F
Keep selected
Change the foreground colour to #848765 and background to nil.
Go down to the textures area and set the foreground texture to "tree bark", then floodfill the area again for a wood texture look.
Duplicate the layer and then go to image - mirror (to easily create the right wall)
At this point, change the texture effect back to nil.
(13) Create a new layer called "left wall poles"
Open up the larger pole image from the zip and paste it on this new layer.
Don't be concerned with the top or bottom, because there is a selection to help you remove what is needed. Just line up the first pole so the right side of the pole touches the left side of the door
Paste another pole and place it near the left edge of the wall
Load selection "removepolearea.sel" then hit the delete key or the scissors.
Now duplicate this layer, mirror and just make sure the right side of the door touches the left of the pole. Adjust if necessary.
(14) Return now and make active the "screen" layer.
Open the "screenwindow.psp" image from the zip and paste onto the layer
Move it into place and make any adjustments. It is a little larger on the sides so erase what is needed, but I made it this way in case you want to use this in any of your other creative work. Feel free to do so since I made this little screen image.
(15) Return now and make active the "glass" layer.
Using the selection shape tool, set to rectangle, draw out an area similar to the image below.

Set your foreground to white and your background colour to #C0C0C0
Set your fill to gradient #1- foreground to background, angle 90 repeats 0 and floodfill
Lower the opacity level of the layer down to approximately 40 - 50 or whatever your liking. Check how it looks after you do the next step of adding the outside scenery.
(16) Return now and make active the "scenery" layer.
Open up the image I provided for you and paste in place or use an image of your own choosing.
At this point check out how much you can see through the glass windows from the last step. Reduce the level further or increase it if you wish.
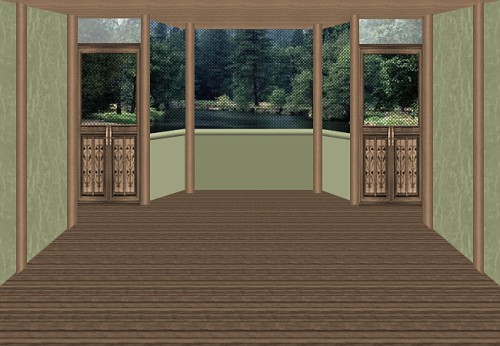
You are finished and now ready for decorating.
Remember to save this image with all its layers in place if you feel you would ever need to redecorate this room again by changing colours, or filling the walls with wallpaper instead, etc. Then duplicate the image and work on decorating your copy.
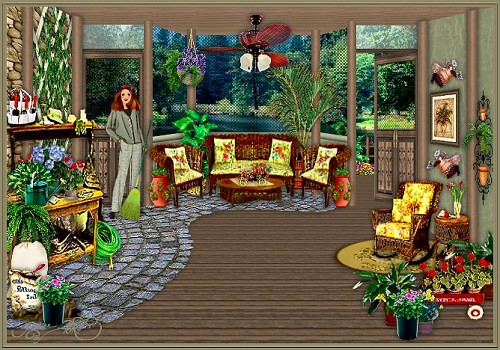
This is the sample that Toni did to show you what the possibilities are in having fun with room decorating.
If you have any problems or need further explanations, please feel free to email me here
TUTORIAL PAGE ONE
TUTORIAL PAGE TWO
TUTORIAL PAGE THREE
This tutorial was posted at the site of "P. Ann's Place" January 12, 2004 and is a joint effort by Toni and
Pat.
All we ask is that you do not claim it as your own.
   
|
|