
This is another Toni Creation that you'll be having fun with here. Its name was derived with help from people from the US, Canada and Ireland - a retreat with an international flair.
We place NO restrictions on the use of this tutorial or your finished image other than we ask you not to reproduce this tutorial on your website without permission or give the impression that it is your own personal creation.
We have included the images for the scenery, wall and floor fills, the column top, the track lighting, and the rug I made that I used in my sample.
This tutorial was completed using PSP7 but can easily be adjusted to other versions.
What You Will Need:
Paint Shop Pro: download a trial version here
Zip of my image files: you can download it here
Zip of my selections: you can download it here
Free Filter by MuRa's Filter Meister called "prospective tiling" which you can download here
PLEASE save your work often!! It is better to be safe than sorry.
(1) Open a new image 650 x 425, 16 mil colours, transparent background.
(2) Create a new layer and load the selection "scenery.sel"
Open the scenery image from the zip file and copy it.
Return to the main image and press control + shift + L to paste the image into the selection.
(3) Create a new layer called "floor"
Set your pattern fill to the one that came in the zip file called "marble", using size 200, angle 0,
Floodfill the area
Go to Effects - Mura Meister's Perspective Tiling and
use the following settings
perspective..... 75
stretch..... 0
centre..... 0
height..... 50
offset x ..... 0
offset y ..... 0
crop ..... 100
crop opacity ..... 255
box underneath called crop by colour - NOT checked
Click OK to apply the effect to the floor.
(4) Create a new layer and load selection "middlewindow.sel"
Floodfill with colour #697B85
Go to effects - inner bevel and use the following settings
bevel - quarter circle, width 4, smoothness 3, depth 3,
ambience 0, shininess 0, colour -white, angle 45, intensity 40, elevation 35
(5) Create a new layer and load selection "leftcentrewindow.sel"
Floodfill with the same colour and apply the same bevel as you did in step 4.
(6) Create a new layer and load selection "leftcentrewall.sel"
Floodfill with #E3C2AC and apply the following inner bevel
bevel - quarter circle, width 1, smoothness 15, depth 1,
ambience 0, shininess 0, colour -white, angle 137, intensity 40, elevation 35
(7) Create a new layer and load selection "windowtopping.sel"
Floodfill with #CAA892 and go to effects - texture -blinds
width 6, opacity 25, colour - black, horizontal box checked, light from the top box not checked.
(8) Hide the scenery, floor and middle window layers and only leave visible the last three -window, wall and topping.
Go to layers - merge visible
Press control + C to copy this image.
(9) Create a new layer and load selection "rightwindowunit.sel"
Press control + shift + L to paste your copied window from the last layer into this selection.
(10) Create a new layer and load selection "centrewall.sel"
Floodfill with colour #CAA892 and apply the same inner bevel as you did in step 6.
(11) Create a new layer and load selection "extremeleftwall.sel"
Open the wall fill image from the zip and set it as your fill at size 100, angle 0
Floodfill the area and then adjust the brightness to minus 25 leaving the contrast at 0
(12) Create a new layer and load selection "extremerightwall.sel"
Floodfill with the same wallfill and adjust only the brightness to minus 15
(13) Create a new layer called "far left window and wall"
Return to either layer with the window/wall unit and copy it
Return to the new layer here and paste it - control + E
Leave it in the centre for a minute because it is too big for where we want to move it. Deselect it and then hit the deformation tool.
Check the little image below to see how I will tell you which boxes to move to perform the deformation.
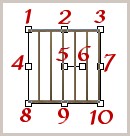
Click your mouse on box 4 and move it to the right to make the wall about half its width.
Then click on box 5 and move it over to the empty space on the left between the extreme left wall and the original left centre wall and window.
Match up the right side of this wall to the left side of the window wall. Remember they are identical so they should fit exactly.
When that is lined up, you may have to click on box 4 again and either make the width of the wall smaller or larger so it meets the wall on the left.
When that is ready, hold down the shift key, grab box 1 and drag it upwards to meet the top of the left wall near where the ceiling would be.
Hold down the shift key, grab box 8, and drag it down so it matches at the bottom of the wall near the floor.
This deformation, to me, is much easier than trying to create 3 new selections on a diagonal. I tried it and goofed up big time with the window topping part.
(14) Create a new layer and load selection "ceiling.sel"
Floodfill with the wallfill pattern, size 100, angle 0, and then adjust the brightness to plus 15.
(15) Create a new layer and load selection "leftlighting.sel"
Open the track lighting image from the zip and copy it. Return to the main image and press control + shift + L to paste your image into the selection.
Duplicate this layer, mirror the image, and then move it over to the right slightly so it is about the same distance away from the centre wall as the left lights.
(16) Create a new layer and load selection "centrecolumn.sel"
Floodfill with the wallfill pattern and then go to "Selections - invert"
Choose Effects -3D- drop shadow and apply the following settings:-
horizontal and vertical - both 0.....opacity 80..... blur 27.2.....colour - black
Duplicate this layer and move to the far left, then duplicate the layer again and move to the far right. If you don't want three columns you can skip these steps or if you want 4, then duplicate again.
(17) Create a new layer called "column tops"
Open up the top column image from the zip and copy it. Paste it onto this layer and move it to the very top of the image and centre it over the column width. Paste again and add it to the tops of your other columns, depending on how many you included in your own picture.
(18) Duplicate this layer and then go to image - flip. This will automatically line up and create the bottoms of your columns.
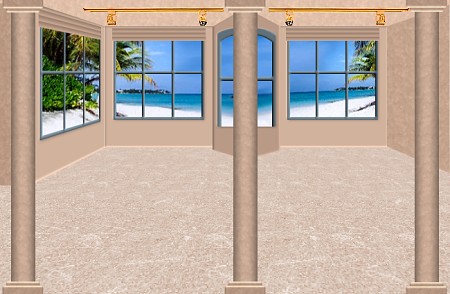
You are now finished and ready for decorating.
Remember to save this image with all its layers in place if you feel you would ever need to redecorate this room again by changing colours, or filling the walls with a different wallpaper. Then duplicate the image and work on decorating your copy.
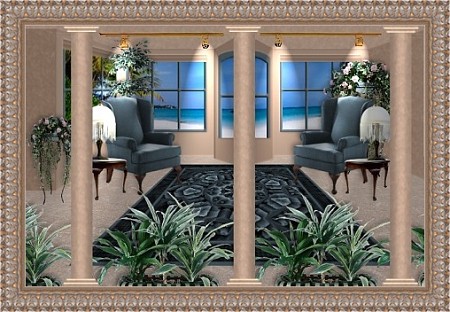
This is the sample that I did to show you what the possibilities are in having fun with room decorating. You will see I illuminated the track lighting. If you have never tried this before, I am almost finished a tutorial on how to do this for the beginner. I am no expert but it will explain how I do it. I hope it will be the next tut appearing.
If you have any problems or need further explanations, please feel free to email me here
TUTORIAL PAGE ONE
TUTORIAL PAGE TWO
TUTORIAL PAGE THREE
This tutorial was posted at the site of "P. Ann's Place" February 17, 2004 and is a joint effort by Toni and
Pat.
All we ask is that you do not claim it as your own.
  
|
|