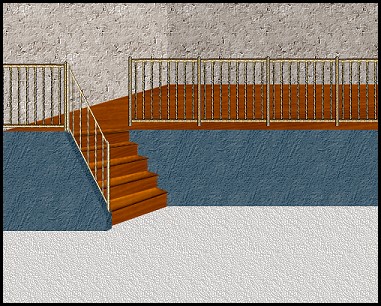

I was just experimenting again trying to make some different room views for my
"Special Websets" images. I decided to write this tutorial to share how I did this version and to show that they aren't really that difficult if you want to
experiment too. You can use different pattern fills than the wallpaper tile I made or even plain colours. This scene only takes about 8 selections to complete and then it is up to you to decorate to your heart's content.
If you want to peek at my finished room sample before you begin, it is at the end of the tutorial. Just make sure you have left enough time for it to download fully.
I place absolutely NO restrictions on the use of this tutorial or your finished image. I have included all the fills and railings in the "images" zip file. The railings I made from a black and white clipart pattern then I applied a bladepro setting to it.
This tutorial was completed using PSP7 but can easily be done in PSP6.
What You Will Need:
Paint Shop Pro: download a trial version here
Zip of my image files: you can download it here
Zip of my selections: you can download it here
PLEASE save your work often!! I did it after every layer. It is better to be safe than sorry.
(1) Open a new image 500 x 400, 16 mil colours, transparent background.
(2) Create a new layer and load selection "upperleftwall.sel"
open the wallfill.psp image from the zip
using it at 100% angle 0 fill the selection
keep it open because you are going to use it again for the next layer
(3) Create a new layer and load selection "upperrightwall.sel"
floodfill with the same pattern
go to colours - adjust brightness and change to minus20.
(4) Create a new layer and load selection "lowercarpet.sel"
open the carpetfill.psp image from the zip and fill at 100%, angle 0
(5) Create a new layer and load selection "upperwoodfloor.sel"
look for the pattern that came with the programme called "stainedwood"
set it to size 50% and set the angle to 355, then floodfill
go to colours- adjust brightness and change to minus60
(6) Create a new layer and load selection "littlerightlowerwall.sel"
open the "lowerfill.psp" image from the zip and floodfill the area
keep this image active on your desktop because you will be using it again in a minute
(7) Create a new layer and load selection "stairs.sel"
open the "stairs.psp" image from the zip file and copy it
taking the shortcut, hold down the control key as well as the shift key and then press the L key and this will paste your copy of the stairs into the selection area.
(8) Create a new layer and load selection "stairwalldepthshading.sel"
floodfill with the same lowerfill.psp image
go to colours -adjust brightness and change to minus20
keep file open because you are going to use it once more in the next layer
(9) Create a new layer and load selection "stairwall.sel"
floodfill with the same pattern but do not adjust shading here
(10) Create a new layer and call it "right side railings"
Open the image from the zip called "largerrailingsection.psp". Starting at the right side of the top stair, copy and paste this railing section. Then paste again. lining up this section to the first one. You will need to do this four times. The fourth one will partially fall off the image.
(11) Create a new layer and call it "left side railing"
paste this same section again but then go to image - mirror -
move it into place on the top of the little wall where the lighter colour and darker colour of the walls meet
(12) Create a new layer and call it "down railing"
open up the "downrailing.psp" image and copy and paste it down the stairs lining up with the top and the darker section of the wall.
WOW! You are finished already.
In the zip file, I also included the end railing piece and the individual spoke piece just in case you want to make your own railing look. You might just want one end piece and all spokes rather than the way I set it up. You will also find the orignal down railing piece before I deformed it. I included it just in case you want to try deforming it yourself for the experience.
Remember you can fill the selection pieces any way you want to. It is totally your choice. You can have plain painted walls, textured walls, papered walls of any shade or colour imaginable. Have fun and I hope I have given you another room alternative to have fun decorating.
Here is my sample. I added baseboard and made mine a dining room over looking the living room. A lot of the images are from my Hemera CD photo collection. I just purchased their 50,000 Volume 1 and their 50,000 Volume 2 collections. That is where the living room furniture came from. Volume 2 is great because they are now including images with the backs of furniture which makes it great for room decorating. I would highly recommend either of these two CD collections. I used my original 25.000 image collection constantly. The dining room set was a tube I collected from
Rosie.

I have been having a lot of fun designing these room images lately. I hope this can spur you on to making a room scene too.
If you have any problems or need further explanations, please feel free to email me here
TUTORIAL PAGE ONE
TUTORIAL PAGE TWO
This tutorial was posted at the site of "P. Ann's Place" January 7, 2003 and written
by Pat Sherman.
All I ask is that you do not claim it as your own.
  
|
|