
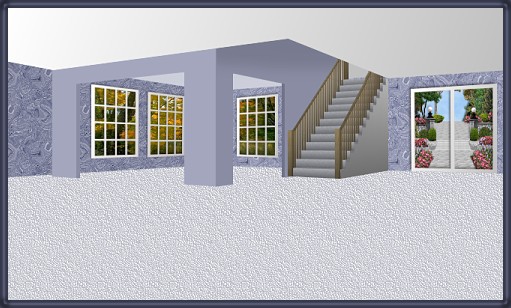
I call this "Two Spaces" because that's what the room has, and I didn't know what else to call it.
This tut isn't a very difficult one. I have included the stairs, door and windowsfor you. I made the stairs in another programme I own called "Architectural Series 18" created by
Punch. I use it to make houses and decks and some room shapes. This is the same programme I used to make the house images I have offered for your use as well. On the sample I did at the end, I changed the colours to give you a different look.
I place absolutely NO restrictions on the use of this tutorial or your finished image, except for reproducing the tutorial on your own site without permission or claiming it as your own.
This tutorial was completed using PSP7 but can easily be done in PSP6 or 8 I am sure.
What You Will Need:
Paint Shop Pro: download a trial version here
Zip of my image files: you can download it here
Zip of my selections: you can download it here
Before we start, I am going to give you a hint about changing colours if you don't like the blue. What I do when I do other's tuts is follow the colour as explained in each step and then at the very end, I go back and colourize each layer. Usually the colours are chosen for their light or dark tones. When you colourize, they will stay the same shading but the colour you choose instead. That way you can follow the tut, then change everything to the tones you would like instead. This is also why I recommend saving the original in psp format before decorating and making a copy to decorate from. That way all your hard work is saved, just in case you want to go back and make a green room, or a yellow room and the tut is already complete and ready to take a minute or two to colourize for a different graphic. I do this often and it has saved many many hours or redoing the same thing when I need a change of colour or wallpaper. This way you can also leave out walls or add your own and get another different look for a very short amount of work.
PLEASE save your work often!! I did it after every layer. It is better to be safe than sorry. You don't know how many times I still forget this and have to start all over again.
(1) Open a new image 660 x 390, 16 mil colours, transparent background.
(2) Create a new layer and call it "outside scenery".
This is where you can add the view you want to look at when the tutorial is almost complete. I have included the two images I have used in case you would like to use them too. One I made and the other is from my graphic collection.
(3) Create a new layer and call it "upstairs wall."
Load selection "tinyupstairswall.sel"
Floodfill with colour #C0C0C0
(4) Create a new layer called "back right wall"
Load selection "backrightwall.sel"
Open up the wallpaper image provided (wallpaperfill.psp) and set it as your fill at size 100 angle 0 and floodfill the area
(5) Create a new layer called "patio door"
We will return to this layer at the end
(6) Create a new layer called "small ceiling"
load selection "tinyceiling.sel"
fill the area with colour #CCCEDA
(7) Create a new layer called "left side wall"
load selection "leftsidewall.sel"
fill the wall area with the same wallpaper fill as we did before
(8) Create a new layer called "left double windows"
Create a new layer called "left single window"
We will also return to these two layers at the end.
(9) Create a new layer called "carpet"
load selection "carpet.sel"
Open up the carpet image provided (carpetsample.psp) and set it as your fill at size 100 angle 0 and floodfill the area
(10) Create a new layer called "left wall depth"
load selection "depthleftopening.sel"
floodfill with colour #898CA3
(11) Create a new layer called "left room wall"
load selection "leftroomwall.sel"
floodfill with colour #A3A6BD
(12) Create a new layer called "right depth wall"
load selection "rightdepthwall.sel"
floodfill with colour #70738A"
(13) Create a new layer called "right room wall"
load selection "rightroomwall.sel"
floodfill with colour #898CA3
(14) Create a new layer called "stairs"
load the selection "stairs.sel"
open the stairs image that I provided for you and copy it
return to the working image and while holding down the "shift" key and the "control" key press the L key and this will paste the copy of your stairs into the image selection.
(15) Create a new layer called "shadow"
load selection "stairshadow.sel"
floodfill with black and then lower the opacity of the layer down to 30 rather than 100
this is to give you the illusion of a darker wall area as you go up the stairs.
(16) Create a new layer called "ceiling"
load selection "ceiling.sel"
set your foreground to white and your background colour to #C0C0C0
set your fill to gradient #1- foreground to background, angle 180 repeats 0 and floodfill
Now we are going to return to the patio doors and window layers but I will explain why I left them to the end.
Open up the three images I provided of the doors, single window and double window and minimize them at the bottom of your work area until needed.
When I follow tutorials by other writers, I often find that their idea of a room and my vision of what I see in the room can sometimes be a little different. This is why I like to leave walls solid and windows and doors until the end, just in case as you are doing this tutorial, you have thought of how you are going to decorate and want to make changes as well. This way you can add the patio door where I have it or you might want to change it into a front door instead. You might want a double window or make it a single one instead. Because I don't make the cutouts in the wall, then that part is left up to you when you have made the final decision of what you are placing where, in case you want to make changes.
I have two ways that I follow to remove wall sections and depending on my mood, I make a choice at the time.
Method One: I zoom in on the image quite close and then make sure the wall layer is the active one and I start erasing with the eraser tool set to about 6 or 7. I remove the area where the glass would be.
Method Two:I zoom in as well but use the lasso tool set to "point to point" feather 0 and antialias doesn't really matter. I then make sure the wall layer is the active one again but then I start in one corner half way the thickness of the door or window molding. Then I move over to the next corner and left click, then move to the next corner and left click and as I am approaching where I started, I right click to complete the area. Then I just hit the delete key or hit the scissors symbol to remove the wall.
I use both methods and it really depends on the size of the area to be removed whether you want to erase with the eraser or with the lasso tool.
(17) Return to the patio door layer and copy and add the patio door image provided in the location of your choice.
activate the back right wall layer and erase the wall section where the glass would be.
(18) Return to the left double window layer and copy and paste the image provided onto the wall where you would like it.
activate the left side wall and remove the wall where the glass would be
(19) Return to the left single window layer and copy and paste the image provided onto the wall where you would like it.
activate the back right wall layer and remove the part of the wall where the glass would be.
(20) Return to the outside scenery layer and paste either my images or your own for the outside view you will be enjoying.
If you want to create the idea of glass in the windows, you can create a new layer beneath all the window and door layers and below the wall layers as well. This way you don't have to be too fussy about the exact sizes since the area will not totally be seen just what peeks through the wall openings. Then using the selection tool, draw out a rectangle where you want the glass to be and use the same gradient we did for the ceiling only set to angle 90. Then lower the layer opacity to what you are comfortable with. I usually use a level between 25 and 35.
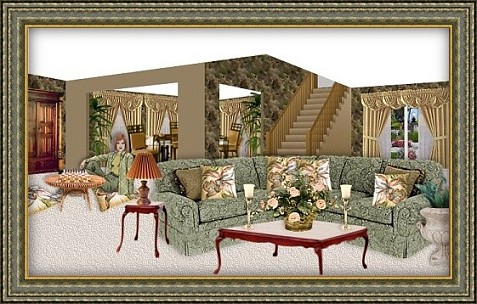
You are now finished the basics so I hope you have fun filling the space with furniture and decorations.
Here is my sample.
If you have any problems or need further explanations, please feel free to email me here
TUTORIAL PAGE ONE
TUTORIAL PAGE TWO
TUTORIAL PAGE THREE
This tutorial was posted at the site of "P. Ann's Place" January 4, 2004 and written
by Pat Sherman.
All I ask is that you do not claim it as your own or post it on your site without permission.
If you are in a group and want to use this as a lesson, please use the link freely and you do not have to write me to ask permission.
   
|
|