
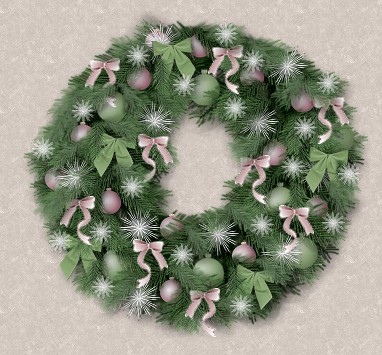
I was just having some fun trying to create a new wreath for my Christmas area and thought perhaps you might like to join in the fun too.
This tut isn't about making the wreath itself, but more about how I go about decorating one.
As I go about making the different layers, I try and have it appear that the decorations and green boughs look as if they really are three dimensional. Rather than
just having a solid layer wreath and then decorating on top, I like to make one layer of green, then add some decorations on the next layer, then add more greenery on
another layer, and then build up the total wreath bit by bit. I am sorry I can't offer the greenery tube because I don't remember the original source, but I am offering you the
completed wreath with 5 separate greenery layers. I am also offering you some of the decorations I have made for this wreath. The little white sparkle puff is originally from
Kandy's site. The version you will get is only half the size so you can visit her and get the full size version as well as other coloured ones.
If you want to use your own decorations go ahead. If you want to colourize them, go ahead. If you just want the wreath and then leave, go ahead. That's okay with me too.
I place absolutely NO restrictions on the use of this tutorial or your finished image.
This tutorial was completed using PSP7 but can easily be done in PSP6. All you really need to know is how to copy and paste.
What You Will Need:
Paint Shop Pro: download a trial version here
Zip of my image files: you can download the wreath here
you can download the decorations here
PLEASE save your work often!! I did it after every layer. It is better to be safe than sorry.
(1) Open up the wreath image. I would suggest you do the "shift key + D" to duplicate and then put away the original for another day.
(2) If you look at the image below, you will see the different layers I used. I think it would be best if you opened your wreath image, went to the layers palette and then
added the decoration layers now where I have them.
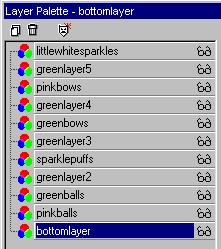
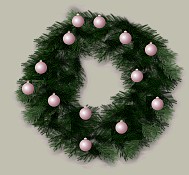
(3)Then what I would like you to do is hide all the layers and only leave visible the bottom, the pinkballlayer and the greenlayer2.
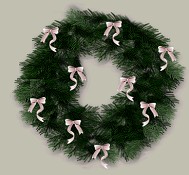
If you check the image below on the left, you will see where I placed the pink decorations. As I originally worked on this there were, of course, no other green layers. What I would like you to see though
is how I placed the pink decorations and then afterwards I made the greenlayer2 slightly covering some of the pink areas and leaving some bare.
Here you will be working with all the layers premade and trying to fit the decorations in so some are more visible than others.
Open up the image of the little pink ornament and make the pinkballlayer the active one. Copy and then start pasting the pink decorations in place. (Remember you are working with another green layer visible on your image that is
not showing in this image.)
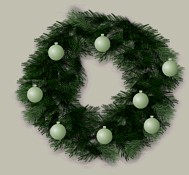
(4) Make your greenballayer the active one, open your green decoration and then copy and start pasting the green images. Check the picture above right for my placements.
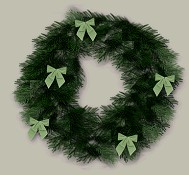
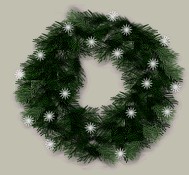
(5) The next two steps will be adding the larger white sparkles on that layer and then the green bows on that layer. Use the larger size sparkle here. Check the two images below for my placements. You of course can add them where ever you want. Remember this is only a
demo tut on how to do it and with suggestions for duplicating my image at the opening. You can place your decorations where ever you would like them. On the green bow layer, after I pasted, on a couple of them I went to image-mirror so the ties were not all
hanging in the same direction.
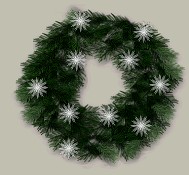
(6) The next two steps will be adding the pink bows on that layer and then the little white sparkles on the top layer. I also did some mirror imaging on the bows so they were sitting in opposite directions. Check the two images below for my placements. As I said above, you can add them where ever you want.
Before you do the last white layer, you might want to make all the green layers visible and then paste that last layer with the whole wreath in view.
(7)And there you have it!! A completed wreath that looks three dimensional. This is the same process I use for doing the Christmas trees I make. I am in the process of just finishing up a tree similar to the wreath. When it is completed I will
decorate it with things I have made and then offer it to you as well - blank, along with the decorations ready for you to have fun decorating a tree. I will put up a page similar to this but
will leave it you to figure out where to place everything. I'll just show the finished image and then you're on your own.
Hints for Animating Your Wreath
This explanation was an afterthought, but perhaps you might be interested in animating your wreath???? I know there are many techniques out there, but
I will explain how I do mine. When I went back and looked at the last layer of sparkles, if I wanted to light up the wreath I would have added some more than what is there now.
Then what I do is create three new layers and I call them lights1, lights2, and lights3. I realize that there are differing ways as well as to how to have them appear twinkling. I like to use a little white flare
and I have gone and added it to the zip decorations file if you'd like it. If you look at the image below it will give you an idea of how I start.
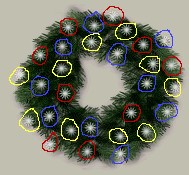
I look at the spread of the sparkles and then I start pasting on lights1 a flare over the sparkles I have circled in red. Then I go to lights2 and start pasting flares over those sparkles circled in blue. I leave all the layers visible
so I can make sure I have them all covered at the end. Then I finish off by going to lights3 and pasting the flares over those sparkles circled in yellow. When I have checked that all the little sparkles are covered and
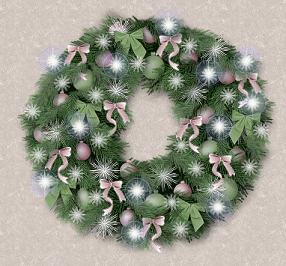
they are basically spread out evenly as possible, then I follow the normal steps of animating an object (speed 25 was used) and end up with the wreath you will see below.
I hope you have enjoyed decorating your wreath. Make any changes you wish.
If you have any problems or need further explanations, please feel free to email me here
MAIN TUTORIAL LIST
This tutorial was posted at the site of "P. Ann's Place" November 9,2002 and written
by Pat Sherman.
All I ask is that you do not claim it as your own.
   
|
|