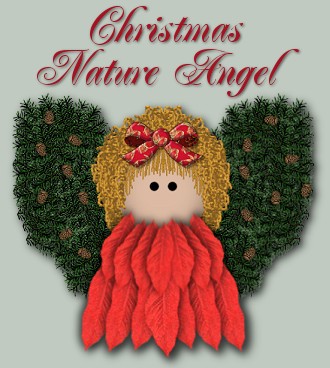
The inspiration for this little lady came from my real crafting days again. I used to do little
wooden heads on a silk flower and add ribbon wings. I bought the fine curly hair and sat with the hot gluegun carefully gluing on hair for what seemed like hours. I came up with this idea when I couldn't get the "real" idea to look good as a "computer" idea. So I played around for a couple of
hours and came up with her, keeping the Christmas spirit in mind. I am sure you could get many variations from this idea by changing hair colours, different ideas for bows, and even
changing the poinsettia to rose petals or any flower petal, even fall leaves. My little angel is short but if you want a taller angel, just add a third row of petals. Remember, she will be your creation, so make her look exactly the way you want. Mine is just here to give you the idea how
to do her and start you off.
What You Will Need to Start
...PSP 6 or 7 (this was done in 6)...
... good knowledge of basic terms and tools...
... the ZIP FILE HERE - includes psp images of...
poinsettia leaf, pine bough, couple of bows
...the "rope" tube to do her hair...
Please check the tubes that came with PSP. You should already have the rope and pine cones, but if not, email me at the address at the bottom of the page.
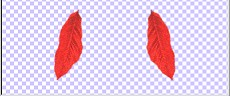
Open a new image 400 by 400, transparent, 16mil. colours. Save as "angel" in psp format and remember to save your work often as you put together your angel. Also open your psp image of the poinsettia petals from the download. You can
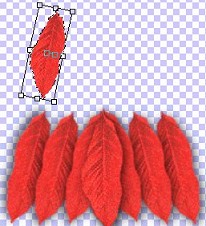
pick whichever petal you would like to use. I provided several for variety. Use your selection tool set to rectangle. Highlight the petal you want, click inside the rectangle and then copy the petal.
Hide this image at the bottom and we will start to work on the main image. Create a new raster layer and then paste your first petal to the far right near the bottom. You will need to turn it a little and the easiest way
I do it, is to click on the deformation tool and then swivel it around to where I want it. Then double click to apply the deformation. Duplicate this layer and then go to "Image - mirror".
You should now have what is in the image below.
We now need to backtrack just a little to add the drop shadows. Return to the first petal layer, select it and add a drop shadow using the
settings
Opacity...75
Shadow Blur...10
Vertical and Horizontal...3
Then go to your duplicate petal layer and add a shadow using these settings
Opacity...75
Shadow Blur...10
Vertical and Horizontal...-3
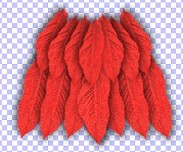
Add a new raster layer and paste your next petal in place just to the left of the original. You might have to use the deformation tool again to adjust the angle
of the petal, then duplicate this layer and go to "Image- mirror". Retrace your steps and add the same drop shadows as above to these two new petals. All the petals on the right half use 3,3 and
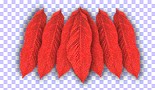
all the petals on the left half use -3,-3. Continue adding layers and duplicating layers until you have 6 petals, then finish off the bottom row with a 7th petal in the middle to cover the join.
If you are happy with the placement, then you can "merge - visible" to combine the 7 layers into one. If you are not happy with the placement, you can go back to the individual layers and make any
changes you want to and then merge.
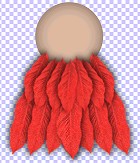
For the upper layer, check the download I gave you and we are going to change to the smaller size petal. The original has been reduced
to 75%. Follow the exact same procedure as the lower layer. Add a new layer for the first petal on the outer edge, use the deformation tool if needed to alter its direction, then duplicate the layer and mirror image. Backtrack and add the drop shadows.
When you have added the 7 petals in the top row, hide the bottom row and merge the visible to make one layer of upper petals instead of 7.
Add a new raster layer and we are going to make the head. Set your colour to #DCBAA3, and choose the shape tool set to circle, antialias checked, feather unchecked. Draw a circle
that is about the size you will need for your individual angel. I judged by coming down a little over the upper petals. Don't worry about that because you are going to send the head behind the petals later. Make sure your shape is selected and we are
going to go to Effects- cutout and use the following settings
Opacity...50
Blur...44
Vertical and Horizontal...0
Then move your head layer down behind the first row of petals.
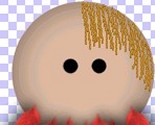
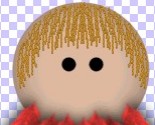
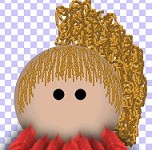
Add two little black circles for eyes and that's all the features I have given her here.
Add a new raster layer and arrange it so it is on the top. Select your rope tube set to size 12. You are now going to start the
tedious and finger cramping chore of adding bangs and hair. However, just as we worked on one side of the skirt and duplicated and mirrored the petals,
we are going to stay smart and work on half a head and then duplicate and mirror to get a "full head of hair".
Start drawing little lines to make her bangs. Curve them on the sides and you can overlap some too. Then duplicate and mirror.
Create a new raster layer and arrange it so it is behind the head layer. Change your rope tube from size 12 to 20. Now is the tedious part even doing half a head.
Start by making squiggles and circles and ringlets etc. until you build up the back of the hair. It looks a bit funny around the head shape but we will fix that up soon. Continue scribbling until you have
the shape you want, then duplicate that layer and image-mirror to get a whole head.
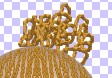
Create a new raster layer and send it to the top. Continuing with the rope tube at size 20, add a few more curls and ringlets etc. to cover
just around the edges of the head and make it much more natural looking.

Create a new raster layer at the top and pick a bow from the ones I provided or choose your own. Place your bow in the centre above her
bangs and then I added a drop shadow using these settings
Opacity...36
Blur...4
Vertical and Horizontal...3
***A THOUGHT***
At this point you might like to merge all visible layers before we add the finishing touch of the wings. Another suggestion would be to save this, as is, just in case you want
to make her again and perhaps change the bow or colourize her hair. You could also continue until the end, then make a duplicate copy and save for your files in psp format and finish this
one merged for this angel look.
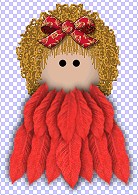
Create a new raster layer and send it to the bottom. You can use the pine bough I have provided or use a favourite you might already have. Just start adding and adding and adding
until you have a nice bushy wing shape. Once again, we will only worry about one side. When you have the shape you are happy with, duplicate the layer and image-mirror to get the matching wing. You might notice in my screen shots below,
I moved my wing up a little so it would be higher than what I had originally done. That is the beauty of working on lots of layers. Finish off by using the pine cone tube at size 20, or whatever your preference, and add however many you would like to the wings.

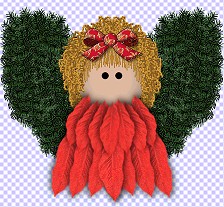
Now, you should have a finished Christmas Nature Angel and I bet yours looks SO cute!!!
If you would like to see a few other alternatives I have tried click to go on to page two.
Thank you for attempting this little angel. If you have any problems, please feel free to email me here.
PAGE TWO
MAIN TUTORIAL LIST
This tutorial was posted at the site of "P. Ann's Place" Oct.31,2001 and written
by P. Sherman.
All I ask is that you do not claim it as your own.
|
|