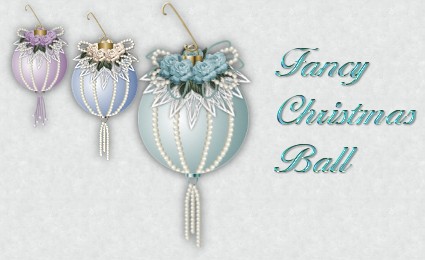
I just love Christmas decorations. If you have visited my Christmas section you will already know that. I used to make these
with inexpensive little plastic balls then decoupage paper on them and add lace, pearls and little flowers. This is my attempt to recreate them.
What You Will Need to Start
...PSP 6 or 7 (this was done in 6)...
Visit JASC to download a free trial
...my zip file containing some of the images in psp format you will need...
... good working knowledge of PSP will definitely help...
We will start by opening an image 300 wide by 400 high, 16 mil colours, transparent background. Go to "save as" and give it a name. Save your work often and never take the chance of losing all your hard work.
Create a new raster layer
called background and flood fill with black. This is strictly for ease of viewing and working against a dark background. This will be deleted at the end.
Create a new raster layer and name it shape. Choose the shape tool and set it to circle - filled - antialias checked. Choose white as your colour.
Starting at point 150 across and 200 down (check the left corner of the bar at the bottom of your screen), draw out a circle until it reaches points 234, 284.
Go to the selection tool set to rectangle and draw a shape around your ball then click inside.
The marching ants will now surround the ball shape itself. Go to Selections - save to an alpha channel. This is the only one we will be doing, so when the
two windows pop up just click okay and you will be returned to your work area. Do NOT deselect yet.
Set up your two paint colours - foreground white and background colour #808080 (grey). Click on the flood fill tool and we will set it up as a sunburst gradient. Check the image below.
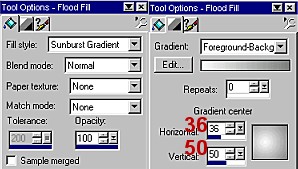
Floodfill the circle then go to effects - add noise - uniform - 3. This will smooth out the gradient changes. Do NOT deselect yet.
Create a new raster layer and call it colour. Set the blend mode from normal to "Burn". Choose the flood fill again but reset it back to a solid colour and pick
colour #C0FFFF (bright turquoise). Flood fill your circle. Deselect.
This is for Information Purposes:
If you do not like this colour, stop here and change it for something you feel you will use. I did some fiddling with colours for you
and if you want to change here are some possibilities. They look brighter than they will appear on the ball.
Pink.....#FFC0FF and #3FD9BB9
Blues.....#C0C0FF and #388A4FE and #37E80CA
Mauves.....#A870BA and #D388FE
Greens.....#C0FFC0 and #8AA08A
Yellows.....#FFFFC0 and #E0E197 and #FDFA9B
Why We Are Not Merging All the Layers As We Go
We are also not going to merge all the layers as we go to facilitate in making colour changes much easier. I did the turquoise one in the title, then did the other two in less
than 2 minutes by just colourizing certain layers.
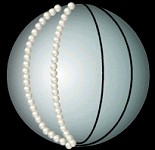
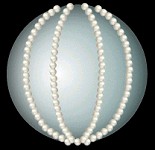
NOW, back to making our ball. Create a new raster layer and you can name it placement. This layer will be deleted later if needed. Choose the shape tool, set to colour black, ellipse, stroked, width 3 and yes to antialias.
Start at points 150 over and 200 down and draw an ellipse that extends to the bottom and top of the ball and wide enough to come close to the outer edges. Check the image below left.
Then repeat this same step but make the ellipse narrower and closer to the centre. These are the lines where you will be pasting your pearls. Open the image from the file called "midgetpearl.psp".
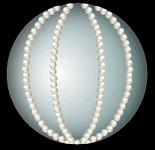
Create a new raster layer on your main image named "pearlsone". When I do all this fine pasting,
I like to choose the eyedropper as I paste to make it easier to see and I zoom in on
the picture as well. Copy the little pearl image and start pasting it along the black lines.
Start at the top and work down. Just do the two lines on the left. Don't worry if you extend because we will fix that when all the pearls are in place.
When you have completed, then duplicate the layer and then do an image - mirror. You should now have all your pearls in place. Check in case you might have to add one right on the bottom centre.

Hide all the layers except the two pearls and merge these. Make the other layers visible again. Then go to Selections - load from an alpha channel" and click on our saved image. When it appears on your work surface,
go to selection - invert and then hit the "delete" key on your keyboard. This has now removed all the excess pearls hanging below the ball.
See the image below left.
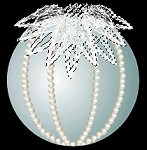
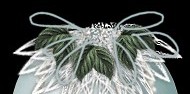
Create a new raster layer and call it lace one. Open the zip image "lacecap.psp". Copy and paste it
onto your new layer. Check the image above right for placement. Have the upper points on the left and right showing above the ball.
When it is in place, go to effects - drop shadow. Use the following settings - colour black, opacity 70, blur 6.5, horizontal and vertical 0. Deselect.
Go to "layers - duplicate". Then go to "image - resize". When the screen appears choose percentage 80% and make sure "resize all layers" has the checkmark removed. Click Ok to apply.
This will now give us a double layer of lace.
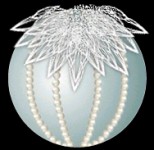
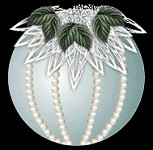
Create a new raster layer named leaves. Open up the zip image "leaves.psp" and copy it. Then paste onto your ball image.
You will have to rotate or use the deformation tool to turn the leaves. Check the image above right.
When finished, go to "image - effects - drop shadow - and use these settings....
Colour - black ; Opacity...37 ; Blur...0.8 ; Vertical and Horizontal... 1
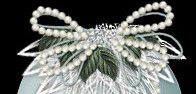
Create a new raster layer called "ribbons". Using the eyedropper pick out a colour on the ball you would like to use. Check the "line tool" and set
to freehand style, stroked, line width 3, antialias yes. Just draw freehand loops on your ball. Do not make them too high above the ball to keep the perspective right.
Check the image above left. When completed, go to drop shadow again and use the same settings of 37, 0.8, 1, 1 as before.
Create a new raster layer and call it "pearl loops". Open the zip image called "pearlloop.psp". Copy it and then paste on your ball image. Once
again you will have to turn, mirror or flip to position similar to the image above right. Again, don't make them too high above the ball.
Then finish off with the same drop shadow as the last two layers.
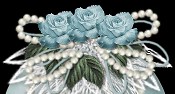
Create a new layer called "backroses". Open the zip image "rose.psp". If you decided to change colours, you will need to stop here and colourize your rose
to match your selected colour. Copy the rose, then paste on the ball image. After each rose, apply the same drop shadow as previously used, to every one
of the roses individually. Check the image below. Make sure the middle one is not too much higher than the others.
Create a new raster layer and call it "topper". Open the zip image "patornamenttop.psp" FBN gave me permission to use hers but I got brave and
tried to make my own, following her examples. Copy and paste in position. Check the image below left. Just let a little of the middle back rose show for perspective.
Create a new raster layer named "front roses" and then paste 2, or you might need 3 more roses in position as per the picture below right. Remember to give each one an individual drop shadow again.
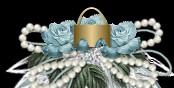
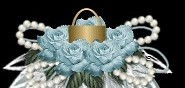
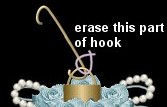
Create a new raster layer named "tree hook". Open the zip image "patstreehook.psp". Copy and paste it into position on the ball. Check the image
below. Where you see the little circle, zoom in and using your eraser tool set at 1, erase part of the hook so it appears to be behind the ring.
We are almost finished. You, now, have the hard choice of deciding how you are going to finish off the bottom of your ball.
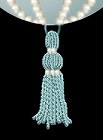
I have three alternatives for you. One is just ribbons with pearls on the end. One is strings of pearls you get to paste again. The third
is a tassel I made for this using the rope tube then I colourized it. No matter which option you choose, you have to create a new raster layer. You want to make
the black background active by clicking on it, then create your new layer. Your new layer should be above the black but behind the ball.
Open the zip file "upsidedowntopper.psp", copy it then paste into position so just a little of the base shows or if you prefer, just have the ring show.
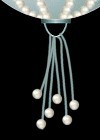

The first choice is achieved just the way we did the ribbon loops, by drawing freehand lines and then pasting a pearl at the bottom of each.
You can use the pearl we already used, or in the zip file there is one called "hangingpearl.psp" that is even smaller. That is the one
you will use for option 2. It is just three lines hand drawn, then the pearls pasted on
one at a time like you did on the ball itself. If you prefer the tassel, open the zip file "tassel.psp", then copy and paste in position. Use it again
in any others you make if you want to.
You have just completed the last step in the production line, but please read further before doing any merging or finishing.
Creating More from this Same Image
If you are happy with the turquoise one you have just completed, go to shift and d to duplicate your image. On your duplicate, delete the black layer, and if any of
your black lines from placing your pearls are showing through, delete that layer too. Then merge the visible layers and you can resize or tube or do whatever you want to with that colour.
On the original, leave all layers as they are and save it just as is. That way, you can make a duplicate copy from it and go in to each layer (ball, ribbons, flowers, bottom decorations) and colourize
without having to make the ball all over again. If you want to try different flowers, go to the back flower layer, remove those and add your new choice. Then go to the front flower layer and
change those. As long as you keep your original in layers, you can make as many duplicates and changes as your heart desires.
I hope you have enjoyed this tutorial and now you can add another decoration to your collection. I know I have enjoyed creating it and it even gets the stamp of approval from my husband, Joe.
If you have any problems or need further explanations, please feel free to email me here
MAIN TUTORIAL LIST
This tutorial was posted at the site of "P. Ann's Place" Nov. 28, 2001 and written
by P. Sherman.
All I ask is that you do not claim it as your own.
|
|