
|
| This is my first attempt at sharing instructions.
I love making snowglobes and I had always wanted to animate it the way a real snowglobe works.
This tutorial is, by no means, worthy of others I see and learn from around the web, but it might help
the more experienced globemaker to see a different form of animation. I did this for one of the
Fantasy Inspiration assignments and my friends there suggested I try making a tutorial. This is not a step by step way to create a globe, but rather
how I do the preparation ready for the final animation. I have done this using PSP6.02 If you click HERE you can
download a zip file with the globe, base and Santa all with the layers intact and if you clickHERE you can
download the tube I use for the snow. This is by Janet from Fantasy Inspirations. When I use the tube, I usually
use size 50% rather than the full 100% size. When you are going to export the tube in PSP, make sure it is 4 cells across and 1 cell down.
The pictures explaining the steps have been resized to make for a faster loading time. If you are interested, the instructions to make your
own dome can be found at The Glass Egg and the base instructions can be found at Mary's Graphics. |
|
| You will need at least 8 images for this tutorial but I prefer to use 9 or 10. I have only
used two at the beginning for the full snow swirling but 3 or 4 is more realistic before it starts to fall. The first step is to open the image in PSP.
Then go to "Selections" and down to "Load from an Alpha Channel". Select the globe and you will then see the marching ants surrounding the
glass dome. If you care to do this on another globe, I usually select the dome and then do "selections", "modify", "decrease by 2". This keeps your
snow tube from hitting the absolute edges of your glass. Now would be the perfect time to make 8 or 9 duplicates. You can do this the easy way of course by holding down the
"shift" key and pressing the letter "d". |
 |
| Make sure you are on the "snow layer". If not, when it comes time to erase some of it, you will also erase your picture. Using the snow tube (preferably at 50%), randomly add snow all over the dome selection until you are pleased with
the effects. Nothing else will be done to this image. Go to the second image and do exactly the same procedure and add snow to the complete dome. If I started at the top of
the first image, I usually start at the bottom of the second image so you are sure the snow ends up in a different position. Nothing else will be done to this second image.
If you prefer more snow swirling before the falling effect takes place, you could do a third image if you so wish. |
 |
| Now is the time you will be starting to add less snow to each image so that it appears to be falling to the bottom.
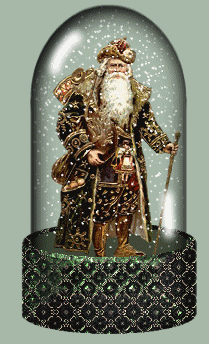
On this particular Santa image, which came from a CD collection I purchased from Broderbund, I looked at it to decide the logical divisions. I decided on (a)head and down
(b) arm and down (c) waist and down (d) below waist and down (e) knee and down (f) all down. The image you see to the right, has the snow
starting only from the head area down and above the head is left completely free of snow. |
 |
| GO TO THE NEXT PAGE |